
Disclosure: This site may use affiliate links. Product specifications should be checked against manufacturer or retailer pages before purchase.
Direct Answer
Direct answer: Trim a coarse medium beard with less pulling by drying it fully when the model requires dry use, supporting and detangling small sections from the ends, separating outer bulk from the underlayer, and testing a longer verified guard. Use short light passes, clear packed clippings after each zone, recomb, and stop immediately at any snag, slowdown, or need for pressure.
This is a preventive medium-length beard workflow, not a pull-free guarantee. It does not rank trimmers, prescribe one motor, blade, guard, direction, pressure, or schedule for every beard, or diagnose hair and skin conditions. The exact model manual and the current condition of the cutting system control safe use.
Why Medium Length Changes the Coarse-Hair Task
A medium beard can place more length and bulk in front of the guard than a short beard. Outer hair can fold over an underlayer, knots can hide near the chin or jaw, and several local growth directions can enter one long stroke. These conditions can load the guard and cutter before the intended zone is complete.
The coarse short-beard guide focuses on a short guarded surface close to the face. This page adds supported detangling, outer-versus-underlayer separation, staged bulk entry, protected chin and jaw structure, and medium-length reassessment. The two pages must not be treated as interchangeable keyword variants.
Separate Coarse, Dense, Curly, and Tangled
| Observation | What it can change | Do not assume |
|---|---|---|
| Coarse-feeling strands | Stiffness, feed, and surface behavior | One required motor or blade |
| High density | Amount of hair entering the guard | That every strand is coarse |
| Curl or direction change | How hair presents to the comb teeth | That projected hair is longer |
| Tangle or product grouping | Resistance before the cutter reaches the zone | That force will solve it |
| Damaged or packed cutter | Feed, sound, heat, and pulling | That beard texture is the cause |
Describe what is visible and testable instead of assigning every problem to “coarse hair.” A correct diagnosis of the grooming variable prevents unnecessary shortening and keeps mechanical problems outside a technique experiment.
Set the Medium-Beard Structure Before Trimming
Define the minimum chin projection, jaw width, cheek coverage, under-jaw drop, mustache length, and sideburn connection that must remain. Then identify the specific excess-bulk zones. “Make it easier” is not a measurable target; “remove the longer outer shelf below the right jaw” is.
Use the medium-beard preparation guide for dry-state reset, full silhouette review, grain mapping, and tool checks. This page begins only after the intended medium-length structure is visible and stable.
Remove Heavy Product and Let the Beard Dry
Follow the exact wet-or-dry instructions. For a conventional dry guarded trim, remove heavy wax, balm, or residue that groups strands and fills the guard, then allow beard hair and skin to dry fully. Damp or coated hair can lie flatter, stick together, and hide the normal volume that returns later.
Philips’ current uneven-trim troubleshooting guidance advises completely dry hair for covered groomers and identifies attachment fit, hard pressure, one-direction trimming, and incorrect settings as causes of uneven results. These instructions apply to the listed products, not every trimmer.
Support the Beard While Detangling
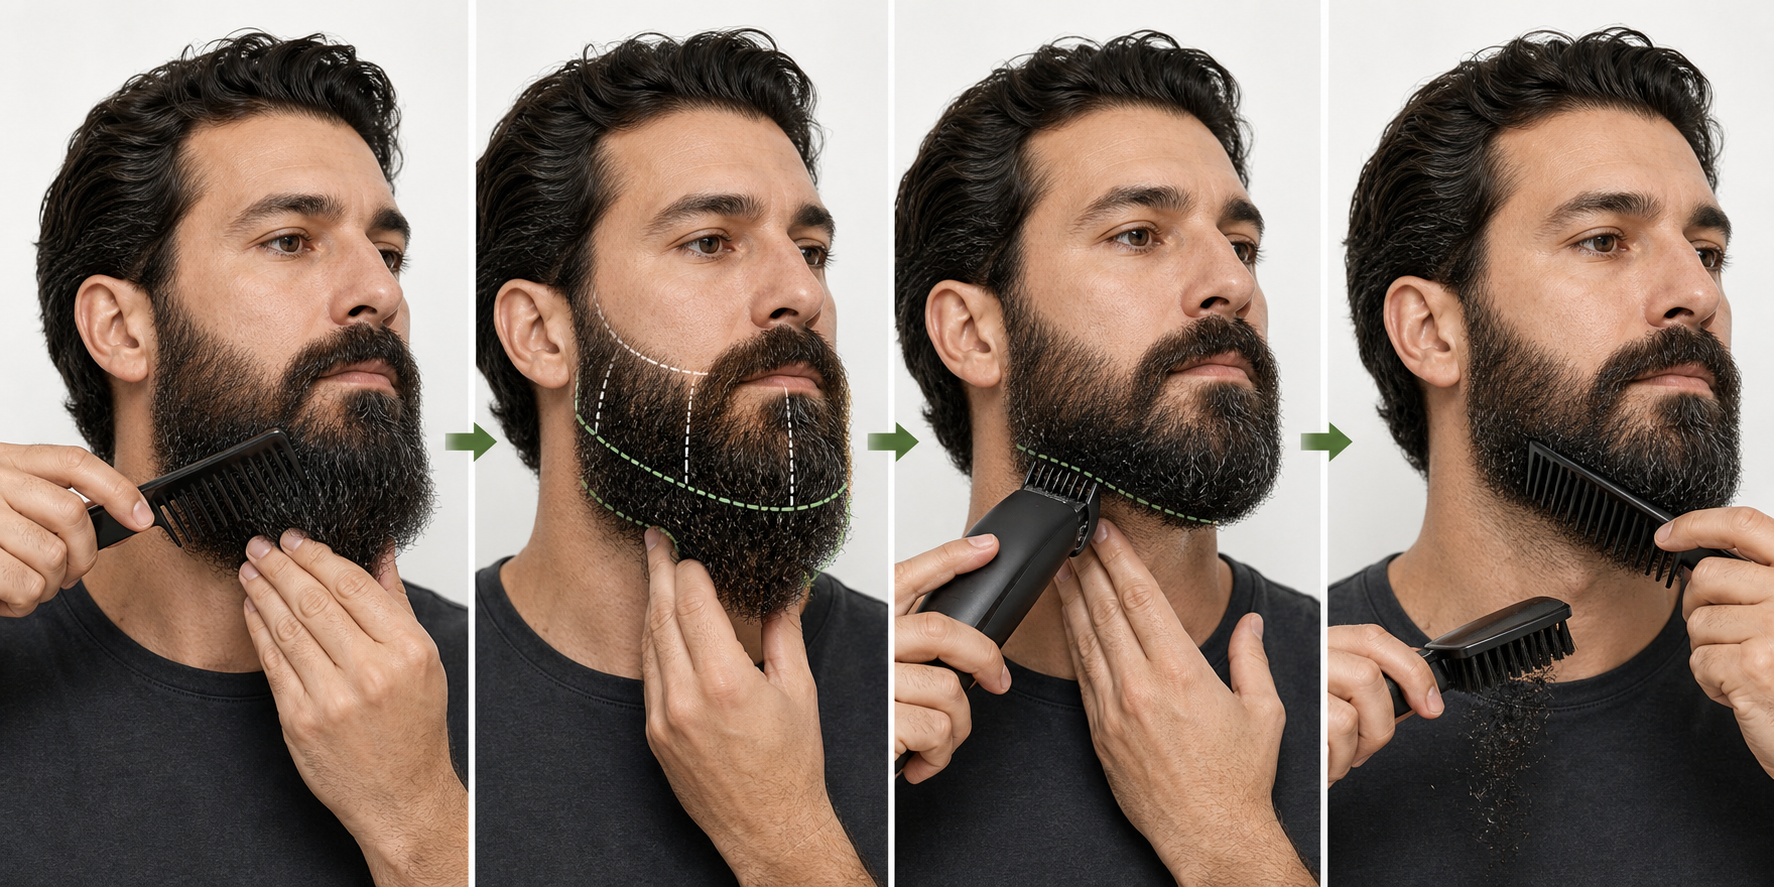
Use clean fingers and a suitable wide-tooth comb. Support the beard near the section being combed without pulling the skin or stretching the hair. Begin at the free ends and work toward the base in small increments. Stop at resistance, isolate the knot, and separate it gently rather than driving the comb through.
Do not select final length while the beard is pulled straight or held under tension. Release each section and let it return to its normal dry shape. If combing itself causes persistent pain, breakage, skin symptoms, or unexplained shedding, stop the trimming session and seek appropriate advice.
Separate Outer Bulk From the Underlayer
Comb the outer cheek, jaw, and chin hair into the worn shape, then lift only enough to see where it overlaps the underlayer. Map the longer outer shelf separately from the shorter structural hair closer to the face. Do not drive one guard through both layers merely because they occupy the same visual area.
Use fingers or a comb only as a sectioning aid unless a trained comb-cutting technique is the explicit plan. Keep the supporting hand outside the blade path. The goal is to control how much hair enters, not to hold hair against a running cutter.
Map Grain by Small Medium-Beard Zones
Divide each side into upper cheek, lower cheek, jaw corner, chin side, central chin, under-jaw, sideburn, and mustache zones. Record local direction after the beard settles. Coarse medium-length strands can cross into a neighboring zone, so trace them back before deciding where a pass belongs.
The medium-beard grain guide explains local direction mapping and conservative direction changes. A single downward sweep cannot represent every zone, and random multidirectional passes can load the guard repeatedly before the result is visible.
Inspect the Cutting System Away From the Face
Switch off and disconnect charging power before touching the blade or attachment. Remove dry debris as the manual permits. Inspect fixed and moving teeth, head seating, guard rails and locks, adjustment stability, corrosion, chips, bends, contact, and anything that can make the guard tilt.
Follow model-specific lubrication instructions. Some cutters require approved oil and others do not. Household oil, spray, water, alcohol, or disinfectant is not a universal substitute. Run the tool briefly away from the face and stop for rattle, changing speed, unusual vibration, odor, heat, or visible blade movement.
Choose a Longer Guard From the Minimum Acceptable Length
Use only a guard or adjustable setting documented for the exact model. Start from the shortest length you are unwilling to lose, then choose that setting or a longer one for the first test. Guard numbers and dial labels do not transfer safely between systems.
The medium-beard guard guide provides a longer-first calibration method. Confirm that the guard sits level and stays locked before every section. Do not hold a loose guard in place, tape a cracked attachment, or compensate for a slipping dial with hand pressure.
Test One Dense, Low-Visibility Section
Select a small dense area within a confirmed excess-bulk zone, away from the cheek line, neckline, lip, central chin point, and a lighter-density area. Seat the longer verified guard as directed and make one short light model-approved pass.
Switch off, clear clipped hair, recomb the complete zone, and inspect retained length, feed, guard stability, and surface transition. If the tool snags, removes more length than expected, exposes the underlayer, or produces an abrupt step, stop. Do not use another area to “average out” a failed test.
Feed One Supported Section at a Time
Let one small separated section enter the guard rather than pushing the entire cheek or jaw bulk into it. Keep the supporting hand clear of the cutter and release tension before judging the result. Use an entry angle and contact method allowed by the exact manual.
Do not bunch hair against the teeth, push the tool beneath hidden outer layers, or trap long strands between the guard and skin. When the next section changes direction or density, end the stroke, lift away, and reset instead of continuing one long pass.
Use Short Light Passes With a Visible Exit
Plan where each stroke begins and ends before switching on near the beard. Keep the full guard position visible, move gently and steadily, and avoid holding a running cutter stationary. One short pass should address one mapped section.
Philips’ OneBlade trimming instructions require correct comb seating and full contact for covered models and direct users to clean after use. That is a model-family example, not permission to use the same orientation or pressure with another tool.
Clear the Guard Before It Packs
Long coarse clippings can bridge across comb teeth, collect behind the guard, and hide the cutter path. After each small zone, switch off, remove the attachment only as directed, and clear loose hair over a dry collection surface. Reinstall it securely and reconfirm the setting.
Use visible loading rather than an arbitrary pass count. Continuing with a packed guard can reduce feed and encourage harder pressure. The trimmer cleaning and oiling guide covers the complete after-session procedure; between-zone clearing is a narrower dry-debris step.
Stage the Dense Jaw and Chin
The jaw corner and chin often combine high density, longer projection, and direction changes. Treat each side of the chin separately, then the central projection, rather than driving a wide guard across the complete curve. Preserve the planned chin point while reducing only the mapped outer shelf.
At the jaw, separate the visible outer edge from the under-jaw weight. A pull in one section does not justify shortening the whole structure. Recomb from front, side, and three-quarter views after each stage.
Keep Under-Jaw Work Visible
Use mirrors and head position that expose the guard and section without stretching the neck excessively. Comb the under-jaw hair into its normal direction and separate one small section. Do not make blind passes behind the jaw or toward skin folds.
Protect the established neckline. This coarse-hair workflow balances medium-length bulk; it does not redesign the boundary. Use the medium-beard edge-cleanup guide only for confirmed regrowth outside a known line.
Change Direction Only After Reassessment
If a section remains longer after clearing and recombing, confirm that the difference is length rather than curl, density, or a hair crossing from another zone. Change only the planned direction when the exact instructions allow it, leaving guard, pressure, and target unchanged.
Do not cycle upward, downward, and across automatically. A direction that lifts more long hair can also increase cutter load. Stop when another direction causes snagging, unstable contact, discomfort, or a result that cannot be judged before the next pass.
Preserve Medium Length While Correcting One Side
Compare matched cheek, jaw, and chin zones under the same light and posture. A fuller-looking side can reflect density, curl, grain, or facial structure rather than excess length. Confirm a projected outer shelf before removing hair.
The medium-beard symmetry guide uses matched landmarks and alternating reassessment. Apply one correction only to the confirmed longer section. Do not shorten both sides repeatedly to chase identical texture or skin visibility.
Diagnose Pulling Before Another Pass
At the first snag, switch off and identify whether the section was tangled, too large, crossing directions, or held under tension. Then inspect guard loading, attachment fit, blade condition, lubrication requirement, charge or power stability, sound, heat, and the selected length.
Use the trimmer-pulling troubleshooting guide when basic sectioning and clearing do not resolve the problem. Do not assume that a motor claim, blade coating, professional label, price, rating, or new attachment guarantees pull-free performance.
Use One-Variable and Pass Limits
For each zone, allow one test, one complete reset, and at most one justified correction before moving away or stopping. Change only section size, direction, or verified setting. Do not alter all three while adding pressure.
Philips’ groomer irritation guidance cautions against repeated coverage and excessive pressure for covered products. Discomfort is a stop signal, not evidence that coarse hair requires a more aggressive pass.
Coarse Medium-Beard Checklist
- The medium-length structure and minimum retained length are defined.
- Coarse texture is separated from density, curl, tangles, and tool condition.
- The beard is clean enough to comb, fully dry, and naturally settled.
- Sections are supported and detangled from ends toward the base.
- Outer bulk and the underlayer are mapped separately.
- Local grain is recorded for cheek, jaw, chin, and under-jaw zones.
- Blade, head, guard, setting, power, and lubrication checks pass.
- A longer guard is tested in one dense low-visibility section.
- Only one supported section enters each short pass.
- The guard is cleared and reattached after visible loading.
- Chin, jaw, cheek line, neckline, and lighter-density areas are protected.
- Pulling and discomfort stop the session immediately.
Repeatable Medium-Length Workflow
- Confirm the exact trimmer, guard, wet-or-dry rule, and care instructions.
- Set minimum chin, jaw, cheek, and under-jaw structure.
- Remove heavy product and let the beard dry and settle.
- Support and detangle small sections from ends toward the base.
- Separate outer bulk from the underlayer and map local grain.
- Inspect and test the cutting system away from the face.
- Choose a longer guard from the minimum acceptable length.
- Test one dense low-visibility section with one short light pass.
- Switch off, clear clippings, recomb, and assess the complete zone.
- Stage jaw, chin, and under-jaw bulk one supported section at a time.
- Make at most one justified one-variable correction.
- Stop, clean as directed, and record the successful setup.
Stop Conditions
Stop for repeated snagging, stalling, a guard packed beyond easy clearing, loose or incompatible attachments, damaged or contacting teeth, a slipping adjustment, abnormal noise, odor, vibration, or heat, smoke, swelling, leakage, damaged power parts, or water exposure outside the exact rating. Do not tape a guard, force a head, open a sealed handle, or add pressure.
Also stop over painful, broken, bleeding, swollen, or actively irritated skin; when detangling causes unexplained shedding; when the section or cutter path cannot remain visible; when the medium-length structure is no longer clear; or when each correction removes coverage without improving the target. Seek qualified help for persistent symptoms or unresolved equipment problems.
Frequently Asked Questions
Why does a trimmer pull a coarse medium beard?
Pulling can follow tangled sections, too much long hair entering at once, a packed guard, incorrect attachment, damaged or dry blades, unstable power, excessive pressure, or a direction that feeds the zone poorly.
Should I comb a coarse medium beard before trimming?
Yes, when the exact grooming method allows it. Support the beard, work gently from the ends toward the base, stop at resistance, and let the hair settle without stretching it straight before choosing length.
Which guard should I use on a coarse medium beard?
Use only a guard documented for the exact model and start from the minimum length you are unwilling to lose. Test a longer setting in one dense low-visibility zone before shortening.
When should I stop if a trimmer keeps pulling?
Stop immediately for repeated snagging, stalling, abnormal sound, heat, odor, vibration, loose parts, damaged teeth, unstable power, painful skin, or a pass that requires pressure. Diagnose the tool before continuing.
Sources and Claim Boundary
Primary references reviewed in July 2026 are Philips support pages on uneven groomer results, OneBlade trimming, and groomer irritation linked above. They support clean dry preparation for covered products, correct attachment fit, local direction awareness, controlled guard contact, clearing, and avoiding repeated pressure.
This page applies those mechanics to a generic sectioned medium-length coarse-beard workflow. It does not report hands-on testing, guarantee pull-free trimming, rank tools, prescribe one motor, blade, guard, setting, direction, pressure, or schedule, diagnose skin or hair conditions, create growth or density, or guarantee symmetry, comfort, or a particular result. The exact model manual controls.
