
Disclosure: This site may use affiliate links. Product specifications should be checked against manufacturer or retailer pages before purchase.
Direct Answer
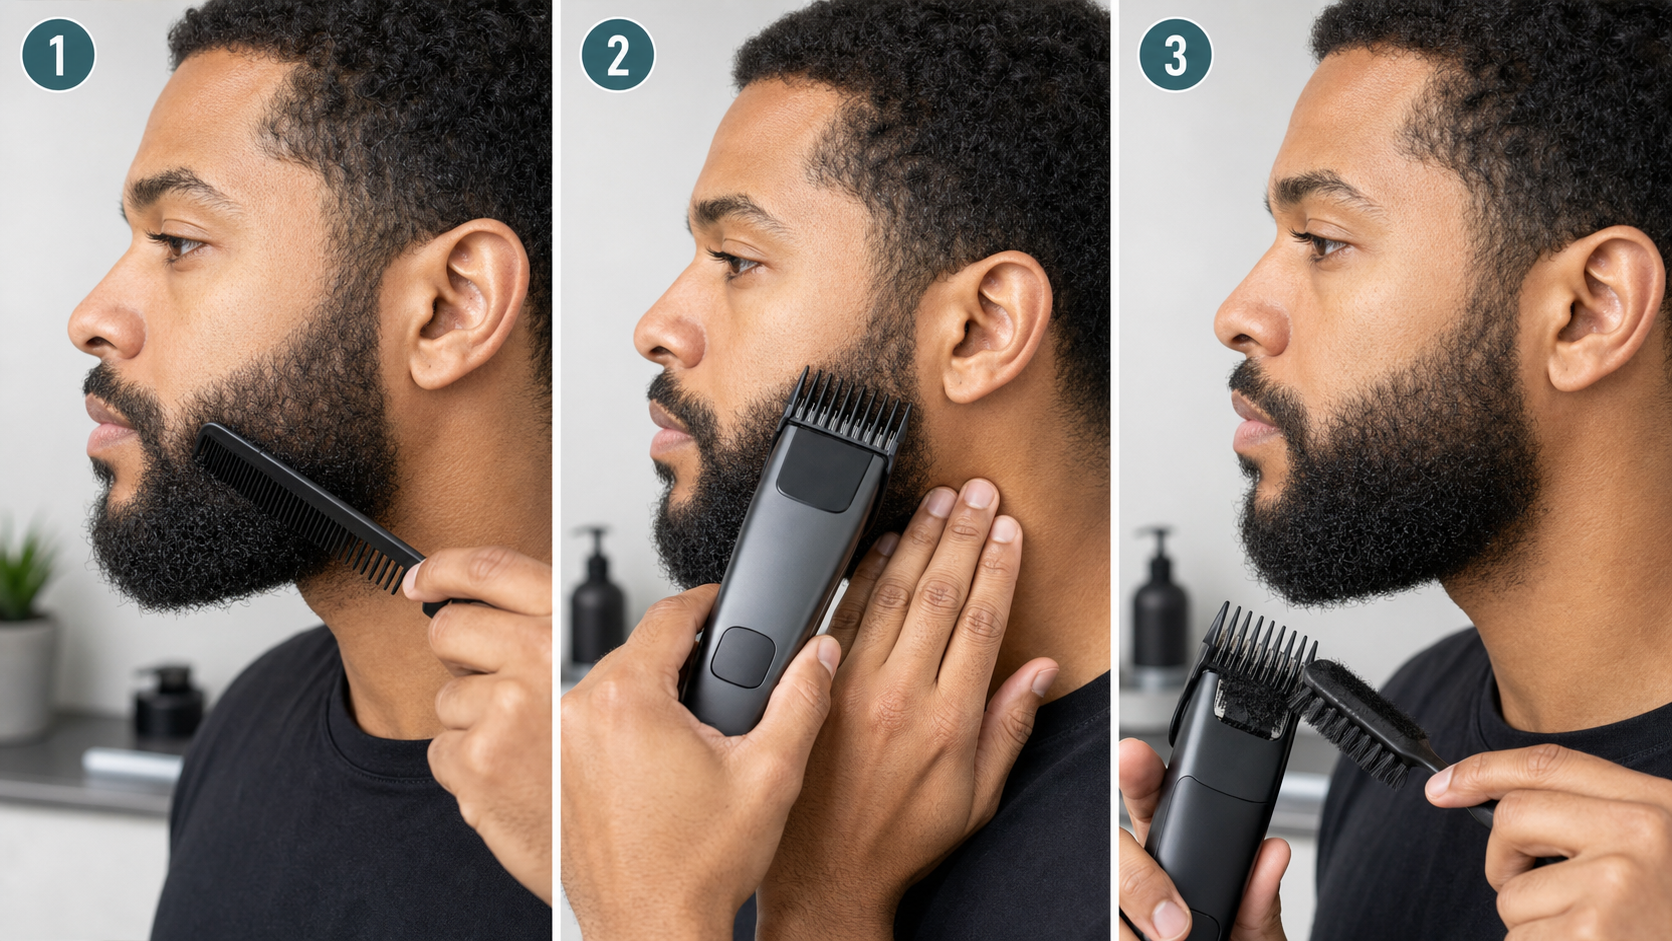
Direct answer: Trim a coarse short beard without unnecessary pulling by working on clean, fully dry hair when the model requires dry use, combing curls into small zones, checking the blade and guard, starting longer, and using short light strokes. Clear packed clippings after each zone. Stop immediately if the tool snags, slows, rattles, heats unusually, or needs pressure to keep cutting.
No method can guarantee a pull-free result with every beard or trimmer. “Coarse” describes how the hair feels and behaves; it does not identify one universal density, curl pattern, blade requirement, or motor specification. The exact model manual and the tool’s current condition control how it should be used.
Coarse Short-Beard Pulling Prevention Map
| Checkpoint | Conservative action | Stop or correct when |
|---|---|---|
| Hair preparation | Clean, dry, and lightly comb the beard as the manual allows | Hair is damp, matted, or heavily coated with product |
| Blade and guard | Verify clean teeth, secure fit, correct setting, and required lubrication | Teeth are bent, guard is loose, or the cutter is packed |
| Starting length | Begin longer than the intended result | The first pass removes more length than expected |
| Stroke | Use short, light, controlled movement through one small zone | The tool slows, catches, or requires force |
| Pass interval | Switch off, clear clippings, recomb, and inspect | Hair fills the guard or hides the cut surface |
| Direction | Map grain and change direction one variable at a time | A direction lifts too much hair into the teeth at once |
The current Philips Multigroom manual advises combing before trimming, using clean dry hair, starting with the maximum trimming length when learning the product, keeping the guard in contact, and trying directions deliberately. Philips’ OneBlade trimming instructions also require a correctly seated comb, model-specific settings, and cleaning after use. These are exact-product examples, not universal performance claims.
Separate Coarse Texture From Excess Length
Comb the beard in its natural resting direction and inspect the cheek, jaw, chin, mustache, and under-jaw separately. A coarse hair can feel stiff even when it is already short. A curl can also project outward while its actual length remains close to the surrounding beard. Do not shorten an entire zone merely because its surface feels rough.
Look for hair that extends beyond the intended silhouette, not hair that simply has a different texture. If a zone is already at the target length, leave it out of the first pass. This distinction reduces repeated cutter contact and helps preserve the beard’s natural coverage.
Prepare Clean, Dry Hair for a Dry Trim
Follow the exact model’s wet-or-dry rules. For a conventional dry guarded trim, wash only when needed to remove heavy product and loose debris, then let the beard and skin dry fully. Water and thick balm can hold coarse curls together, flatten their normal direction, and fill a guard with clumped hair.
Use a clean wide-tooth beard comb or soft brush to separate the hair without pulling hard at knots. Work from the ends toward the base where necessary. The goal is to reveal growth direction and free loose hairs, not to stretch the beard straight or create tension against the skin.
The stubble preparation guide covers lighting, drying, growth mapping, and the initial tool check. This page adds a coarse-hair workflow and does not replace the preparation baseline.
Inspect the Cutting System Before Contact
Switch the tool off and disconnect charging power before touching the blade or changing a guard. Brush cut hair from both sides of the cutter and from inside the guard. Check for bent or chipped teeth, corrosion, a loose blade, a cracked comb, damaged locking tabs, and anything that prevents the guard from sitting level.
Follow the model’s lubrication instruction. Some conventional metal blade sets need approved clipper oil; some replaceable cutter systems do not. More oil is not better, and household oils or sprays are not substitutes. Wipe away excess before facial contact.
Run the tool briefly away from the face. The sound and movement should be steady for that model. Stop if it rattles, stalls, smells hot, becomes unusually warm, or the blade shifts. The cleaning and oiling guide provides the broader maintenance sequence.
Verify Guard Fit and Start Longer
Choose only a guard or adjustable setting documented for the exact trimmer. Confirm that it locks evenly and cannot rock toward the moving teeth. Guard numbers are not universal, so use the stated millimeter length or the model chart rather than copying a number from another system.
Start one or more documented steps longer than the intended result. Coarse curls can enter a comb unevenly, and the first pass reveals how that tool feeds the current beard. Make the test in a small dense area that can blend into the surrounding length, then switch off, clear hair, and inspect before shortening.
Use the beard trimmer guard-size guide to verify attachment language and setting differences.
Divide the Beard Into Small Grain Zones
Do not treat the entire face as one direction. Cheek hair may run down or diagonally, jaw hair may turn toward the chin, and under-jaw hair may reverse or form a swirl. Comb and map each zone before the cutter enters it.
Use zones small enough that one short stroke remains visible from start to finish. Around a direction change, end the stroke, switch off if needed, clear the guard, and reposition. A long sweep can feed several growth patterns and too much coarse hair into the cutter at once.
Use Short Strokes and Light Pressure
Place the guard as the manual directs and move slowly enough to maintain control, but do not hold a running cutter stationary. Use light, consistent contact. Pressing harder does not prove the trimmer is cutting better; it can change guard contact, compress skin, and force more hair toward the blade.
Complete one short stroke, lift away, and inspect the path. If hair remains, recomb it before deciding whether the direction or setting should change. Do not repeat the same stroke rapidly while loose cut hair remains trapped at the teeth.
The short-beard trimming mistakes guide covers pressure, setting jumps, wet hair, packed clippings, and repeated corrections across the rest of the beard.
Clear the Guard Before It Packs
Coarse, curled clippings can bridge across guard teeth or collect behind the cutter. Switch the tool off and remove the guard only as the manual permits. Brush the attachment and cutting area over a dry surface. Reattach it securely and confirm the setting before restarting.
Use clearing intervals based on what you can see, not an arbitrary number of passes. A small guard may need cleaning after every zone. Continuing with a packed comb can reduce feed, hide the cutting edge, and encourage the operator to press harder.
Change One Variable at a Time
If the first pass leaves genuinely longer hair, change only one factor: stroke direction, guard setting, or zone. Do not shorten the setting, turn against the grain, and increase pressure simultaneously. One-variable changes make the result easier to interpret and limit accidental overtrimming.
Against-grain movement can lift more hair into a guard, while with-grain movement may remove less. Neither direction is a universal first choice for every model and curl pattern. Use the exact instructions, begin conservatively, and stop if a new direction produces snagging.
Handle the Chin, Jaw, and Mustache Separately
The chin and jaw often contain denser hair and stronger direction changes. Approach each side of the chin as a separate zone and avoid driving a wide guard across the center turn in one motion. Under the jaw, use a mirror angle that keeps the guard and skin contact visible.
Comb the mustache downward and keep it out of a beard pass unless it shares the same verified target length. Work around the mouth with shorter strokes and a model-approved attachment. Do not press a guard into the lip or nose to capture resistant hairs.
Diagnose Pulling Instead of Forcing the Pass
If the tool catches hair, stop immediately and switch it off. Check for a packed guard, incorrect attachment, loose fit, damaged teeth, required lubrication, low charge, abnormal sound, and an overly large section of hair entering the cutter. Recomb the zone and return to a longer setting if the tool and manual support continued use.
Do not assume that a motor specification, blade coating, product rating, or “professional” label guarantees a pull-free trim. If basic checks do not correct the problem, use the beard trimmer pulling troubleshooting guide and the manufacturer’s service route. Do not open a sealed housing or alter blade alignment without exact instructions.
Stop Conditions
Stop when teeth or guards are damaged, the blade is loose, the attachment will not lock, the tool repeatedly stalls, pulling persists after basic checks, or there is unusual heat, odor, noise, vibration, battery swelling, cable damage, or exposed wiring. Do not continue on broken, painful, or actively irritated skin.
This workflow does not diagnose skin or hair conditions. Persistent pain, bleeding, a concerning skin change, or sudden hair loss is outside a routine trimming guide and requires appropriate professional advice.
Repeatable Coarse Short-Beard Workflow
- Confirm the exact tool, guard, wet-or-dry rule, and lubrication instruction.
- Clean and fully dry the beard when performing a dry trim.
- Comb gently and map the grain in cheek, jaw, chin, mustache, and neck zones.
- Inspect, clean, and test the blade and guard away from the face.
- Start longer than the intended result on one small dense test zone.
- Use one short, light stroke in a controlled direction.
- Switch off, clear clippings, recomb, and inspect the surface.
- Change only direction, setting, or zone when another pass is justified.
- Stop and troubleshoot at the first snag, slowdown, or abnormal condition.
- Record the model, guard, direction, zones, and successful stop point.
Frequently Asked Questions
Why does a trimmer pull a coarse short beard?
Pulling can follow packed cut hair, a damaged or dry blade, a loose guard, low power, fast movement, heavy pressure, or feeding too much hair into one pass. Stop and check the exact tool rather than forcing it.
Should coarse beard hair be wet before trimming?
Use the condition specified by the exact model manual. For a conventional dry guarded trim, clean hair should be fully dry so curls, growth direction, and guard loading remain visible.
Should I trim a coarse beard with or against the grain?
Map the grain first and follow the exact model instructions. Start with the less aggressive controlled direction that feeds hair reliably, then change one variable at a time only if needed.
Does a more powerful trimmer guarantee no pulling?
No. A motor label does not prove pull-free trimming. Blade condition, guard fit, cleanliness, charge, hair preparation, direction, pressure, stroke length, and model compatibility all matter.
Sources and Claim Boundary
Primary references reviewed in July 2026 are the current Philips Multigroom manual and Philips OneBlade support instructions linked above. This page provides a generic preventive workflow, not hands-on testing or a guarantee of pull-free trimming. It does not rank products or make motor, blade, medical, or performance claims. The exact model manual controls attachment identity, direction, pressure, wet use, cleaning, lubrication, charging, and safety.
