
Disclosure: This site may use affiliate links. Product specifications should be checked against manufacturer or retailer pages before purchase.
Direct Answer
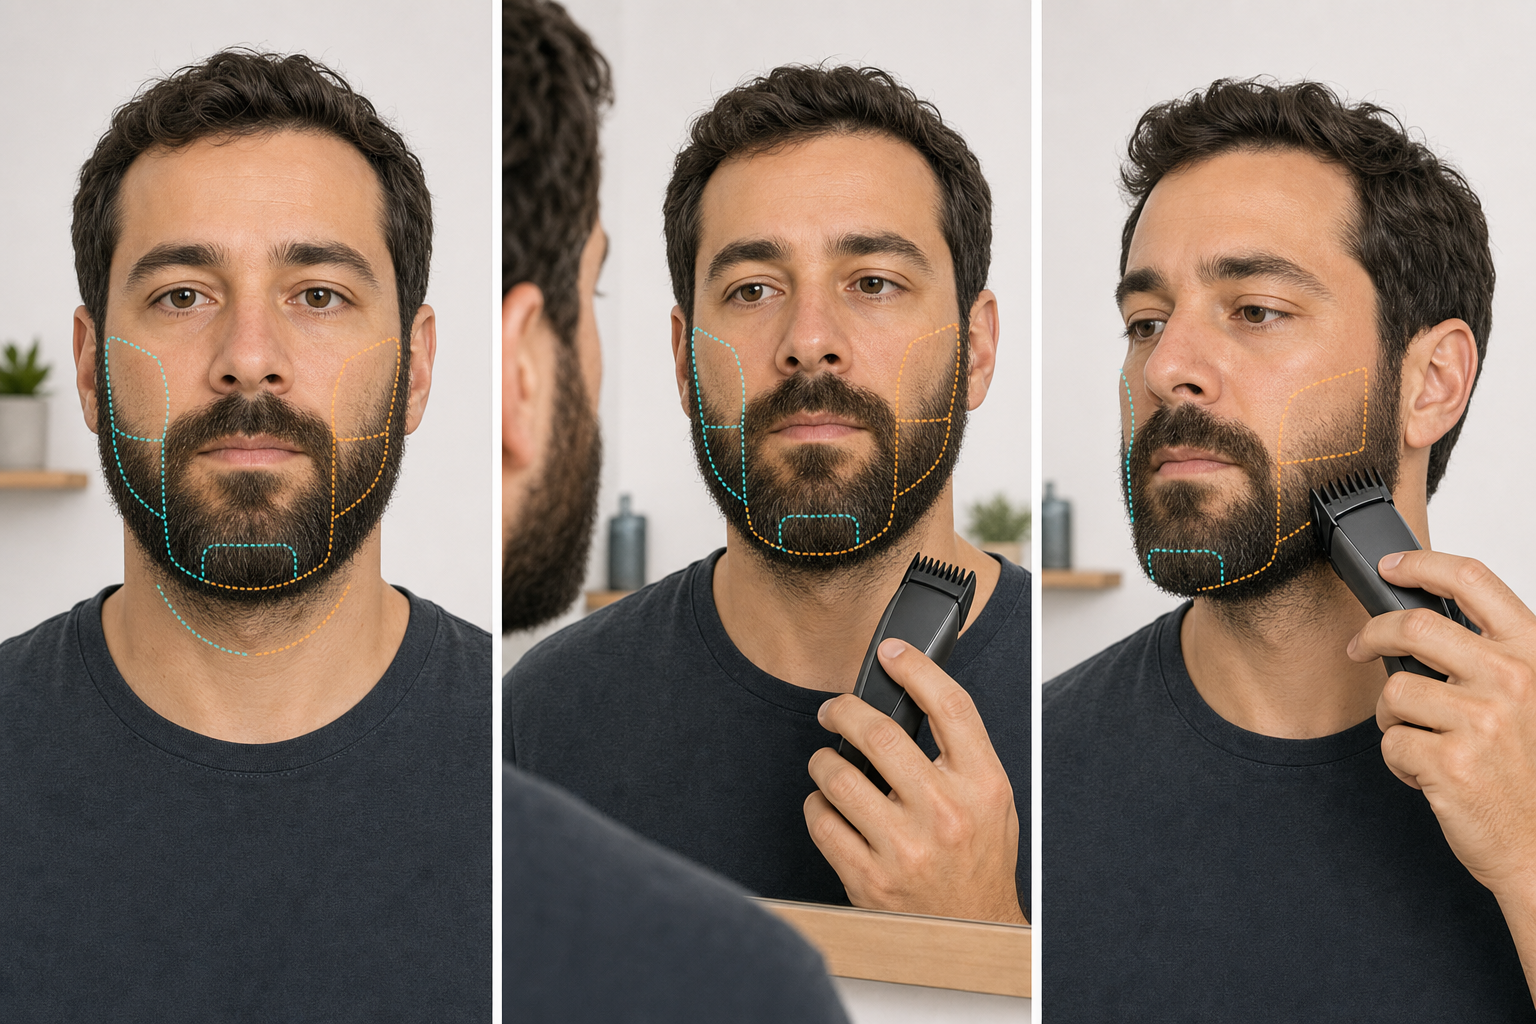
Direct answer: Keep a medium beard even on both sides by mapping matched cheek, jaw, chin, sideburn, and under-jaw zones; comparing them under the same light and head angle; and correcting only one small zone at a time. Recomb after every pass, alternate sides, and stop when remaining differences come from natural density, curl, growth direction, or face shape rather than removable length.
Even does not mean mathematically identical. A medium beard can use equal measured settings and still look different from side to side. This workflow balances visible length and outline while protecting natural coverage. It does not promise perfect symmetry, create beard density, change facial structure, or diagnose hair or skin conditions.
Matched-Zone Comparison Map
| Matched zone | Compare | Conservative correction |
|---|---|---|
| Upper cheeks | Visible height, projection, and isolated long hairs | One light guarded pass only on the fuller zone |
| Lower cheeks | Density transition into the jaw | Preserve the sparser side and reduce only excess length |
| Jaw corners | Width and transition into the chin | Use a narrow mapped band rather than shortening the whole side |
| Chin shoulders | Left and right projection beside the center chin | Keep the center reference isolated from side corrections |
| Sideburns | Transition height and width | Match one short section at a time |
| Under-jaw | Bulk and direction around local swirls | Remap growth before changing direction or setting |
The goal is a controlled comparison system. It avoids completing one whole side from memory, repeatedly cutting the darker-looking side, or treating a natural coverage difference as proof that the hair is longer.
Prepare a Stable Comparison Baseline
Begin with a clean, fully dry beard resting in its normal shape unless the exact trimmer instructions require another condition. Remove heavy product, detangle gently, and let compressed or damp sections recover before comparing them. A wet, stretched, or freshly flattened beard can make one side appear temporarily longer.
Use the same room, mirror distance, and neutral front-and-side lighting throughout the trim. Take a front view, both profiles, and an under-jaw reference before cutting. The medium-beard preparation guide covers drying, detangling, growth mapping, tool inspection, and first-pass planning in more detail.
Define What Even Means for This Beard
Write a plain-language target before trimming: similar cheek projection, similar jaw width, a centered chin, matched sideburn transitions, and a stable neckline. Also record what must remain natural, such as a slightly fuller cheek, a curl pattern, or a sparser growth zone.
Do not use a perfectly mirrored face diagram as a result promise. Human faces and beards are not perfectly symmetrical. A practical target is that the outline looks intentional from ordinary viewing distance and that neither side contains an avoidable block of excess length.
Map Left and Right Matched Zones
Divide both sides into corresponding upper-cheek, lower-cheek, sideburn, jaw-corner, chin-shoulder, and under-jaw zones. Use the center of the chin, lower lip, nose, and neck as orientation references rather than as proof of perfect facial symmetry.
Label the zones before judging them. Compare upper cheek with upper cheek, not one full profile against the other. A zone map makes each decision smaller and prevents a correction at the jaw from spreading unnecessarily through the cheek or chin.
Separate Length From Density and Direction
Comb matched zones in the same way and observe them from the same angle. A darker side may have more hairs, coarser hair, tighter curl, a different lay, or different lighting. Those factors can change visual weight without indicating longer hair.
Stroke or comb each local zone to map its grain. The medium-beard grain guide explains why direction can change across cheek, jaw, chin, mustache, and neck. Do not make repeated passes merely because a low-lying section looks darker after trimming.
Verify the Guard and Exact Model
Confirm the full trimmer model, compatible guard, and documented millimeter value. Guard numbers and dial positions are not universal. Inspect teeth, rails, tabs, hinges, and adjustment controls, then attach the guard with the tool off and verify that it sits level and remains locked.
Use the longest verified setting that could preserve the target. The medium-beard guard guide covers shortest-zone preservation, longer-first calibration, and zone-specific settings. Equal side-to-side work requires the same verified setup unless a deliberate zone plan says otherwise.
Choose a Reference Side and Reference Zone
Select the side or zone that already fits the target more closely and protect it as the reference. This does not mean that the reference side should never be touched. It means the first correction should address clear excess length on the matched fuller zone rather than shortening both sides automatically.
Start in a dense, non-edge area where guard contact is stable. Avoid choosing a sparse cheek patch, neckline corner, mustache edge, or central chin as the first calibration zone. Those areas can affect the overall shape disproportionately.
Make One Small Test Correction
Place the verified guard as the exact model manual directs and make one short, light pass through the selected fuller zone. Keep pressure and contact consistent. Stop, switch off if required, clear clippings, and recomb the area into its natural dry position.
Philips’ official OneBlade trimming instructions describe full comb contact and a model-specific direction for the covered tools. A current Philips groomer manual notes that hair grows in different directions and recommends smooth, gentle strokes. These sources support controlled guard contact and local direction mapping, not a universal symmetry result.
Recomb Before Every Comparison
Loose clippings and compressed hair can make a freshly trimmed zone look uneven. Clear the guard and beard according to the tool’s instructions, then comb both matched zones with the same motion. Let them settle before comparing.
Use a close mirror to check guard position, but step back to assess the silhouette. Compare front, profile, and three-quarter views. A difference visible only at extreme magnification may not justify removing length from an entire medium-beard zone.
Alternate Sides Instead of Finishing One Side
After one correction, compare the matched zone and move to the opposite side only if it now contains clear excess length. Alternate small adjustments across matched zones. Do not finish the complete right side and then attempt to copy it on the left from memory.
An alternating sequence preserves feedback. If the first pass changes less or more than expected, the next decision can account for it. It also reduces the risk of successively shortening both sides while trying to make each one match the other.
The stubble side-comparison guide uses a related matched-zone check at a much shorter length. This medium-beard workflow additionally protects chin projection, jaw bulk, curl, and longer natural density, so the two pages do not prescribe the same correction sequence.
Change One Variable at a Time
Keep the guard, direction, contact, and zone constant during a comparison. If another correction is needed, change only one variable: the target zone, the documented guard setting, or the model-approved direction. Re-test after every change.
Do not combine a shorter setting, harder pressure, reversed direction, and a larger zone in one pass. That makes the result impossible to attribute and removes correction room. The general beard-trimmer workflow provides an end-to-end one-variable sequence.
Balance Cheek Projection Without Erasing Coverage
Compare the upper and lower cheek zones separately. If one side projects farther because a few hairs are longer, make a light guarded pass only through that mapped area. If it looks darker because it has more coverage, shortening it may expose skin without making the two sides visually identical.
Preserve sparse zones and use the fuller side as the main correction area. The patchy-beard visual balance guide explains the distinction between reducing excess density projection and making unsupported hair-growth promises. The same principle applies to a medium beard.
Match Jaw Corners in Narrow Bands
Jaw corners strongly affect profile width. Mark a narrow transition band on each side and compare its height, width, and connection to the chin. Correct only the band that clearly projects beyond the planned silhouette.
Keep the guard flat as the surface curves. Tilting onto the front teeth can remove more hair than the nominal setting suggests. Do not carry a jaw-corner correction upward through the entire cheek or inward across the center chin.
Protect the Center Chin Reference
Treat the center chin as a structural reference, especially when it is intentionally longer than the cheeks. Compare the left and right chin shoulders beside it without running a shorter side setting through the center.
View the chin from the front and both three-quarter angles. A center tuft can lean to one side because of grain or curl. Recomb it before cutting. Correct isolated excess length only when the difference remains after the hair settles.
Compare Sideburn Transitions
Match the transition zone where the beard meets the hairline, but do not assume both natural hairlines begin at the same height. Compare transition softness, width, and the point where the medium-beard length begins.
Use one documented setting change at a time in a short vertical band. Keep this step separate from cheek bulk reduction. A broad pass can create a visible notch or move the transition lower than intended.
Map the Under-Jaw Separately
Use a second mirror and divide the under-jaw into left, center, and right zones. Hair can turn upward, sideways, or into a swirl. The same downward stroke may be with the grain on one side and against it on another.
Compare bulk while the head is in the same neutral position. Stretching the neck or lifting the chin differently can change the apparent outline. This step balances under-jaw volume; it does not redraw the neckline. Use the neckline guide for boundary placement.
Delay Edge Work Until Bulk Is Stable
Do not move cheek or neckline boundaries while deciding whether the bulk is even. A higher line can make one side look shorter or lighter even when the guarded length is unchanged. Stabilize the medium-beard silhouette first.
After bulk comparison is complete, restore the existing cheek, mustache, sideburn, and neckline edges with the exact attachment and unguarded-use rules for the model. Make short strokes outside the retained beard and stop before an edge correction changes the planned shape.
Use a Three-View Final Check
Clear clippings, comb the complete beard, and let it settle. Check the front view for cheek and chin balance, both profiles for jaw projection, and the under-jaw view for bulk. Use the same light, head angle, and camera or mirror distance used at the start.
Then leave the mirror for several minutes and check again under ordinary viewing conditions. Stop when the outline looks intentional and remaining differences follow natural density, curl, direction, or facial structure. More cutting cannot create missing coverage.
Common Side-to-Side Balancing Errors
- Finishing one complete side before checking the other.
- Comparing a cheek zone with the opposite jaw or chin zone.
- Using different light, head angle, or combing direction between checks.
- Treating darker natural density as proof of longer hair.
- Changing guard, direction, pressure, and zone together.
- Shortening both sides after every comparison and creating a correction loop.
- Moving cheek or neckline boundaries while bulk length is still unsettled.
- Running a shorter cheek setting through an intentionally longer center chin.
- Pressing harder when the guard or blade is packed with clippings.
- Pursuing perfect symmetry after only natural differences remain.
Repeatable Matched-Zone Sequence
- Prepare the beard in a clean, dry, relaxed comparison state.
- Define the intended silhouette and natural differences to preserve.
- Map matched cheek, jaw, chin, sideburn, and under-jaw zones.
- Separate apparent length from density, curl, direction, and lighting.
- Verify the exact model, longer guard, attachment fit, and blade condition.
- Select one good side or zone as the temporary reference.
- Make one light test pass through the clearly fuller matched zone.
- Clear clippings, recomb both sides, and compare from the same views.
- Alternate sides and change only one variable when another correction is justified.
- Protect the center chin and existing cheek and neckline boundaries.
- Complete edge work only after bulk and projection are stable.
- Stop when remaining differences are natural rather than removable length.
Stop Conditions
Stop if the guard is cracked, loose, tilted, incompatible, or changes setting; the blade has damaged teeth; or the tool rattles, stalls, pulls, smells abnormal, vibrates strongly, or becomes unexpectedly hot. Stop for damaged power parts or water exposure outside the exact model rating.
Philips’ groomer irritation guidance cautions against repeated passes and excessive pressure for the covered tools. Do not continue a side-to-side correction loop over the same area. Also stop over painful, broken, bleeding, or actively irritated skin. Use the trimmer-pulling checks before another pass if the cutter pulls despite light contact.
Frequently Asked Questions
Why can both sides look different at the same guard setting?
Natural density, curl, growth direction, face shape, lighting, and guard contact can make equal measured lengths look different. Recomb and compare matched zones before removing more hair.
Which side of a medium beard should I trim first?
Start with one small matched zone on the visibly fuller side, then stop and compare it with the corresponding zone. Alternate sides rather than finishing one complete side first.
How often should I compare both sides while trimming?
Compare after every small zone or one-variable adjustment. Clear clippings, recomb, use the same head angle and light, and step back before deciding whether another correction is justified.
Can trimming make a naturally patchy beard perfectly symmetrical?
No. Trimming can balance length and outline, but it cannot create missing density or change growth direction. Preserve coverage and stop when further cutting would only make the beard smaller.
Sources and Claim Boundary
Primary references reviewed in July 2026 are the Philips OneBlade trimming instructions, current Philips groomer manual, and Philips groomer irritation guidance linked above. They support exact-model guard contact, local growth-direction awareness, smooth light passes, and avoiding repeated pressure. The matched-zone and alternating-correction method is a conservative editorial workflow derived from those mechanics.
This page does not report hands-on testing, guarantee symmetry, change natural density or growth, diagnose skin or hair conditions, or prove that every trimmer uses the same direction, guard, pressure, cleaning, lubrication, wet-use, charging, or safety rules. The exact model manual controls.
