
Disclosure: This site may use affiliate links. Product specifications should be checked against manufacturer or retailer pages before purchase.
Direct Answer
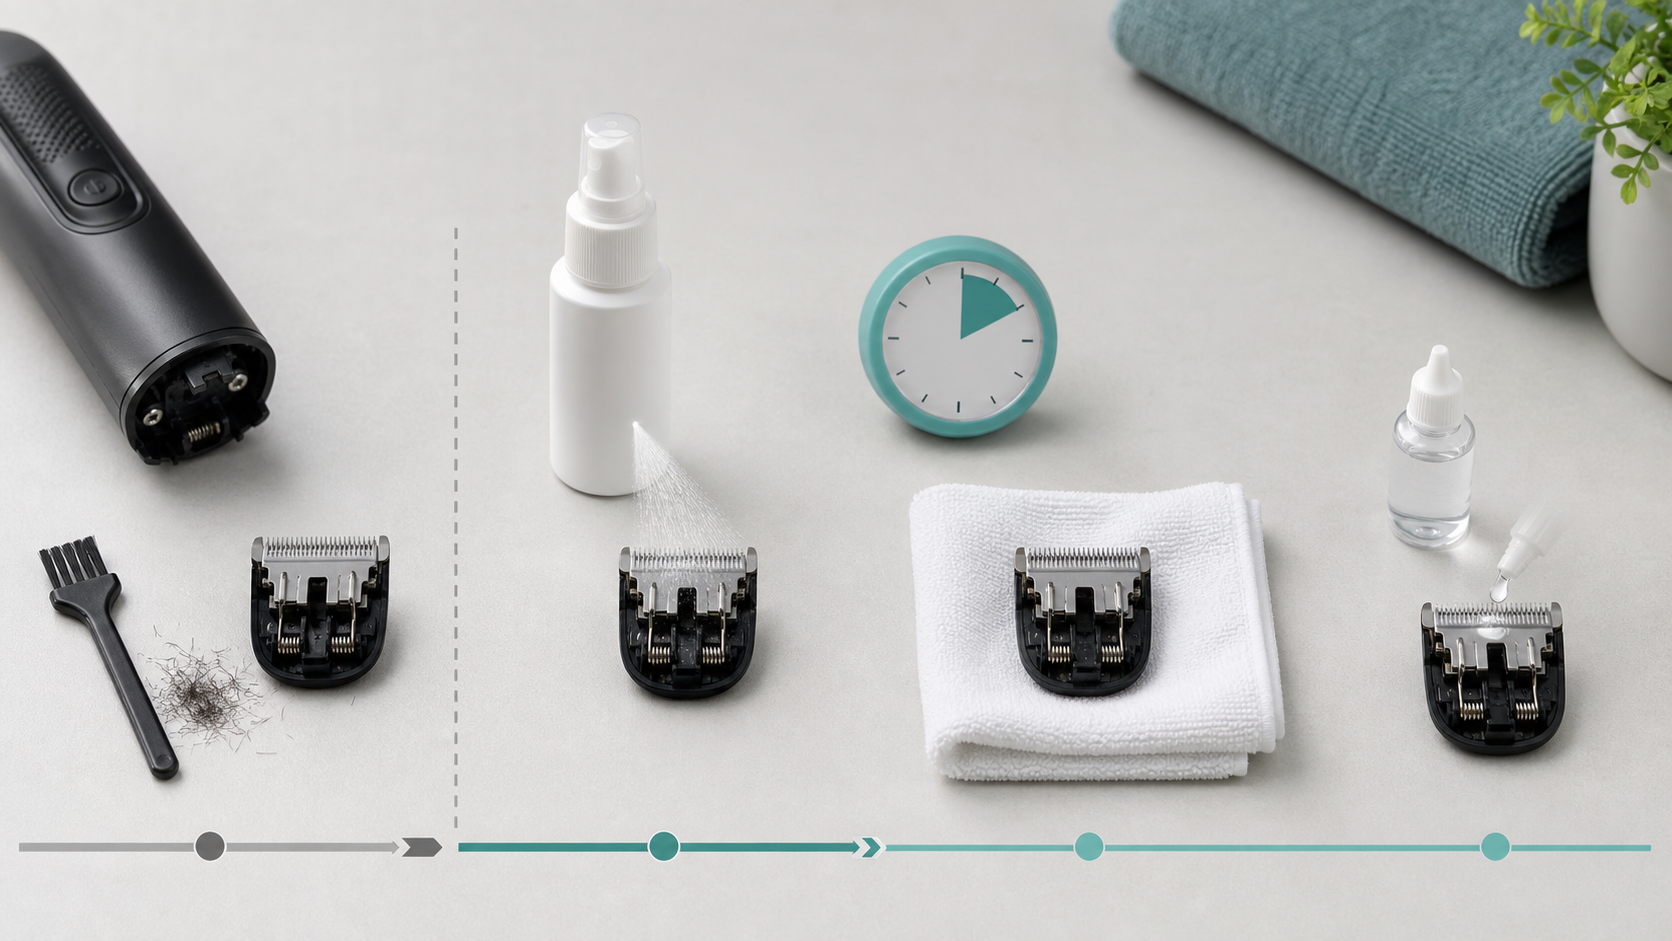
Direct answer: Switch the trimmer off and unplug it, remove loose hair with a dry brush, and clean the blade as its manual permits. Apply only a disinfectant whose label covers the blade material and intended use, keep the surface wet for the labeled contact time, then wipe, rinse, dry, and oil only as both instructions require.
Cleaning and disinfection are separate steps. Cleaning removes clipped hair, skin oil, product residue, and other visible soil. Disinfection uses a labeled chemical process on an already cleaned, compatible surface. Neither step means sterilization, and a general household recipe is not a substitute for the trimmer manual or the disinfectant label.
This guide focuses on a conventional removable or exposed metal trimmer blade. Foils, rotary heads, ceramic cutters, coated blades, sealed cartridges, charging contacts, and complete trimmer bodies can have different limits. If the exact model instructions do not identify a permitted disinfection method, contact the manufacturer instead of guessing.
Check Compatibility Before Applying Liquid
Read the complete trimmer model number and its cleaning section first. Determine whether the blade is fixed, screw-mounted, click-off, or part of a replaceable cartridge. Look for explicit directions about removing the blade, rinsing, spraying, wiping, dipping, drying, and lubrication. Words such as “washable head,” “wet and dry,” and “waterproof” do not automatically authorize the same treatment.
Next, read the disinfectant’s EPA registration information and full label. The US Environmental Protection Agency explains that the Directions for Use identify where a registered disinfectant may be used, how to apply it, and the required contact time. A product claim for a countertop or another nonporous surface does not automatically prove compatibility with a trimmer’s metal, coating, plastic carrier, adhesive, or motor housing. Use the product only where both sets of instructions agree.
Do not mix disinfectants or add soap, bleach, alcohol, oil, or another chemical unless the product label specifically tells you to do so. The CDC warns against mixing cleaning and disinfection products. Work with ventilation and any gloves or eye protection required by the label, and keep chemicals away from skin, eyes, children, pets, food, flames, and charging equipment.
Step 1: Power Down and Separate Clean From Used
Switch the trimmer off, disconnect the charger, and move it away from the sink. Let a recently used blade cool before handling it. Remove the guard and blade only through the documented release point. Do not press directly on sharp teeth, pry a sealed head, or loosen alignment screws merely to disinfect the tool.
Prepare two areas on a dry, well-lit surface: one for the used blade and brush, and one for the cleaned, fully processed parts. A disposable towel or washable tray can keep clipped hair from spreading across the workbench. Do not place a cleaned blade back onto a surface that still holds hair or used cloths.
If the blade cannot be removed, orient the unplugged trimmer so liquid cannot run into the housing. Wahl’s current professional blade-care instructions, for example, direct users of compatible tools to hold the unplugged clipper downward during spray application. That is a brand-specific example, not permission to spray every trimmer.
Step 2: Remove Hair and Visible Soil
Use the supplied dry brush to sweep hair from the teeth, blade edges, rails, and accessible mounting area. Brush away from openings in the handle. A blower, compressed air, pipe cleaner, or card should be used only if the model manufacturer permits it; uncontrolled air can push debris deeper into a tool or damage a delicate foil.
Follow the manual’s cleaning method for residue that brushing does not remove. Some removable heads can be rinsed, while other metal blades are dry-clean only. Never rinse a connected charger, charging port, or non-washable housing. If water is allowed, use the specified temperature and flow, then remove visible moisture before applying a product that requires a dry precleaned surface.
The CDC distinguishes cleaning from disinfection and states that surfaces should be cleaned before they are sanitized or disinfected because dirt can interfere with the chemical reaching the surface. For routine non-shared home use, cleaning may be the only step generally needed; disinfection becomes a separate decision based on sharing, illness, professional rules, contamination, and the manufacturer’s directions.
Step 3: Apply the Labeled Disinfectant
Confirm the label’s surface, dilution, application, ventilation, protective equipment, and contact-time instructions immediately before use. Apply the product to the blade by the permitted spray, wipe, or dip method. Do not improvise immersion because a detachable blade looks waterproof. Some tool manuals explicitly prohibit dipping or soaking the clipper or blade, while specific detachable-blade systems may document a controlled dip process.
Use enough product to meet the label without flooding the blade carrier or motor opening. If the label requires the surface to remain visibly wet, start timing after the blade is fully treated and keep it wet for the entire stated contact time. The EPA notes that contact time is the period the product must remain on the surface to be effective. Do not shorten it because the blade looks clean, and do not extend it beyond the tool or product instructions in an attempt to make the process “stronger.”
Wahl’s current Clini-Clip directions illustrate a complete manufacturer-specific sequence for compatible Wahl blades: use the product on an unplugged tool, allow the stated two-minute period, wipe excess, and follow with Wahl blade oil. This does not establish a two-minute rule for another product or another brand. The active product label and exact tool instructions always control.
Step 4: Finish the Label’s Wipe, Rinse, and Drying Steps
When the labeled contact time is complete, follow the required finish. Depending on the registered product and use site, that may mean air drying, wiping excess with a clean cloth, or rinsing. Do not invent a rinse step, and do not leave chemical residue when the label requires its removal.
Dry every permitted-to-wet component completely before reassembly, charging, storage, or skin contact. Place it on the clean side of the work area, not on the used towel. Inspect tooth gaps, screw recesses, springs, and the underside of removable heads for trapped moisture. Do not use heat, an oven, a microwave, or an open flame to accelerate drying.
If liquid entered the handle, charging port, battery compartment, or a non-washable opening, do not power or charge the tool. Follow the manufacturer support route. The charging-port inspection guide explains why metal tools and liquids should never be inserted into a port.
Step 5: Lubricate and Reassemble Only as Directed
Disinfection can remove protective oil from conventional metal blades. If the model instructions require lubrication, apply the named blade oil in the stated locations and amount after the blade is dry. Wipe excess from exterior surfaces. Do not use cooking oil, skin oil, essential oil, penetrating spray, or a disinfectant marketed as a lubricant unless the blade manufacturer approves that exact use.
Reinstall the blade and guard using their normal attachment points. Confirm that the blade sits evenly, the latch closes, and the guard does not rock or detach. The blade replacement guide covers model identity, seating, alignment, and a cautious first test; routine sanitation does not require changing alignment unless the manual says otherwise.
Run the trimmer briefly away from the face only after all parts are dry and secure. Stop for rattling, scraping, slowed movement, unusual heat, odor, visible corrosion, a loose blade, or damaged teeth. Do not use a damaged blade simply because it has been disinfected.
Home Use, Sharing, and Professional Service
A single user with an intact scalp and no contamination event may not need to disinfect a personal trimmer after every use; regular model-approved cleaning and drying may be the normal routine. The CDC notes that cleaning alone is often sufficient in ordinary home situations. Follow current public-health guidance when illness or a specific contamination concern changes that context.
For a shared household tool, use separate guards or tools when practical, and complete a compatible cleaning and disinfection process before another person uses it. Do not share a blade across broken skin, an active rash, or a known infection. This page does not diagnose skin conditions; pause use and seek appropriate professional advice when skin is inflamed, bleeding, painful, or infected.
Barbers and other licensed professionals must follow the current laws, board rules, workplace procedures, and product labels in their jurisdiction. A website article cannot replace local sanitation requirements. Use the barber cleaning supplies checklist to organize brushes, approved disinfectants, clean storage, and station separation without treating product ownership as proof of correct use.
Common Mistakes to Avoid
- Spraying disinfectant over hair and oil instead of cleaning first.
- Using a product because its marketing says “sanitizer” without checking the registered label, surface, method, and contact time.
- Assuming a detachable blade can be soaked or that a washable head permits handle immersion.
- Letting liquid run toward the motor, switches, battery, or charging port.
- Mixing products, reusing a visibly dirty cloth, or returning the blade to a contaminated surface.
- Wiping the blade before the labeled wet contact time is complete.
- Skipping drying or model-required lubrication before storage.
- Calling a cleaned or disinfected blade “sterile.”
Build the process into the broader beard trimmer cleaning and oiling routine. Keep the product label available, record the disinfectant name and expiration date in a professional setting, and replace brushes or cloths that cannot themselves be cleaned as required.
Frequently Asked Questions
Is cleaning a trimmer blade the same as disinfecting it?
No. Cleaning removes hair, oil, and visible soil. Disinfection uses a compatible registered product according to its label after cleaning. A blade can look clean without having completed a labeled disinfection process.
Can I soak every beard trimmer blade in disinfectant?
No. Some detachable blades permit a model-specific dip process, while other blade sets and complete tools must not be soaked. Follow both the trimmer manual and disinfectant label.
How long should disinfectant stay on a trimmer blade?
Use the contact time on the product label for the approved surface and purpose. Do not substitute a universal time. Keep the treated surface wet only as directed, then complete the label’s wipe, rinse, or drying step.
Should a trimmer blade be oiled after disinfection?
Follow the exact blade and disinfectant instructions. Many conventional metal clipper and trimmer blades require approved blade oil after the disinfectant step, but some cutter systems must not be oiled.
Sources and Claim Boundary
Primary references reviewed in July 2026: the EPA directions for registered disinfectants, the CDC cleaning and disinfection guidance, the Wahl Clipper & Trimmer Care guide, and the current Wahl Clini-Clip directions.
This page provides a generic decision and sequencing framework. It does not certify a disinfectant, report laboratory or hands-on testing, sterilize equipment, diagnose infection, or override a product label, tool manual, professional sanitation rule, or local law. Verify the current label and exact model before every chemical process.
