
Disclosure: This site may use affiliate links. Product specifications should be checked against manufacturer or retailer pages before purchase.
Direct Answer
Direct answer: To replace a beard trimmer blade, switch the tool off, disconnect charging power, identify the exact model and replacement part, remove the old head only as the manual directs, clean the mounting area, install and align the new part, then test it briefly without touching the teeth. Stop if the blade does not seat, sounds abnormal, pulls hair, or becomes hot.
Blade replacement is not universal. A detachable head may release by lifting a tab, a standard clipper blade may use mounting screws, and a sealed cutter may require authorized service. The safest method is the one written for the complete model number on your trimmer, not a method copied from a similar-looking tool.
Identify the Blade System Before You Start
Read the model label on the handle, charging base, or rating plate. Record every letter, number, and regional suffix. Manufacturers may sell several products under one family name while using different blades, screws, release switches, chargers, or alignment rules. Search the manufacturer’s parts catalog or support page with that exact identity.
A replacement listing should state the compatible models, blade type, and included hardware. If the seller lists only a brand or broad series, ask for the manufacturer’s part number. Do not assume a head fits because the width and mounting points look similar in a photo. A nearly matching part can sit crooked, move against the wrong surface, or expose teeth beyond the safe relationship intended by the manufacturer.
The official Wahl FAQ illustrates why model-specific instructions matter: detachable heads and screw-mounted standard blades use different removal and alignment steps. Philips also publishes a separate OneBlade replacement procedure for handles with and without a release switch. These examples are references, not universal instructions for another brand or model.
Tools and Preparation
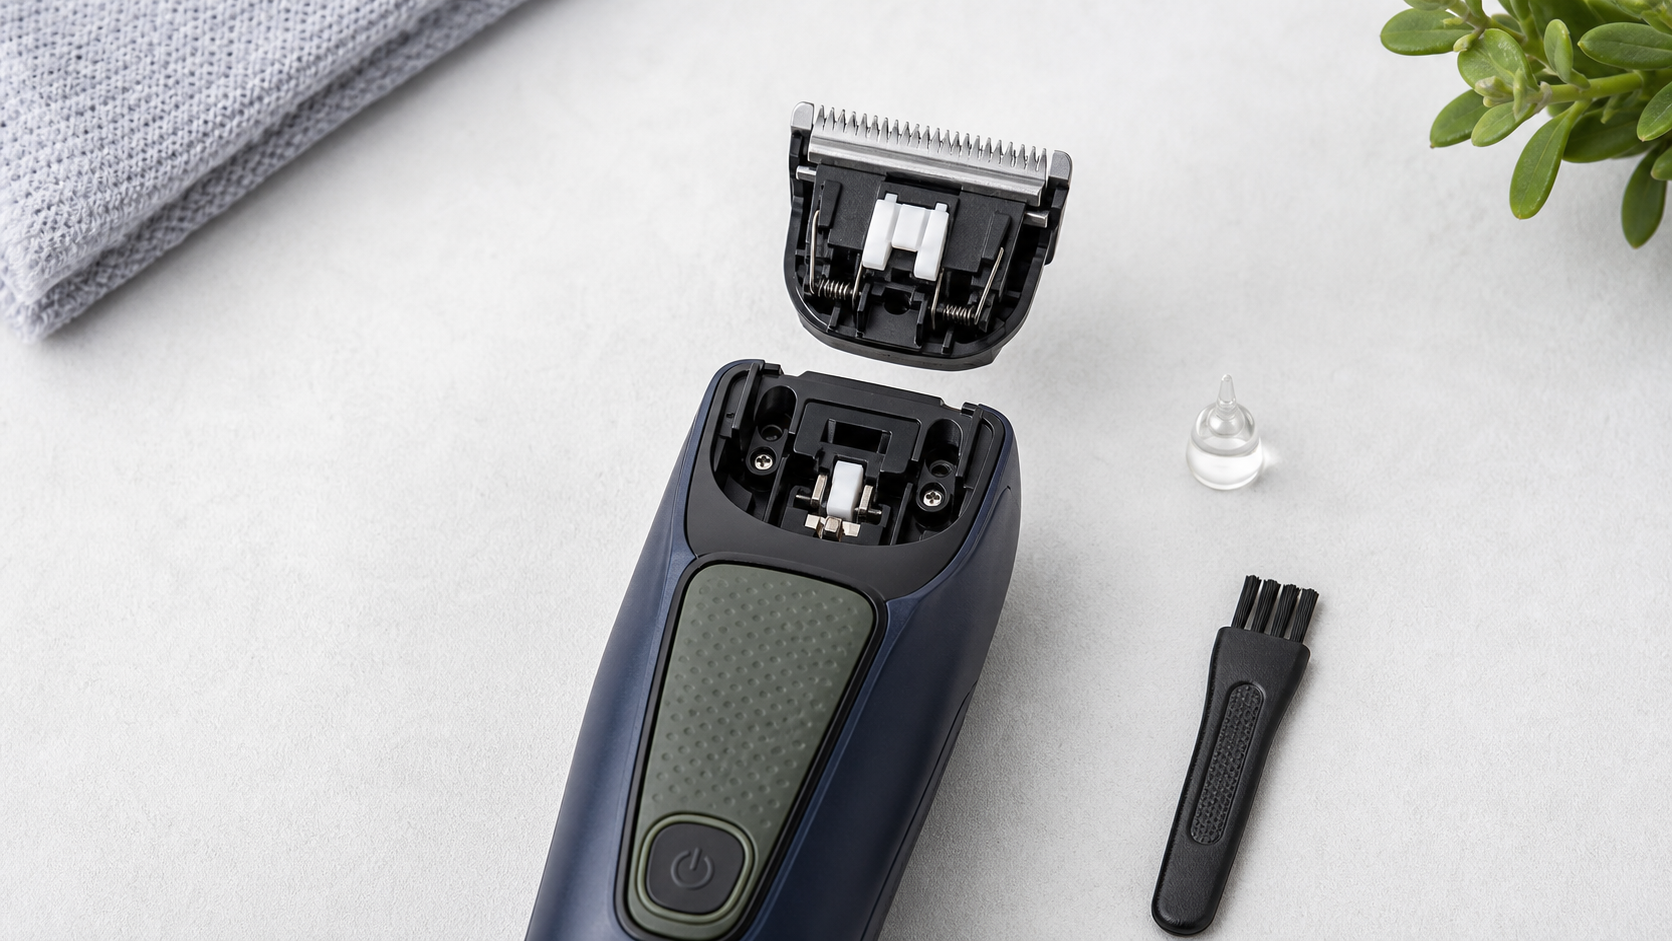
Work on a clear, dry, well-lit surface. Keep a small tray or folded light-colored towel under the trimmer so screws cannot roll away. Gather the exact replacement blade, the supplied instructions, a cleaning brush, and only the screwdriver or oil named by the manual. Do not improvise with an oversized driver that can strip a screw head.
- Switch the trimmer off and disconnect the cable or charging stand.
- Remove the guard comb and brush loose hair away from the head.
- Photograph the original blade position before loosening anything.
- Confirm that the replacement package includes every required screw, spring, tab, or spacer.
- Inspect the new blade for bent teeth, chips, corrosion, or shipping damage.
Do not handle sharp teeth more than necessary. Hold a detachable cutter by the sides or the location shown in its instructions. If the unit has a removable battery, follow the manual rather than opening the housing. Blade replacement does not authorize battery repair, wiring changes, or bypassing safety interlocks.
Remove the Old Blade by System Type
Click-off or detachable head: Hold the handle securely and release the head at the designated edge, tab, or switch. Do not twist the teeth sideways. Some heads lift straight off; others pivot from a rear tab. If normal hand pressure does not release it, stop and confirm the model instructions.
Screw-mounted blade set: Keep the trimmer flat, support the blade, and loosen screws gradually. Note the order of the moving blade, fixed blade, guide, spring, and screws. Avoid turning the tool on while the screws are loose. Clean loose hair from the exposed mounting area with a dry brush, but do not push debris into the motor opening.
Foil or cartridge cutter: Release only the outer cassette or component identified as user-replaceable. Foils are thin and can deform under finger pressure. A rotary head may have retainers that must return to a specific position. Use the model manual and do not transfer clipper alignment steps to a foil or rotary assembly.
If you are unsure whether the tool is a trimmer, clipper, or shaver, use the trimmer, clipper, and shaver comparison before ordering a part.
Install and Align the Replacement
For a click-on head, align the rear tab or mounting channel first, then press only where the instructions show until the head sits evenly or clicks. Pull gently at the sides to confirm it is locked. A head that rocks, tilts, or leaves a visible gap is not ready to run.
For a screw-mounted set, place the moving and stationary blades in the documented order. Start both screws by hand before tightening either one. Keep the blade movable enough to align, then compare tooth position with the manufacturer’s diagram. Alignment is a safety issue: the moving teeth generally must not project beyond the stationary teeth, but the exact offset and side relationship vary by model.
Tighten screws evenly and only enough to secure the set. Excess force can strip threads or distort a bracket. Move the adjustment lever through its range while the tool is off and check that the blade remains seated. If the lever binds or the blade shifts, loosen, realign, and recheck rather than forcing it.
Use the guard-size guide to confirm that guards still attach securely after replacement. A blade can be correctly mounted while an incompatible guard remains unsafe or gives the wrong length.
Oil, Test, and Stop Conditions
Follow the exact lubrication instruction. Many conventional metal blades use one or a few small drops of clipper oil across the moving contact area, followed by a short run and a wipe of excess. Other cutter systems are designed to run without oil. Do not use cooking oil, skin oil, penetrating spray, or an unspecified household lubricant.
Before trimming hair, hold the tool away from the face and switch it on briefly. Listen for a steady sound and watch for smooth movement. Switch it off immediately if the blade rattles, strikes another part, slows the motor, smells hot, or shifts in its mount. After a short test, check for unusual heat without touching the teeth directly.
Make the first hair test with a longer guard on a small, easy-to-see area. Use light pressure. Pulling can come from incorrect alignment, a wrong part, debris, missing oil where required, a loose guard, or a damaged cutter. The trimmer-pulling troubleshooting guide explains the checks to make before cutting more hair.
Stop using the tool if any tooth is bent or broken, the housing is cracked, the cord or plug is damaged, the battery is swollen, the blade will not lock, or abnormal heat persists. Contact the manufacturer or an authorized service route rather than repeatedly powering a questionable assembly.
Care After Replacement
Brush away hair after each use and follow the model’s cleaning limits. “Washable,” “rinseable head,” “wet and dry,” and “waterproof” are not interchangeable. Keep the handle out of water unless the exact instructions allow immersion. Let rinsed components dry fully before storage or reassembly.
Record the part number and replacement date. A maintenance note helps you identify unexpectedly rapid wear and reorder the correct component later. Store spare blades in their original protective package, away from moisture and loose metal objects. Keep guards supported so their teeth do not bend.
For the broader routine, use the cleaning and oiling guide. Manufacturer instructions remain controlling whenever that general guide differs from the exact model.
Frequently Asked Questions
Can every beard trimmer blade be replaced at home?
No. Some heads click off, some blade sets use screws, and some sealed tools require manufacturer service. Use the exact model manual before removing anything.
How do I know which replacement blade fits?
Match the complete model number and regional suffix to the manufacturer’s parts list. A similar shape, brand family, or marketplace title is not enough.
Should I oil a new beard trimmer blade?
Follow the exact manual. Many metal clipper and trimmer blades need a small amount of approved oil, while some replaceable cutter systems require no oil.
What should I do if the new blade pulls hair?
Switch the tool off, confirm the part number, seating, alignment, cleanliness, and lubrication instructions. Stop if teeth are damaged or the tool becomes unusually hot.
Claim Boundary
This guide provides generic maintenance sequencing and model-verification checks. It does not replace the exact manufacturer’s instructions, authorize opening a sealed housing, report hands-on testing, guarantee compatibility, or provide medical or electrical repair advice. The model manual, part listing, current tool condition, and manufacturer support route control the final procedure.
