
Disclosure: This site may use affiliate links. Product specifications should be checked against manufacturer or retailer pages before purchase.
Direct Answer
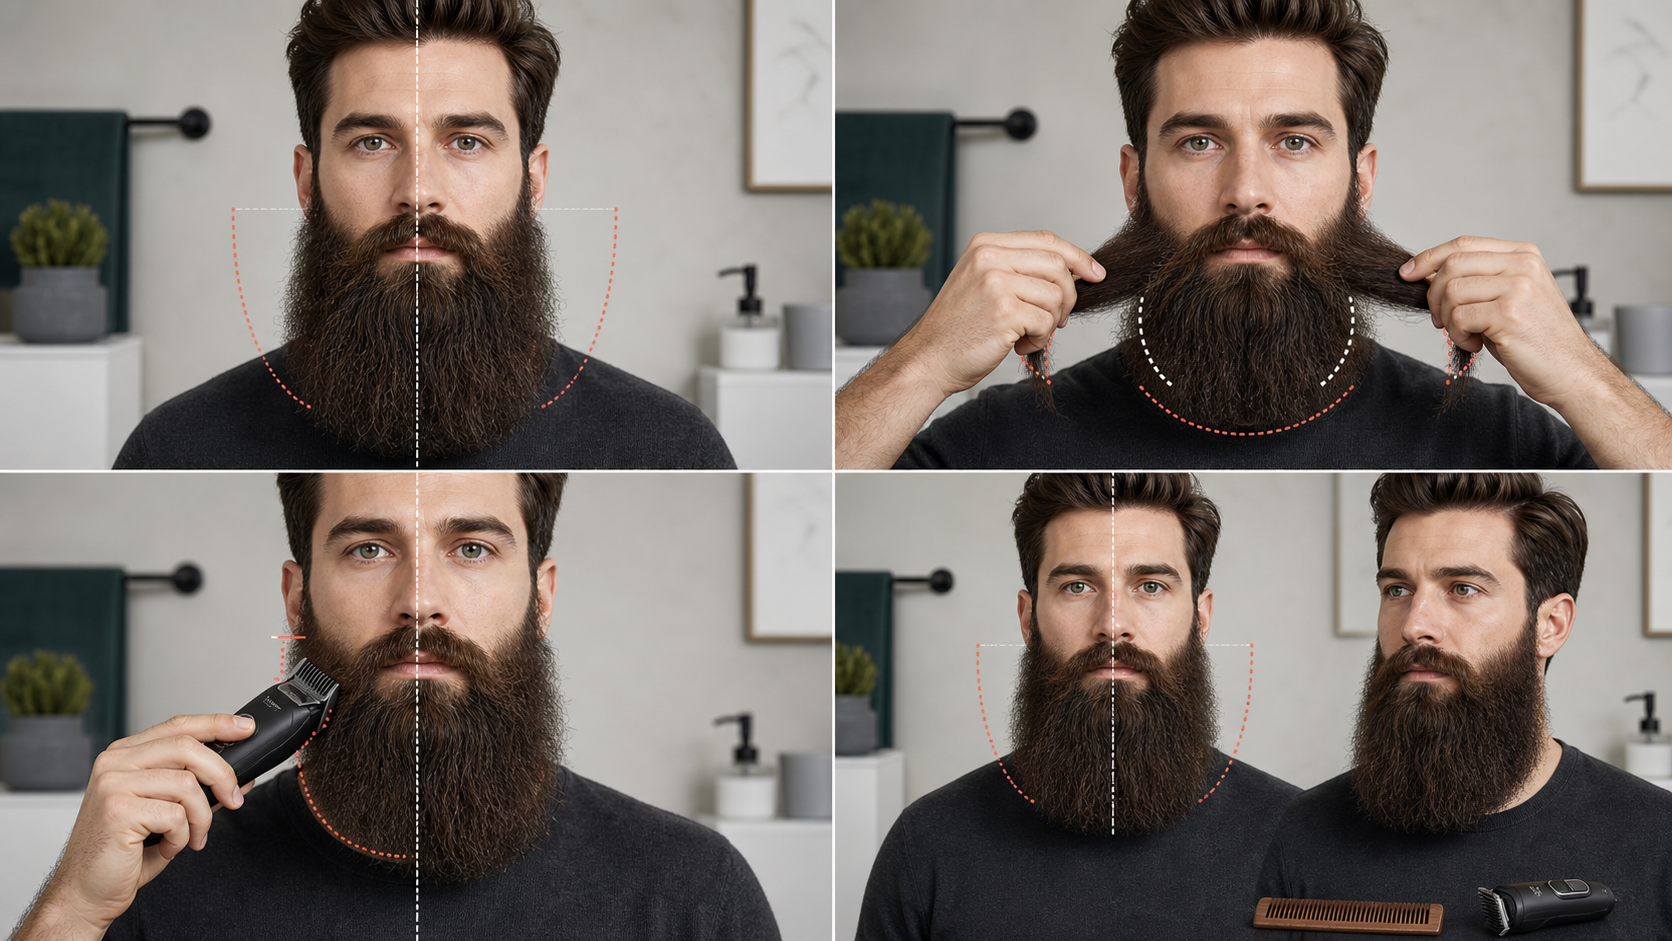
Direct answer: Keep a long beard even on both sides by preparing its normal dry shape, marking a stable centerline and matched landmarks, separating hanging outer hair from shorter supporting layers, and identifying one confirmed longer section. Leave the reference side untouched, make one small longer-first correction, then switch off, clear, recomb, release, and compare the complete silhouette before trimming again.
Even does not mean mathematically identical. Facial structure, density, curl, growth direction, old damage, and intentional style can differ from side to side. The goal is a coherent released shape around shared landmarks, not equal strand counts, equal skin visibility, or forced removal from both sides.
Why Long-Beard Symmetry Needs Its Own Guide
A medium beard can often be compared through cheek, jaw, and chin zones close to the face. A long beard adds hanging outer panels, crossing hair, hidden supporting layers, a larger central chin projection, jaw-corner anchors, and ends that move when posture, combing, humidity, or hand tension changes.
The medium-beard symmetry guide explains matched facial zones and alternating checks. This page adds hanging-length ownership, outer-versus-underlayer protection, lowest-point records, center projection, long-beard release time, reference-side preservation, and one-sided micro-corrections.
Prepare the Natural Dry Shape First
Complete the long-beard preparation workflow. Remove heavy residue when needed, let the roots and underlayers dry, detangle from the ends in supported sections, clear loose hair, and let the complete beard hang without bands, clips, strong pulling, or persistent hand shaping.
Use the normal state in which the beard will be worn. A wet, stretched, tightly compressed, heat-straightened, or heavily styled beard can create a temporary symmetry that changes after release. Record the preparation state so later comparisons use the same reference.
Use Neutral Posture and Repeatable Lighting
Stand upright with shoulders level, jaw relaxed, eyes forward, and neck neither extended nor tucked. Use diffuse front lighting plus enough side light to reveal the outline. Avoid a single overhead light that deepens one side or a window that makes one edge disappear.
Mark the floor position, mirror distance, camera height, and head position when photographs are used. A phone held closer to one cheek can make that side look wider or longer. Compare front, left profile, right profile, and three-quarter views from matched distances.
Establish a Stable Centerline
Use the facial midline from the center of the nose, philtrum, lower lip, and central chin as an observation reference. Do not draw a cutting line through the beard. The beard’s lowest point can sit slightly off the facial center because of density, curl, growth direction, or the intended style.
Record whether the central chin projection is intentionally centered, angled, rounded, square, forked, or asymmetric. Protect that design decision before comparing side length.
Mark Matched Long-Beard Landmarks
| Matched landmark | Compare after release | Do not force |
|---|---|---|
| Upper side panels | Outer width and cheek connection | Equal skin visibility in different densities |
| Lower side panels | Hanging width and jaw transition | Identical curl or strand direction |
| Jaw corners | Projection, turn, and chin connection | Removal of a natural facial difference |
| Central chin | Lowest point, width, and projection | Shortening the main anchor to match side ends |
| Under jaw | Left, center, and right front contribution | One flat line across different growth zones |
| Sideburn transitions | Connection height and visible bulk | Same density or hairline anatomy |
Use several landmarks together. One projecting curl or transparent edge is not enough to declare the entire side longer.
Separate Length, Width, Density, and Curl
A side can look larger because it is longer, wider, denser, curlier, more forward, or better lit. Record hanging length from a matched root zone, silhouette width, density transition, and curl direction separately. Trimming length cannot safely equalize every category.
Do not repeatedly shorten the denser side until equal skin is visible. Do not remove width when the actual mismatch is one longer outer section. Name the difference before selecting a correction.
Trace Crossing Hair to Its Source
Long hair from one cheek or chin zone can hang across another. Support one small section near its middle, trace it gently to the root, then release it. Assign it to the source zone even when its end appears on the opposite side of a visual boundary.
The long-beard grain guide explains root, middle, and released-end direction. This prevents an apparent right-side projection from being trimmed when it is actually center or left-side hair crossing the midline.
Separate Outer Panels From Supporting Underlayers
Lift only enough outer hair to see the shorter supporting layer beneath. The underlayer may preserve side width, cover a lighter-density area, support the jaw connection, or hold the central chin shape. Record its shortest retained length before choosing a guard or path.
Do not place outer and underlayer hair into one guard merely to make the sides look equal quickly. A single pass can remove hidden structure while leaving the visible ends nearly unchanged.
Protect Structural Anchors
Mark the central chin point, both jaw corners, maximum side widths, mustache connections, cheek boundaries, neckline, and intentional projection. These are no-pass anchors until the comparison proves that a specific anchor itself requires adjustment.
The long-beard length-preservation guide covers staged anchor control. Symmetry work should not shorten both jaw corners or the chin point because one loose end projects beyond the outline.
Create a Matched-Zone Record
For each left-right pair, record the source root zone, released endpoint, outer width, local direction, shortest protected underlayer, structural role, and confidence that the difference persists after recombing. Use “uncertain” rather than guessing.
A zone becomes a correction candidate only when the mismatch is visible in more than one matched view, survives at least two release cycles, and can be isolated without capturing protected hair.
Let the Beard Settle Before Judging
After combing, lifting, clothing contact, or changing posture, let the beard hang and settle. Gently move the head through normal positions, return to neutral, and wait for compressed sections to release. Curly, coarse, or dense hair may need more time.
Do not compare one side while freshly combed downward and the other after it has sprung back. Use the same preparation, combing, release time, posture, light, and viewing distance.
Choose and Preserve a Reference Side
The shorter or better-shaped side is usually the reference, not an automatic cutting target. Record its silhouette, jaw corner, chin connection, and lowest side-panel point. Keep that side untouched during the first correction.
Alternating full passes on both sides can move the target repeatedly and shorten the entire beard. One fixed reference preserves a visible stopping point.
Confirm the Difference Is Removable Length
Trace the projecting section to its root and release it again. Confirm that it belongs to the matched longer zone, lies outside the intended silhouette, and is not an anchor, density support, curl transition, or crossing section from another area.
If the difference disappears when posture and release are standardized, no correction is needed. If it comes from facial anatomy or density, changing length may make the shape less coherent.
Verify the Exact Tool and Longest Compatible Setup
Identify the complete trimmer model, cutting head, guard, and documented setting. Confirm secure attachment, intended contact surface, clearing method, and direction instructions. The long-beard guard guide explains protected floors and one-section tests.
The current Philips Multigroom manual illustrates model-dependent guards, settings, attachment, movement, and clearing for covered models. Its range and instructions do not transfer to another tool.
Use a Comb Only as an Observation Aid
A comb can reveal an outer line and support a section, but pulling the beard taut creates a stretched measurement. Use light contact, keep the roots natural, and release the section before judging the result.
Do not use a comb as an improvised cutting guard unless a documented controlled technique and sufficient skill support that method. This workflow uses a verified guarded setup for a small outer-section correction.
Select One Low-Risk Correction Section
Choose a small dense outer section on the confirmed longer side. Avoid the central chin, jaw corner, mustache connection, neckline, lighter-density patch, crossing hair, and hidden underlayer for the first correction.
Record the starting point, endpoint, source zone, retained floor, guard and setting, local direction, and stop boundary. If the section cannot remain isolated and visible, do not trim it.
Run the Assembled Tool Away From Hair
Install the verified attachment with the tool off and disconnected from charging power. Confirm that it sits level, locks securely, and holds the chosen setting. Run it away from the beard and stop for unusual rattle, vibration, speed change, blade contact, odor, heat, unstable power, or guard movement.
The trimmer pulling guide covers blade, cleanliness, lubrication, power, and guard checks. Do not use long beard hair to diagnose a questionable tool.
Make One Small One-Sided Correction
Keep the reference side untouched. On the confirmed longer outer section, use light stable handling and one short visible pass within the exact model instructions. End before the structural boundary, move the tool away, and switch it off.
Do not cross the centerline, continue around the jaw corner, tilt the guard to reach hidden hair, press harder, or repeat immediately. The correction should test one variable only.
Clear Clippings and Reconfirm the Setup
Long clippings can bridge guard teeth and change hair admission. With the tool off, clear the guard and cutter only as the manual permits. Reconfirm the guard identity, attachment lock, and setting before another pass.
Use the cleaning and oiling guide for general maintenance boundaries. Water exposure, blade removal, brushing, lubrication, and chemical use remain model-specific.
Recomb, Release, and Compare the Whole Beard
Recomb both sides with the same light sequence, release all tension, return to neutral posture, and let the beard settle. Compare the front, profiles, three-quarter views, under jaw, jaw corners, central chin, and side widths with the starting record.
Do not judge only the corrected patch. A locally straighter edge can expose an underlayer, narrow one side, alter the chin connection, or make the opposite side appear different.
Require Confirmation in Two Matched Views
Before another correction, require the remaining mismatch to appear in at least two matched views, such as front plus three-quarter or front plus profile. Confirm that the same source section remains responsible after another release cycle.
A difference visible only in one angled photo can be perspective, lighting, curl orientation, or camera distance. Do not chase it with repeated cutting.
Correct the Smallest Confirmed Difference
If a mismatch remains, correct only the smallest clearly longer outer section. Preserve the reference side and all no-pass anchors. Repeat the full off-tool clearing, recombing, release, posture reset, and multi-view comparison.
Stop when the silhouette reads coherently. Do not keep shortening until every loose strand ends on an imaginary line.
Preserve Natural and Intentional Asymmetry
One cheek may be denser, one jaw corner may project farther, one side may curl inward, or the beard may intentionally sweep to one side. These can be part of a balanced style. Record them as retained decisions rather than defects.
Symmetry is a relationship between beard and face, not a demand that both halves contain identical hair. A skilled barber can help when structure, density, or freehand shape work exceeds a controlled guarded correction.
Handle the Central Chin Separately
The central chin often owns the lowest and most projected portion of a long beard. Compare its center, width, and connection to each jaw, but do not divide it into two independent side targets. Protect it during side-panel corrections.
If the chin leans or forks, map root ownership and natural split before cutting. A side correction cannot safely repair an unresolved central structure.
Map the Under Jaw in Multiple Zones
Use left, center, and right under-jaw zones at minimum. Hair rooted there may support the front chin, side width, or neckline transition. Compare matched source zones rather than cutting one horizontal line beneath the beard.
The beard neckline guide treats boundary placement separately. Do not raise or flatten the neckline to make hanging side lengths look equal.
Allow More Release Time for Curly or Coarse Hair
Curly or coarse sections can compress during combing, spring back at different rates, and hide shorter support hair. Work in smaller sections, clear more often, and allow longer settling time. Compare natural dry shape rather than stretched length.
The curly medium-beard guide explains spring-back and section release. Long-beard symmetry adds crossing-hair ownership, hanging panels, and protected anchors.
Common Long-Beard Symmetry Errors
- Comparing a wet or stretched side with a naturally released side.
- Using unequal light, camera distance, head angle, or shoulder position.
- Calling density, curl, or facial structure a length problem.
- Ignoring crossing hair and trimming it in the wrong source zone.
- Capturing a shorter supporting layer with the outer panel.
- Shortening both sides during every pass and losing the reference.
- Starting at the central chin, jaw corner, or lighter-density area.
- Repeating before clearing, recombing, releasing, and comparing.
- Chasing one angled photograph or one loose strand.
- Forcing mathematical symmetry onto an intentional style.
Repeatable Long-Beard Side-Balance Sequence
- Prepare and record the normal dry released shape.
- Standardize posture, lighting, mirror distance, and camera position.
- Mark the centerline and matched long-beard landmarks.
- Separate length, width, density, curl, and facial structure observations.
- Trace crossing hair to its source zone.
- Separate outer panels from protected supporting underlayers.
- Mark chin, jaw, width, mustache, cheek, and neckline anchors.
- Choose the shorter or better-shaped side as the untouched reference.
- Confirm one mismatch survives two release cycles and two views.
- Verify the exact model, head, guard, setting, and instructions.
- Select one low-risk outer correction section.
- Run the assembled tool away from hair.
- Make one short correction on the longer side only.
- Switch off, clear, recomb, release, and compare the whole beard.
- Stop when the shape is coherent or the difference is structural.
Stop Conditions
Stop when the mismatch disappears after release; belongs to density, curl, direction, anatomy, or intentional style; requires shortening a protected chin or jaw anchor; or cannot be isolated without crossing hair and supporting layers.
Also stop when the cutter path is hidden, the guard shifts or captures protected hair, blade teeth are damaged, the tool pulls or behaves abnormally, the method requires force, or skin is painful, broken, bleeding, swollen, or actively irritated. This page does not diagnose skin or hair conditions.
Frequently Asked Questions
How can I tell which side of a long beard is actually longer?
Release the dry beard in neutral posture and compare matched root zones, outer side width, jaw corners, lowest hanging points, and central chin projection in the same light. Trace crossing hair to its source and repeat the comparison after recombing before calling one side longer.
Should both sides of a long beard be perfectly identical?
No. Facial structure, density, curl, growth direction, and the beard’s intended style can differ naturally. Aim for a coherent released silhouette around shared landmarks, not identical strand counts, skin visibility, or compressed measurements.
Which side should I trim first when balancing a long beard?
Keep the shorter or better-shaped side untouched as the reference. On the confirmed longer side, test one small outer section with the longest verified compatible setup, then clear, recomb, release, and compare the complete beard before another correction.
When should I stop trying to make a long beard even?
Stop when the difference disappears after release, belongs to natural density or curl, requires shortening a protected chin or jaw anchor, hides the cutter path, captures supporting layers, or continues to shift after repeated combing and posture resets.
Sources and Claim Boundary
Primary references reviewed in July 2026 are the linked Philips Multigroom manual and current Philips OneBlade trimming guidance. They support exact-model guard identification, model-dependent settings, secure attachment, combing in natural growth direction for covered workflows, longer-setting familiarization, gentle movement, and clearing accumulated hair.
This page applies those bounded principles to a generic layered long-beard symmetry workflow. It reports no hands-on testing, defines no universal measurement, guard, direction, pressure, pass count, or ideal facial symmetry, and does not guarantee comfort, density, growth, performance, or a particular result. Natural anatomy and the released beard remain valid constraints, and the exact model manual controls.
