
Disclosure: This site may use affiliate links. Product specifications should be checked against manufacturer or retailer pages before purchase.
Direct Answer
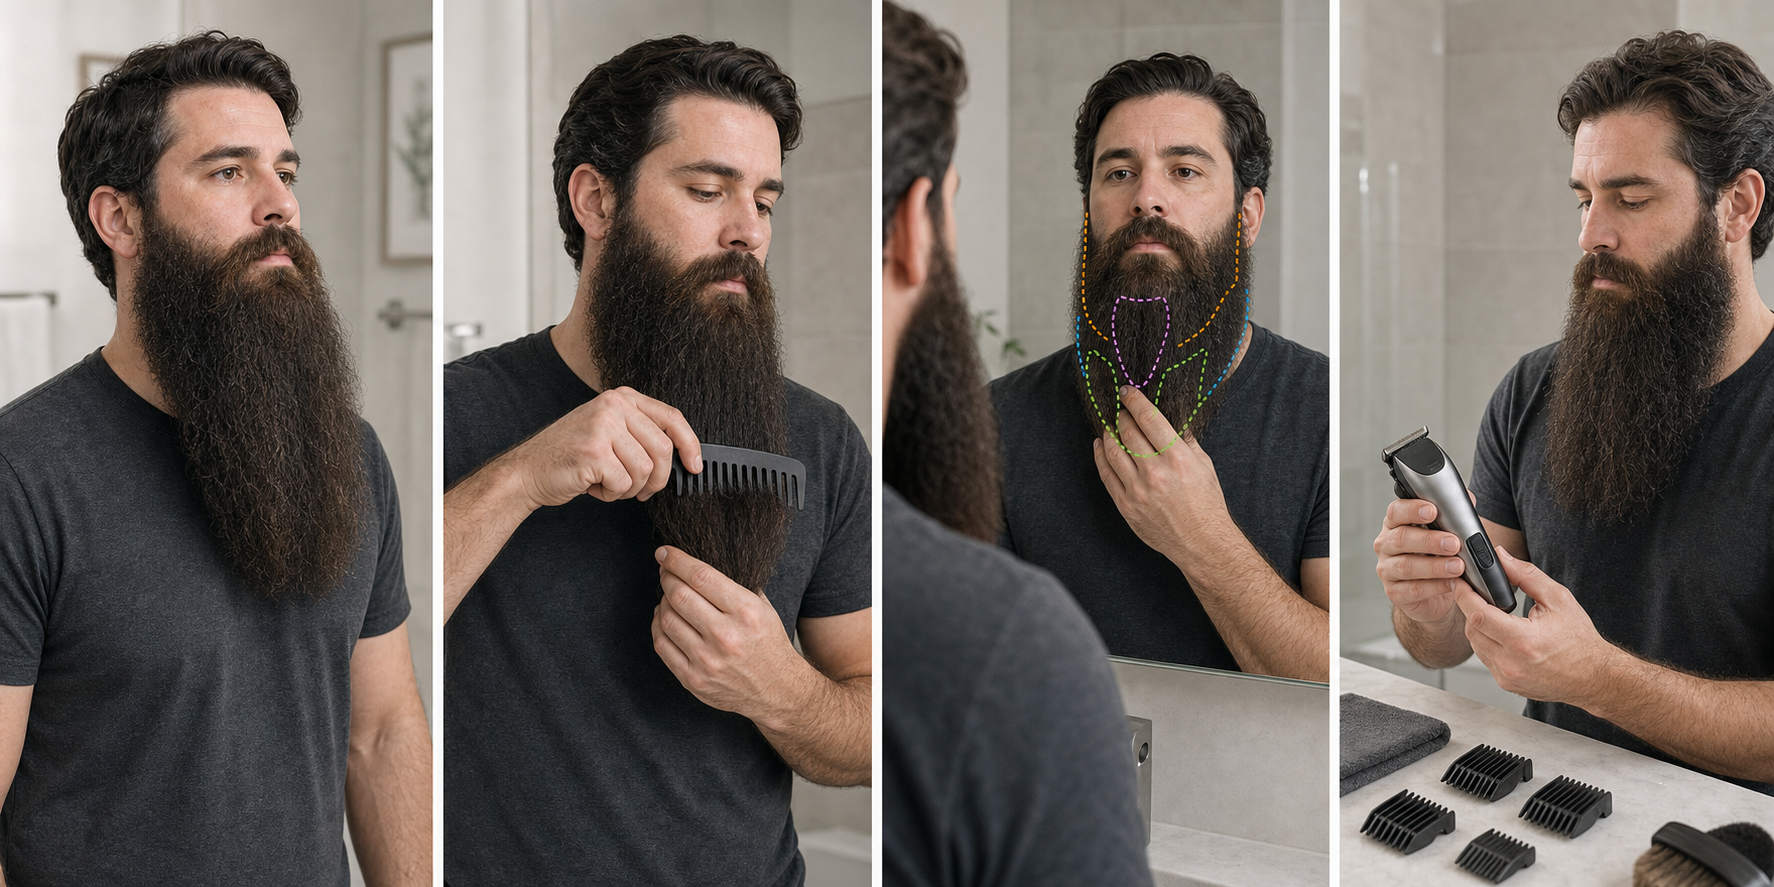
Direct answer: Prepare a long beard for trimming by removing heavy product, letting it dry and settle naturally, detangling small supported sections from the ends, and mapping outer length, shorter underlayers, grain, and protected shape. Inspect the trimmer and every guard off the face, define the minimum length to keep, then plan one longer-setting test section before any full pass.
This is a long-beard preparation workflow, not a cutting schedule or promised result. It does not prescribe one wash product, straightening method, guard, direction, pressure, style, or trim frequency. The exact tool manual and the intended dry worn shape control the setup.
Why a Long Beard Needs Its Own Preparation Method
A long beard is not simply a medium beard with more millimeters. Outer hair can hang across several growth zones, hide a shorter structural underlayer, collect product, form knots away from the skin, and change apparent length when lifted or released. The central chin, jaw corners, side panels, mustache, and under-jaw volume may contribute to one silhouette while retaining different natural lengths.
The medium-beard preparation guide focuses on a compact shape that can usually be mapped close to the face. This long-beard workflow adds hanging-length records, layer isolation, end-first detangling, protected projection, tool-reach checks, staged section plans, and a no-cut baseline photograph. It is not a longer keyword copy of the medium page.
Define the Result Without Starting the Trimmer
Write a narrow objective before washing, combing, or choosing a guard. Examples include reducing only a lower outer shelf, restoring a visible jaw transition, clearing split or visibly damaged ends for later scissor work, or preserving central chin projection while controlling side bulk. “Make it neat” is not a measurable target.
Mark what must not change: minimum central length, cheek coverage, side width, mustache connection, jaw corners, neckline, and any lighter-density zone. Use the beard-style shaping guide only to name a shape boundary, not to force a face-shape prescription. The long-beard trimmer checklist covers tool range and reach; preparation decides whether the task belongs to a guarded trimmer at all.
Record the Natural Dry Baseline
Before changing the beard, stand in stable front, profile, and three-quarter light. Let it hang without hand tension. Record the lowest central point, each jaw corner, side width, cheek boundary, under-jaw drop, and where outer hair crosses into another zone. A simple photograph is a reference, not proof of a result.
Note today’s product, moisture, recent washing, clothing contact, wind, and brushing because each can change how long hair groups. Use the same posture and camera distance for later comparison. Do not measure a pulled strand and call that the final worn length.
Remove Heavy Product Without Scrubbing the Beard
Sticky balm, wax, heavy oil, fibers, and styling paste can bind several hairs into one false section and clog a guard. Clean the beard and skin with a method suitable for the person and product, then rinse as directed. Avoid aggressive scratching, repeated degreasing, or introducing a new product immediately before a precision trim.
The American Academy of Dermatology’s healthy-beard guidance emphasizes care for both facial hair and the skin beneath it. This page uses that source for general cleaning, combing, and skin-observation boundaries, not for a universal product or cutting prescription.
Let the Beard Dry and Release Fully
For a dry guarded method, wait until the roots, underlayer, mustache, jaw corners, and dense central section are dry, not only the visible surface. Pat rather than rub when appropriate, then allow enough time for the beard to return to its normal worn shape. Damp long hair can hang lower, group more tightly, or hide volume that returns later.
The current Philips OneBlade support page instructs clean, dry preparation for the covered products and says model-specific combs and instructions vary. That is a product-family example. A wet-capable device does not automatically make wet length the correct reference for a long-beard shape.
Detangle From the Free Ends in Small Sections
Support one small section above the working area with the tool still off. Begin at the free ends with clean fingers or a suitable wide-tooth comb, clear a short distance, then move gradually toward the base. Stop at resistance, separate the knot, and reduce the section rather than pulling the complete beard straight.
Braun’s beard care guide discusses combing to untangle knots. It also contains marketing and generalized style language that is not adopted here. Detangling prepares visible sections; it does not authorize cutting under tension or guarantee comfort.
Release Every Section Before Measuring It
After a section is free of obvious tangles, remove hand and comb tension. Let the hair settle, then observe its hanging endpoint and contribution to the complete silhouette. Repeat this release after every preparation change.
Do not flatten, stretch, heat-straighten, or band the beard merely to create a uniform measurement. A stretched section can expose shorter underlayers and encourage a cut that becomes unexpectedly short when the hair returns to its usual form.
Separate Outer Length From the Structural Underlayer
Lift only enough outer hair to see what lies beneath. Map where the long outer layer begins, where shorter structural hair supports it, and which crossing hairs originate from another zone. Work from one side panel toward the chin rather than lifting the entire beard at once.
The distinction matters because a guard can admit a hanging outer section and a much shorter underlayer in the same pass. Long-beard preparation should reduce that uncertainty before the cutter runs. The curly medium-beard workflow explains related spring-back behavior, but this page remains focused on pre-trim mapping for any long-beard texture.
Map Hanging Length by Zone
| Zone | Record before trimming | Protect from accidental crossover |
|---|---|---|
| Side panel | Outer endpoint, width, density transition | Cheek line and lighter upper growth |
| Jaw corner | Where side length turns toward the chin | Hidden underlayer and ear-side connection |
| Central chin | Lowest natural point and projection | Shortest length you refuse to lose |
| Under jaw | Base direction, released drop, neckline | Blind cutter path and crossing chin hair |
| Mustache | Lip clearance and beard connection | Lip, nose, and unsupported free ends |
Record natural endpoints rather than assigning one number to the complete beard. Several zones can look equally long from the front while retaining different lengths and directions.
Map Root Grain Separately From End Travel
Trace small sections back to where they grow. The direction at the skin can differ from where a long end hangs. Mark cheek, sideburn, jaw, chin, under-jaw, mustache, and neck directions separately.
This map is preparation evidence, not an instruction to run the tool in every direction. The exact manual controls allowed orientation and guard contact. Direction changes should be deliberate only after a test, clearing, release, and reassessment.
Identify Protected Shape Anchors
Choose stable landmarks that must survive the trim: central chin point, two jaw corners, maximum side width, mustache-to-beard connection, cheek line, neckline, and any intentional asymmetry. Mark them mentally or on a private reference image without putting a running tool near the boundary.
Compare structure, not darkness. Density, curl grouping, lighting, and facial shape can make equal endpoints appear different. Preparation should prevent overcorrection, not promise identical sides.
Check Skin and Hair Stop Conditions
Use bright light to inspect the skin beneath separated sections without scraping it. Stop over painful, broken, bleeding, swollen, crusted, or actively irritated skin. Pause for sudden or unexplained hair loss, a new patch, or symptoms that require qualified advice.
Do not use trimming to diagnose or treat a skin or hair condition. AAD guidance supports caring for the skin beneath a beard; it does not replace individual medical evaluation.
Match the Tool to the Planned Long-Beard Task
Confirm the exact trimmer model, blade or head, compatible guards, documented length range, power mode, wet-or-dry limits, and care instructions. A tool suited to edges may not have the guard depth, opening, or control needed for long bulk.
The beard trimmer buying guide explains how to evaluate range, adjustment, service, and maintenance without unsupported rankings. If the planned retained length exceeds the documented system, change the method or seek appropriate help rather than improvising an attachment.
Inspect the Cutter With Power Disconnected
Switch the tool off and disconnect charging power before touching the cutting head. Clear dry debris as the manual permits. Inspect fixed and moving teeth, blade seating, fasteners, housing, guard rails, adjustment controls, cable, port, and battery area.
Stop for damaged or contacting teeth, a loose head, cracks, corrosion, swelling, residue that cannot be safely removed, or a control that slips. Follow model-specific lubrication rules; the cleaning and oiling guide provides a bounded maintenance sequence.
Verify Every Guard Individually
Identify each guard by its exact system, not by appearance alone. Check teeth, rails, tabs, locks, adjustment travel, and seating. Install it with the tool off, confirm that it sits level and locks, then remove and reinstall it once to verify repeatability.
The guard size guide explains why numbers and colors do not transfer reliably between brands or product families. Never stack guards, tape a loose attachment, hold it in place, or infer a retained length from an unrelated system.
Choose a Longer-First Reference Setting
Find the shortest released length in every zone you intend to pass over and the minimum length you refuse to lose. Choose a documented guard or setting at that value or longer for the first test. If no verified setting protects it, the guarded method is not ready.
Philips support recommends beginning with the longest setting while learning on covered OneBlade Pro models. Treat that as model-family guidance and a risk-reduction principle, not as a universal millimeter recommendation.
Test Tool Operation Away From the Face
After inspection and correct assembly, run the tool briefly away from the beard. Listen and feel for abnormal noise, speed changes, vibration, heat, odor, unstable power, or a guard that moves. Switch off before touching or readjusting anything.
If the tool fails this check, preparation stops. The trimmer pulling guide covers broader blade, guard, loading, and power checks. Long hair must not be used as the first diagnostic material for an uncertain cutter.
Divide the Beard Into a Staged Work Order
Write the sequence before cutting: for example, left side outer layer, right side outer layer, jaw corners, chin side sections, central chin only if intended, then visible under-jaw work. Keep mustache, cheek line, and neckline as separate tasks.
Each stage should name the section, retained-length floor, guard, direction allowed by the manual, start and exit point, and stop condition. This prevents one long pass from crossing several grain patterns and protected anchors.
Choose One Low-Visibility Test Section
Select a small dense section inside a confirmed excess-length zone, away from the central chin, cheek line, neckline, lip, jaw anchor, and lighter area. Separate it, release unnecessary tension, and confirm that the cutter path and guard remain visible.
The preparation plan allows one short light test with the longer setting after all checks pass. It does not authorize a full sweep. Switch off, clear, recomb, release, and compare the complete silhouette before deciding whether another section is ready.
Set Clearing and Reset Points in Advance
Long clippings can bridge across guard teeth and hide the cutter. Plan to stop after every small section or visible buildup. Clear only as the exact manual allows, reinstall the guard, and reconfirm the setting before resuming.
Also plan a full visual reset after each zone: comb into the worn shape, release, wait, then inspect front, profile, and three-quarter views. A fixed pass count is less useful than visible loading and an observable shape change.
Create a No-Cut Preparation Record
Before switching on near the beard, record the model, head, guard, setting, dry-state method, protected anchors, work order, test section, and stop conditions. Save the baseline views privately if useful.
This record makes the first pass auditable and repeatable. It also creates a clear point at which to stop if the actual tool, guard, beard state, or objective differs from the plan.
Long-Beard Preparation Checklist
- The intended change and protected minimum lengths are written.
- The natural dry front, profile, and three-quarter baseline is recorded.
- Heavy product is removed without aggressive scrubbing.
- Roots, underlayer, jaw corners, and central section are fully dry when required.
- Small sections are detangled from the ends without final-length tension.
- Outer length and shorter underlayers are mapped separately.
- Hanging endpoints, root grain, and protected anchors are recorded by zone.
- Skin and hair stop conditions are absent.
- The exact tool, head, guards, power mode, and manual are confirmed.
- The cutter and every selected guard pass an off-face inspection.
- A longer-first setting and one low-visibility test section are chosen.
- The staged work order, clearing points, resets, and stop rules are written.
Stop Conditions
Do not proceed for painful, broken, bleeding, swollen, or actively irritated skin; sudden or unexplained hair loss; a knot that requires force; a section that cannot be released; or a cutting path that cannot remain visible. Do not trim while rushed, impaired, or unable to hold a stable posture.
Stop for incompatible or loose attachments, damaged teeth, slipping adjustments, abnormal noise, vibration, odor, or heat, unstable power, a packed guard that cannot be cleared, or any setup that requires pressure. Do not tape, stack, bend, or hand-hold a guard to continue.
Frequently Asked Questions
Should a long beard be wet or dry before trimming?
Follow the exact tool and method instructions. For a conventional dry guarded trim, let the beard and skin become fully dry and naturally settled before measuring or cutting because moisture, tension, and product can change hanging length and section grouping.
Should I straighten a long beard before trimming it?
Do not make heat or tension straightening a universal preparation step. Detangle gently, release each section, and judge the beard in its normal dry worn shape unless a documented professional method deliberately uses a different reference state.
How do I choose the first guard for a long beard?
Identify the shortest natural length you are unwilling to lose, use only a guard documented for the exact trimmer, and begin at that length or longer. Test one small low-visibility section before considering any shorter setting.
When should I stop preparing and not trim?
Stop for painful, broken, bleeding, swollen, or actively irritated skin; unexplained hair loss; a tangle that requires force; damaged teeth; a loose guard; abnormal heat, odor, noise, or vibration; unstable power; or an unclear cutting plan.
Sources and Claim Boundary
Primary references reviewed in July 2026 are the linked Philips OneBlade support page, the AAD healthy-beard guidance, and the Braun beard-care page. They support model-aware clean and dry preparation for covered tools, correct comb installation, longer-first familiarization, general beard and skin care, and gentle detangling.
This page applies those bounded principles to a generic layered long-beard preparation workflow. It reports no hands-on testing, does not prescribe one product, guard, direction, straightening method, pressure, or schedule, does not diagnose skin or hair conditions, and does not guarantee comfort, symmetry, growth, density, or a particular result. The exact model manual controls.
