
Disclosure: This site may use affiliate links. Product specifications should be checked against manufacturer or retailer pages before purchase.
Direct Answer
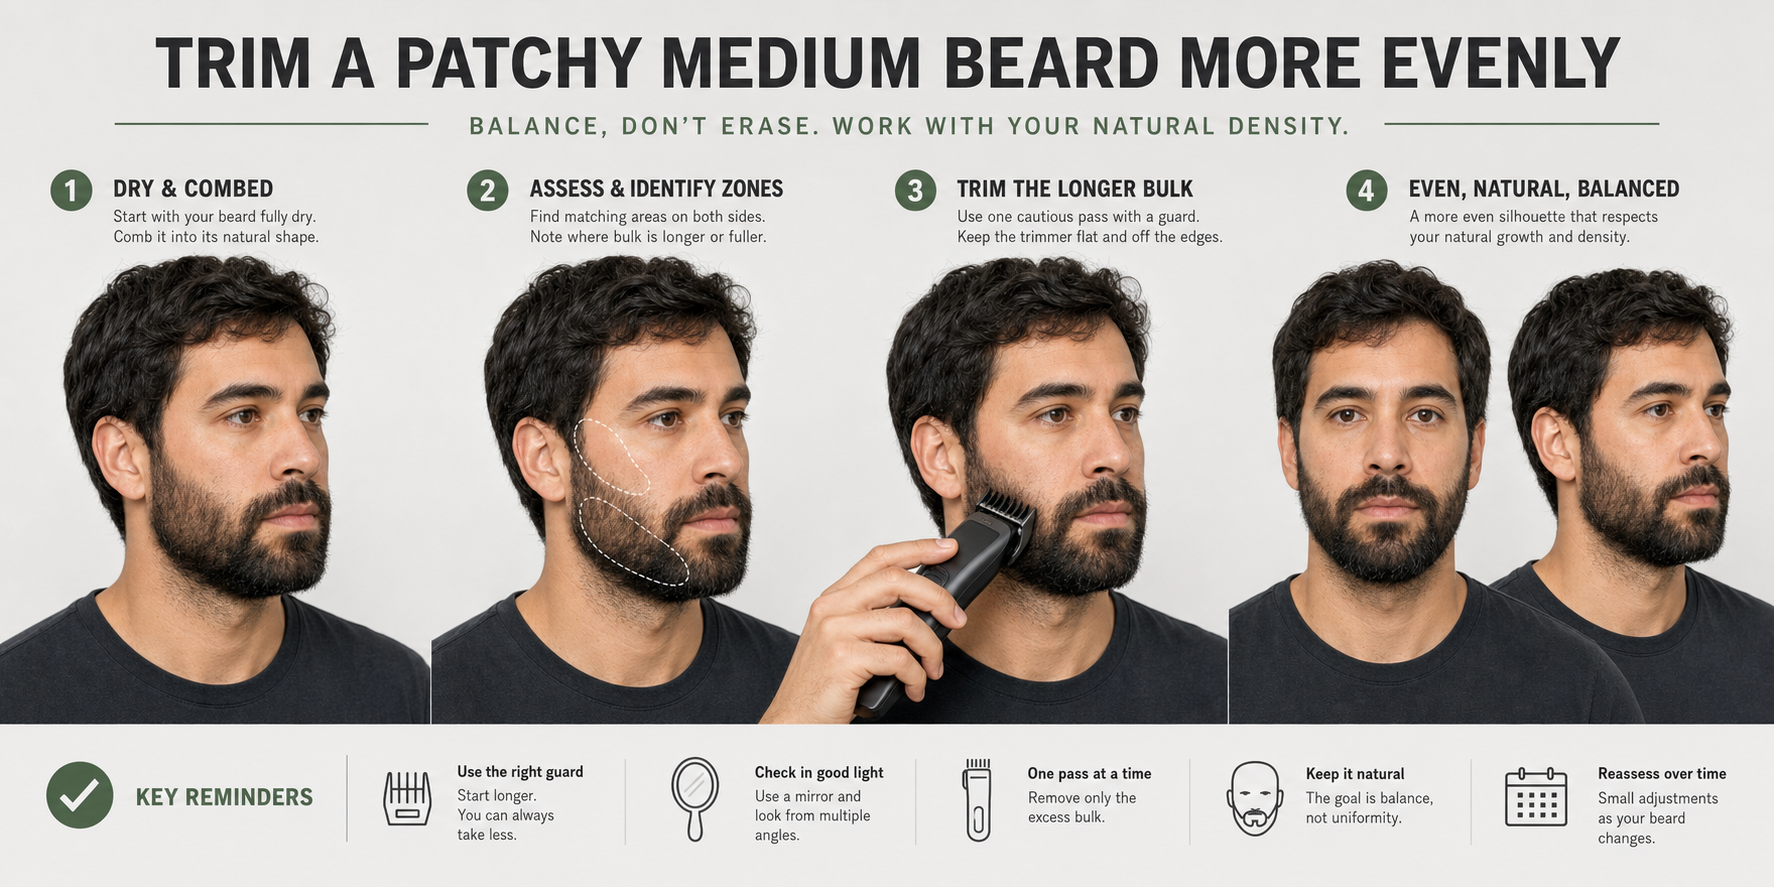
Direct answer: Make a patchy medium beard look more even by drying and combing it into its normal shape, mapping local growth directions, and comparing matched cheek, jaw, and chin zones. Preserve useful coverage in lighter areas. Use a verified longer guard to reduce only confirmed excess length in fuller zones, then recomb and step back before any second adjustment.
This is a cosmetic bulk-balancing workflow, not a hair-growth method. Trimming can change silhouette, overhang, and transitions, but it cannot create follicles, increase density, diagnose sudden hair loss, or guarantee symmetry. The exact trimmer manual controls attachments, settings, contact, direction, cleaning, and operating safety.
Define What “Patchy” Means in This Trim
Patchy can describe several different visual effects: naturally lighter cheek density, hair growing in conflicting directions, a fuller jaw beside a thinner cheek, isolated long hairs crossing a sparse zone, or a newly visible smooth area. These do not all call for the same action.
Write a neutral observation before switching on the trimmer. For example: “the lower right jaw projects farther than the matched left zone after combing,” or “long cheek hairs cross a stable lighter area.” Avoid a vague goal such as “remove the patch.” A trimmer removes length; it does not remove the underlying density difference.
Separate Stable Density From New Hair Loss
Use earlier photographs, normal grooming records, and the current dry beard to decide whether the distribution is longstanding or has changed. Stable lower density can often be handled as a styling variable. Sudden loss, rapid expansion, or a smooth well-defined area is not a routine trimming target.
The American Academy of Dermatology’s alopecia areata signs and symptoms notes that sudden hair loss can begin as a round or oval smooth patch and can affect the beard. This page does not diagnose that condition. Seek qualified assessment for a new smooth patch, spreading loss, itching, burning, redness, scaling, pain, broken skin, or another unexplained change.
Let a Medium Beard Dry and Settle
Water, heavy balm, sleep compression, mask pressure, and comb tension can temporarily move longer hair across lighter areas. Cutting the shifted shape can expose more skin when the beard returns to its normal position. Begin with a fully dry beard unless the exact model and method specifically direct otherwise.
Comb gently into the way the beard is normally worn, then wait for the hair to settle. The medium-beard preparation guide covers drying, detangling, grain mapping, and tool inspection. Do not stretch curls straight or pull hair away from the face to manufacture an even surface.
Map Grain Before Mapping Length
Hair can point down on one cheek, angle toward the chin on the other, and reverse beneath the jaw. That directional difference can look like missing density when the hair is actually lying away from the viewer. Divide the beard into small cheek, jaw, chin, under-jaw, sideburn, and mustache zones and record each local direction.
Philips’ current uneven-trim troubleshooting guidance says hair grows in different directions, advises completely dry hair for covered groomers, and identifies attachment fit, excess pressure, one-direction trimming, and incorrect settings as causes of uneven cutting. Those instructions apply to listed products; another manual may differ.
Set a Visual Goal That Preserves Coverage
A useful goal is usually a balanced outer silhouette with softer transitions, not identical skin visibility on both sides. Preserve hairs that bridge a stable lighter zone when they lie naturally and do not create an obvious shelf. Target only excess length that projects beyond the intended medium-beard shape.
Do not lower a cheek line, raise a neckline, hollow the jaw, or shorten chin projection merely to expose matching amounts of skin. Use the medium-beard symmetry guide to compare landmarks without treating normal facial and density differences as trimming errors.
Divide the Beard Into Matched Zones
| Zone pair | Compare after recombing | Possible trim target | Do not chase |
|---|---|---|---|
| Upper cheeks | Surface lay and isolated overhang | Clearly longer hair outside the settled surface | Equal skin visibility |
| Lower cheeks | Transition into jaw bulk | A hard shelf from excess length | Natural density difference |
| Jaw corners | Width and projection | One confirmed longer corner | Bone or face-shape asymmetry |
| Chin sides | Connection to central chin | Loose side overhang | Central growth pattern |
| Under-jaw | Weight and visible drop | Bulk below the planned silhouette | Hidden density variation |
| Sideburn links | Transition height and weight | A distinct unblended ledge | A new fade design |
Compare one matched pair at a time under the same light and head position. A difference that vanishes when you change angle, recomb, or step back is not a reliable cutting target.
Choose a Guard From the Minimum Acceptable Length
Identify the exact trimmer model and regional suffix, then verify the guard or adjustable setting in the manual. Choose a starting setting that preserves the shortest useful coverage in the zone, not one that matches the longest projecting hair. Begin longer when the record is uncertain.
The medium-beard guard guide provides a longer-first calibration method. Do not infer millimeters from a guard number, mix attachments from another model, hold a loose guard in place, or assume that a previous setting will leave the same result after hair direction and beard length change.
Inspect the Tool Before Balancing Density
With the tool off, inspect blade teeth for chips, bends, contact, corrosion, or residue. Confirm that the head and guard seat level and lock securely. Check the documented power mode and enough charge for stable operation. Clear dry clippings only as the manual allows.
Stop for a loose attachment, damaged teeth, pulling, abnormal noise, odor, vibration, rapid heat, smoke, swelling, leakage, damaged cable or port, or water exposure outside the exact rating. The trimmer-pulling guide covers mechanical checks before another pass.
Test One Dense, Low-Visibility Area
Choose a small dense section that is part of the confirmed excess-bulk zone and is not a cheek line, neckline, mustache edge, or the center of a lighter patch. Seat the verified guard exactly as directed and make one short model-approved pass.
Switch off, clear clippings, and recomb the entire matched zone. Check retained length, guard stability, surface feel, and whether the transition improved at normal viewing distance. If the pass removes too much, leaves an abrupt ledge, or exposes the lighter zone, stop. Removed length cannot be restored during the session.
Trim the Dominant Length, Not the Sparse Zone
When a fuller zone projects beyond the intended silhouette, reduce only that dominant length in small sections. Keep the lighter zone outside the first pass so its useful coverage remains available. The goal is to reduce a shelf or overhang, not to make every hair the same length.
Do not repeatedly run a guard through a lighter area because a few hairs remain uncut. Those hairs may follow a different direction, sit below the guard, or provide needed visual coverage. Recomb first. If they settle inside the silhouette, leave them.
Use a Direction Matrix Instead of Random Passes
For each small zone, note local grain, the model-approved contact method, one planned direction, and the visible result. Philips’ OneBlade beard-trimming instructions direct full comb contact and against-growth movement for covered models while acknowledging that hairs can grow in different directions.
That source does not create a universal rule for every trimmer. Do not rotate through upward, downward, and crosswise passes automatically. Try another direction only when the exact instructions allow it, the guard remains fully seated, the target is still confirmed, and the prior result has been cleared and reassessed.
Build a Soft Transition Between Density Zones
A visible shelf often forms where fuller lower-cheek or jaw hair overlaps a lighter upper zone. Work from the longer bulk toward the transition using the same or a verified longer setting. End the pass before entering the lowest-density center. Recomb after every short section.
Do not create a staircase of several unrecorded shorter settings. One controlled transition variable is easier to judge and reverse in a later session than multiple changes made at once. The jaw-corner blending guide explains the matched-zone logic; apply it here only to medium-beard bulk and preserve the distinct length.
Preserve Cheek Line, Neckline, and Chin Structure
Patchiness in the beard surface does not automatically justify moving a boundary. Keep the existing cheek line and neckline fixed while bulk is being balanced. Protect the central chin and under-jaw structure unless those areas are separately mapped as excess length.
The medium-beard edge-cleanup guide handles confirmed regrowth outside established lines. Use the neckline guide only when line placement itself is the planned task. Do not combine edge redesign, bulk balancing, and a fade in one correction loop.
Step Back After Every Small Zone
Loose cut hair and close mirrors exaggerate gaps. Switch off as required, clear clippings, comb the complete beard into its normal lay, and view it from the front, both three-quarter angles, and both sides. Use the same posture and light for each comparison.
Judge silhouette, transition, and visible overhang before individual hairs. If the fuller and lighter zones now connect without an obvious shelf, stop even when density remains different. A cosmetically balanced medium beard can still show natural variation.
Change Only One Variable Per Correction
If a confirmed bulk difference remains, change one variable: a small zone, one direction, or one verified setting. Do not change guard, pressure, direction, edge position, and beard angle together. Record the adjustment before making it.
Use one test, one reassessment, and at most one justified correction in the same zone. Philips’ uneven-trim guidance favors gentle, steady full contact for listed groomers and identifies hard pressure as a cause of uneven results. More force is not a substitute for correct fit, direction, or maintenance. Use the medium-beard touch-up guide when the remaining target is an isolated flyaway rather than a density transition.
Patchy Medium-Beard Checklist
- The beard is fully dry and settled into its normal worn shape.
- Stable density differences are separated from sudden hair loss.
- Local growth direction is mapped by small zone.
- The goal names excess bulk or a hard transition, not “remove patchiness.”
- Matched cheek, jaw, chin, and under-jaw zones are compared.
- The exact model, head, guard, setting, and instructions are verified.
- Blade, attachment, power, and cleaning checks pass.
- A longer setting is tested in one dense low-visibility area.
- Lighter zones and useful coverage remain outside the first pass.
- Cheek line, neckline, chin projection, and jaw structure are protected.
- Clippings are cleared and the complete beard is recombed after each zone.
- One-variable and pass limits are defined before trimming.
Repeatable Balancing Sequence
- Dry the medium beard and comb it into its normal shape.
- Check whether the density pattern is stable or newly changed.
- Map grain across matched cheek, jaw, chin, and under-jaw zones.
- Define one visible excess-bulk or hard-transition target.
- Verify the exact tool, guard, setting, and manual.
- Inspect blade, attachment fit, power, and stop conditions.
- Choose a longer setting from the minimum acceptable coverage.
- Test one dense, low-visibility section.
- Switch off, clear clippings, recomb, and step back.
- Reduce only confirmed dominant length in small zones.
- Keep lighter-density areas and established edges protected.
- Make at most one justified one-variable correction, record, and stop.
Stop Conditions
Stop for any loose, tilted, cracked, or incompatible attachment; damaged or contacting teeth; pulling; abnormal noise, odor, vibration, or heat; smoke; swelling; leakage; unstable power; or water exposure outside the exact rating. Do not tape a guard, force a head, add pressure, or continue when the cutter path is hidden.
Also stop when only natural density remains, a correction would enter a lighter zone, the target disappears after recombing, or each pass makes the transition less clear. Stop over painful, broken, bleeding, swollen, scaly, or actively irritated skin. Seek qualified assessment for sudden smooth patches, spreading loss, persistent symptoms, or any change that is not reasonably explained by grooming.
Frequently Asked Questions
Can trimming make a patchy medium beard look more even?
Trimming can balance excess length, reduce isolated overhang, and soften transitions between fuller and lighter-density zones. It cannot create follicles, increase density, or treat new hair loss.
Should I trim the thinner areas shorter?
Usually the first target is excess length in fuller zones, not the shortest hair in lighter zones. Preserve useful coverage, test a longer guard on one dense area, and reassess the complete silhouette before shortening anything else.
Which direction should I trim a patchy beard?
Map the local grain and follow the exact model instructions. Some covered systems direct against-growth passes with full comb contact, but hair grows in different directions and another tool may require a different method.
When should patchy beard growth be checked by a dermatologist?
Seek qualified assessment for sudden round or oval smooth bald areas, rapid change, spreading loss, broken or painful skin, redness, scaling, drainage, or other persistent or unexplained symptoms.
Sources and Claim Boundary
Primary references reviewed in July 2026 are Philips support pages on uneven groomer results and OneBlade beard trimming, plus the AAD alopecia areata signs and symptoms page linked above. They support dry-hair preparation, correct attachment fit, controlled contact, local growth-direction awareness, pressure limits, and separating sudden smooth hair-loss patches from routine cosmetic density variation.
This page applies those principles to a generic medium-beard bulk-balancing workflow. It does not report hands-on testing, prescribe one guard, setting, direction, pressure, line position, or schedule for every beard and trimmer, diagnose or treat hair loss or skin conditions, create density or growth, or guarantee symmetry, comfort, or a particular result. The exact model manual controls.
