
Disclosure: This site may use affiliate links. Product specifications should be checked against manufacturer or retailer pages before purchase.
Direct Answer
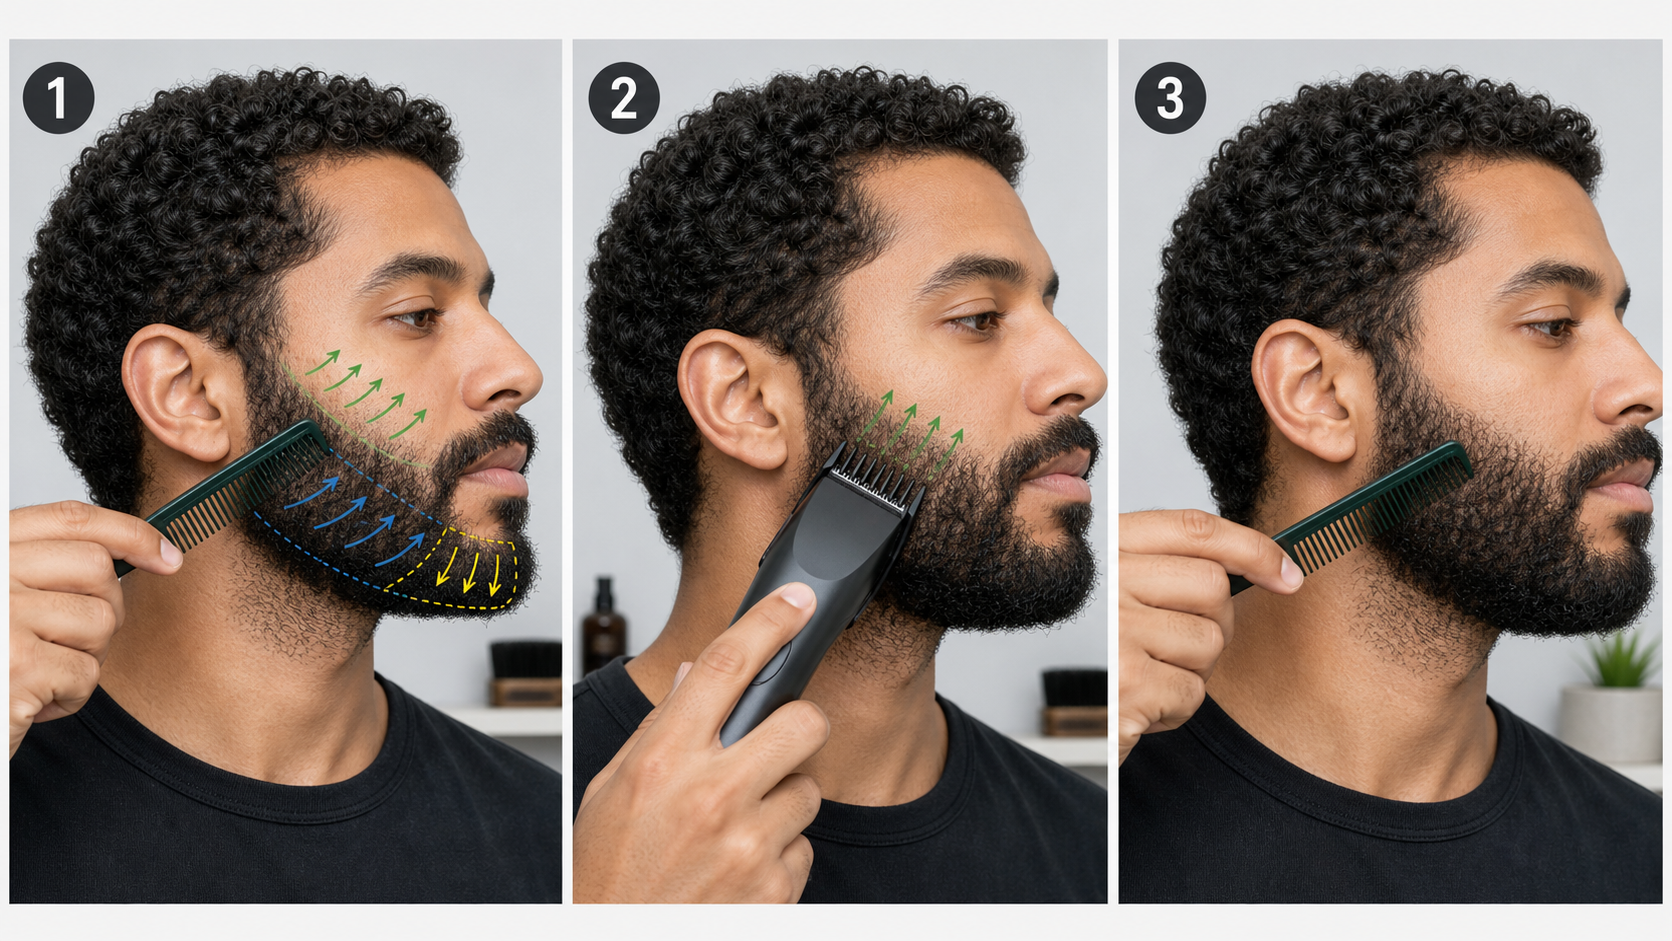
Direct answer: Trim a curly short beard with better control by assessing it clean, dry, and unstretched; mapping curl direction in small cheek, jaw, chin, and neck zones; starting with a longer verified guard; and making short light passes. Recomb after every zone so the curls can spring back before you judge length, change direction, lower the setting, or refine an edge.
This workflow manages visible length and silhouette; it does not change curl type, create identical growth, or guarantee symmetry. Curly facial hair can project, compress, and spring back differently across the face. The exact trimmer manual controls attachments, wet or dry use, direction, cleaning, charging, and safety.
Curly Short-Beard Control Map
| What you observe | Controlled response | Avoid |
|---|---|---|
| Curls lie in several directions | Divide the beard into small grain zones | One long pass across cheek, jaw, and chin |
| Hair looks longer when combed outward | Release tension and judge natural spring-back | Cutting to a stretched measurement |
| One zone feeds unevenly into a guard | Recomb, clear the guard, and change one variable | Adding pressure or repeated fast passes |
| One side appears darker | Compare silhouette and curl direction before shortening | Chasing equal darkness with a lower setting |
| Jaw or chin curls project | Use a longer local test and short visible strokes | Removing the whole structural zone at once |
The current Philips Multigroom manual supports combing before trimming, using clean dry hair, beginning with the maximum trimming length when learning a tool, keeping the guard in contact, and trying directions deliberately. Philips’ OneBlade trimming instructions likewise require a correctly seated comb and model-specific setting. These are exact-product examples, not guarantees for every curl pattern or trimmer.
Judge Curls in Their Natural Dry State
Follow the exact model’s wet-or-dry rule. For a conventional dry guarded trim, remove heavy product and let the beard and skin dry fully. Damp curls can clump, stretch under their own weight, or lie closer to the face. A result judged while damp can look shorter or less even after drying.
Comb gently into the normal resting pattern. Do not pull the hair straight and hold it under tension while choosing the final length. A curl can extend when stretched and retract when released, so a stretched measurement is not the same as the visible dry result.
The stubble preparation guide covers lighting, drying, growth mapping, and the first tool check. This page adds curl-zone and spring-back controls for a short beard.
Map Direction by Zone
Inspect the upper cheek, lower cheek, sideburn, jaw corner, chin, mustache, under-jaw, and neck separately. A curl can point down at the cheek, turn toward the mouth, wrap under the jaw, or reverse near the neck. The visible end of a curl does not always reveal the direction in which its base grows.
Use a comb to lift one small zone, then let it settle. Note the direction that exposes longer ends without stretching the hair. Work with zones small enough that one clipper stroke does not cross a major direction change.
Record the map if the pattern is difficult to remember. A simple front and side photograph in the same lighting can help compare future trims, but it is not an objective density or curl measurement.
Inspect the Blade and Guard
Switch the tool off and disconnect charging power before touching the blade or changing a guard. Brush loose hair from the cutter and inside the attachment. Check blade and guard teeth, locking tabs, screws, adjustment controls, housing, cable, port, and battery area.
Stop for bent or chipped teeth, a loose blade, a rocking guard, cracked housing, damaged power parts, unusual heat, or anything that prevents stable contact. Follow the model’s lubrication instruction; some metal blade sets require approved oil while other cutter systems do not.
Run the tool briefly away from the face. The sound and movement should be normal for that unit. The cleaning and oiling guide provides the general care sequence without overriding model-specific limits.
Start With a Longer Verified Setting
Choose only a guard or dial setting documented for the exact trimmer. Confirm that the attachment sits level and locks. Guard numbers are not universal, and the same printed number can represent a different physical length on another system.
Start longer than the intended result, particularly when the curl map or tool is unfamiliar. Test a small dense zone near the lower cheek or jaw. Make one light pass, clear the cut hair, recomb, and wait for the zone to settle before judging it.
The guard-size guide explains why model identity and millimeter labels matter. A longer start preserves room for correction when curls feed into a guard unevenly.
Use Short Passes Through One Direction
Place the guard as the manual directs and use light, stable contact. Move only through the current mapped zone. End the stroke before the beard turns around a jaw corner or into a differently oriented chin section.
Do not press harder to capture a curl that lies outside the guard path. Lift away, switch off when appropriate, recomb the zone, and decide whether another direction is justified. Pressure is not a documented length setting.
Long sweeping passes can carry the cutter from a flatter cheek area into springier jaw or chin curls. Short visible strokes keep each change attributable to one setting, zone, and direction.
Recomb and Check Spring-Back
After each zone, remove loose clipped hair and recomb the curls into their natural resting pattern. Wait briefly for tension to release. Inspect from the front and side at normal distance rather than relying only on a magnifying mirror.
If the zone now sits inside the intended silhouette, stop even when individual curls are not identical. If a few ends still project, isolate the local zone instead of lowering the whole beard. Spring-back can reveal that a curl already appears shorter than it did during the pass.
Use one test-change rule: one setting or direction change, then a complete recomb and check. Repeated cutting before curls settle removes the evidence needed to make the next decision.
Change Direction One Zone at a Time
With-grain and against-grain are useful shorthand, but a curly beard can contain diagonal, sideways, and rotating zones. Follow the exact tool instructions and begin with the conservative direction that feeds the current zone predictably.
If genuinely longer hair remains, change direction without also lowering the guard or increasing pressure. Brush, recomb, and compare. Changing direction, setting, and contact simultaneously makes an overtrim difficult to diagnose.
The with-the-grain trimming guide covers grain mapping in more detail. Curly short-beard work uses the same principle but requires more frequent spring-back checks.
Control Jaw and Chin Projection
Jaw corners and the chin often contain strong curves and direction changes. Preserve them as structural zones rather than treating every projecting curl as excess bulk. Test the longer guard on one small section and compare the relaxed silhouette before reducing another step.
Approach each side of the chin separately. A wide guard moving straight across the center can feed the left and right curl patterns differently. Under the jaw, reposition the mirror or head so the guard remains visible without stretching the neck strongly.
Use the short-beard jaw-corner guide when the issue is a length transition rather than curl control. Do not combine a full blend reset with a routine curl-management pass unless that larger change is planned.
Balance the Sides Without Chasing Darkness
Compare matched zones in the same light and head position: sideburns, upper cheeks, lower cheeks, jaw corners, and chin edges. First compare outer silhouette and boundary position. One side may look darker because of density, curl grouping, color, or light rather than excess length.
Do not lower the darker side repeatedly when its surface already matches the intended shape. Natural left-right differences can remain after a controlled trim. A balanced appearance does not require identical curls or hair count.
For a more general left-right sequence, use the even-stubble comparison guide. Apply its matched checkpoints without treating curly hair as straight stubble.
Clear the Guard Before Curls Pack It
Curled clippings can bridge across guard teeth or collect behind the cutter. Switch off and remove the attachment only as instructed. Brush the guard and blade over a dry surface, then reinstall and confirm the setting before restarting.
Do not continue when packed hair changes how the guard contacts the beard. The resulting slowdown can encourage pressure and repeated passes. Clear by visible need rather than waiting for a fixed number of strokes.
Separate Curl Control From Pulling Troubleshooting
This page focuses on how to see, zone, and trim natural curls. If the tool snags, pulls, stalls, rattles, or needs force, stop the technique session and diagnose the equipment and preparation.
The coarse short-beard guide provides a preventive feed-and-clearing workflow, while the trimmer pulling guide covers broader mechanical checks. Curly and coarse are not interchangeable descriptions.
Common Curly Short-Beard Errors
- Choosing final length while curls are wet, stretched, or held straight.
- Using one grain direction across cheek, jaw, chin, and neck.
- Starting at the shortest planned setting.
- Making another pass before recombing and checking spring-back.
- Using pressure to force curls into a guard.
- Changing guard, direction, and zone simultaneously.
- Chasing equal darkness instead of comparing silhouette.
- Removing jaw or chin structure because several curls project.
- Continuing with a packed guard or damaged cutting system.
Repeatable Curly Short-Beard Workflow
- Confirm the exact tool, guard, wet-or-dry rule, and care instructions.
- Assess the beard clean, dry, relaxed, and free of heavy product.
- Map curl direction in cheek, jaw, chin, mustache, and neck zones.
- Inspect and test the clean blade and locked guard away from the face.
- Start with a longer verified setting in one small dense zone.
- Make one short, light pass through a single mapped direction.
- Clear clippings, recomb, release tension, and check spring-back.
- Change one variable only when genuinely longer hair remains.
- Compare matched silhouettes without chasing natural density differences.
- Record the model, guard, zone, direction, and useful stop point.
Stop Conditions
Stop if the blade or guard is damaged or loose; the attachment will not lock; the tool pulls, stalls, rattles, smells abnormal, or becomes unusually hot; or repeated passes are needed before the relaxed result can be judged. Do not continue over broken, painful, or actively irritated skin.
This workflow does not diagnose hair or skin conditions. Sudden hair loss, a new sharply defined bare area, persistent pain, bleeding, or another concerning change is outside routine styling and requires appropriate professional advice.
Frequently Asked Questions
Should a curly short beard be straightened before trimming?
No universal straightening step is required. Trim clean, dry curls in their normal resting pattern unless the exact routine and tool instructions say otherwise, then recomb and check spring-back.
Should I trim a curly beard with or against the grain?
Map each zone first because curl direction can change around the cheek, jaw, chin, and neck. Start conservatively and follow the exact model instructions, changing direction one zone at a time.
Why does a curly beard look shorter after I stop pulling it straight?
A curl can spring back toward its natural shape after tension is released. Judge the beard in a relaxed, dry state rather than cutting to a length measured while the hair is stretched.
Can trimming make both sides of a curly beard identical?
No. Trimming can balance length and silhouette, but natural curl pattern, density, growth direction, and facial structure can remain different on each side.
Sources and Claim Boundary
Primary references reviewed in July 2026 are the current Philips Multigroom manual and Philips OneBlade support instructions linked above. This is a generic curl-control workflow, not hands-on testing or a promise of symmetry, straightness, comfort, or a specific appearance. Trimming does not change natural curl type. The exact model manual controls attachment identity, direction, pressure, wet use, cleaning, lubrication, charging, and safety.
