
Disclosure: This site may use affiliate links. Product specifications should be checked against manufacturer or retailer pages before purchase.
Direct Answer
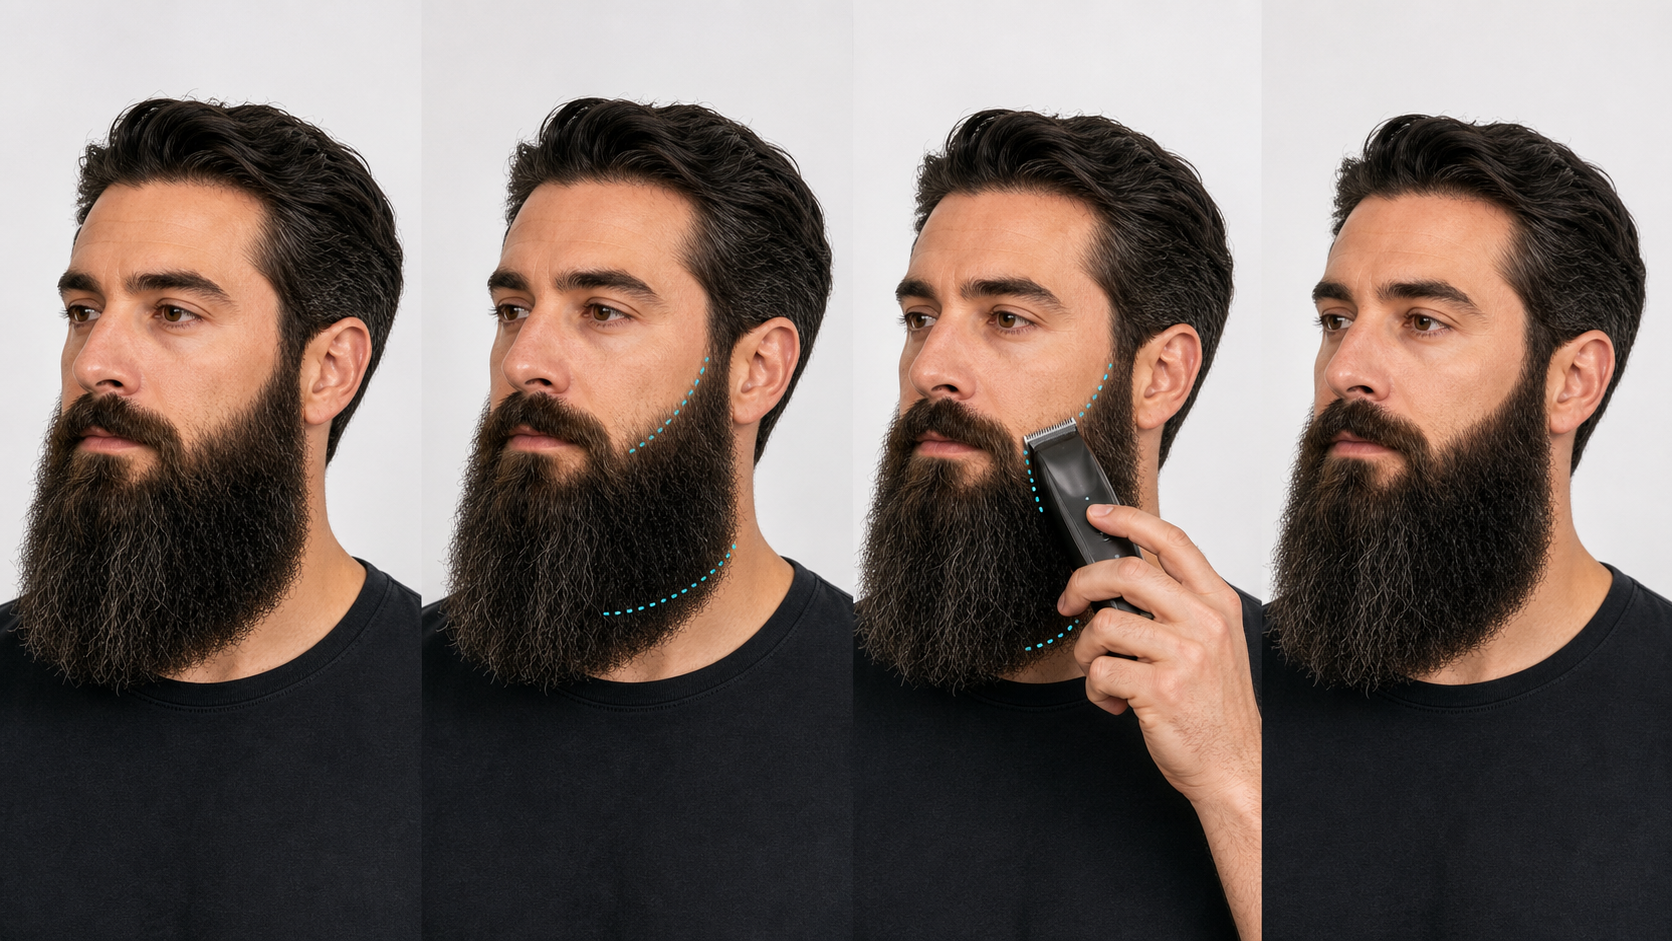
Direct answer: Clean up the edges around a long beard by fully releasing the dry beard, identifying the existing cheek, neckline, and sideburn boundaries, and separating them from bulk length. Mark one stable edge with the tool off, protect the central chin, jaw corners, and hanging layers, remove only hair clearly outside that line, then switch off, clear clippings, release everything, and reassess from the front and profile.
Edge cleanup is boundary restoration, not beard reshaping. Do not raise a neckline because long hair hides it, lower a cheek line to make it sharper, or continue a detail pass into the beard bulk. If the old boundary cannot be found consistently, stop and plan a separate redesign instead of inventing a new line during maintenance.
Long-Beard Edge Decision Table
| Observed area | Maintenance decision | Protected structure |
|---|---|---|
| A few hairs sit above a stable cheek line | Mark the existing line and remove only the isolated outgrowth | Cheek density, side panel, mustache corner |
| Short neck growth appears below the established boundary | Expose the old line without lifting the beard higher than necessary | Lower connection, jaw corner, hanging bulk |
| The entire cheek or neck boundary looks misplaced | Stop maintenance and plan a deliberate redesign | All boundary hair until the new shape is mapped |
| Long strands cross the line from another zone | Trace and release them; do not treat them as edge growth | Source zone and full strand length |
| Sideburn transition is overgrown | Restore only the recorded transition with a verified attachment | Temple connection and long side panel |
Separate an Edge From the Beard’s Silhouette
An edge is the boundary between intentionally retained facial hair and intentionally clear skin. The silhouette is the outer shape made by the beard’s length, width, curl, and layers. A cheek line, neckline, and sideburn transition can be maintained without shortening the silhouette, but only when those targets remain separate.
Write the target before preparing the tool: “restore the existing right cheek line” or “clear short neck growth below the recorded low boundary.” “Make the beard cleaner” is not specific enough. It can silently expand into lowering both cheeks, raising the neck, shortening the side panels, and changing the jaw corners.
Begin With the Beard Fully Released
Remove bands, clips, tight collars, and prolonged hand tension. Follow the exact tool’s approved wet or dry method, but judge boundary position after the beard has returned to its ordinary worn shape. Water, heavy product, compression, and stretched hair can temporarily expose or conceal an edge.
The long-beard preparation guide explains drying roots and underlayers, end-first detangling, and recording the baseline. For edge work, use enough preparation to see where the beard naturally hangs. Do not comb the whole beard upward merely to create a larger clear area beneath it.
Record the Existing Boundaries Before Cutting
Take front, left-profile, right-profile, and three-quarter views in even light. Keep the head neutral rather than tilting the chin high to expose the neck. Mark the current cheek endpoint near the sideburn, the cheek-to-mustache relationship, the jaw-corner turn, and the lowest visible neck boundary.
Use a previous photograph only when beard release, head angle, camera distance, and lighting are comparable. A close phone lens can curve a cheek line or make one side appear higher. Step back and confirm the boundary in a mirror before treating the image as the cutting map.
Map the Cheek Line Without Lowering It
Gently move only crossing strands that originate below the cheek. The maintained line should be visible through several small landmarks rather than one imagined sweep. Identify where it begins near the sideburn, how it travels toward the mustache, and whether natural density creates a soft section.
A sparse point inside the beard is not automatically a reason to lower the entire line. Remove only isolated hair that is clearly above the stable boundary. If the intended line disappears when lighting or expression changes, leave the uncertain section and reassess later.
Find the Neckline Under Hanging Length
Lift or secure the long beard only enough to expose the short neck growth and the previous boundary. Keep the central chin, lower corners, and supporting layers out of the tool path without pulling them tight. A low neckline may sit beneath the hanging beard and remain mostly invisible in the normal released view.
Do not use a generic finger count or universal distance above the throat. Neck shape, beard design, density, and length differ. The medium-beard edge guide uses the same restore-don’t-redesign principle, but a long beard adds hanging layers and a lower connection that must remain protected. The maintenance reference is the stable existing line and its connection to the jaw corners. If that reference is missing, release the beard and defer the cut.
Protect the Lower Beard Connection
The lower connection is the transition from neck growth into the underside and jaw structure of the beard. Raising the neckline into this area can expose skin behind the hanging length, reduce support, or create a shelf visible from the side when the beard moves.
Mark the no-pass zone before switching on. Keep the cutter below the established boundary and away from the dense underside. If the tool must travel behind hanging hair where its edge cannot be seen, the section is not safely isolated for self-maintenance.
Protect the Jaw Corners and Central Chin
Jaw corners connect the side panels to the lower beard; the central chin controls much of the forward and downward projection. Neither is part of routine cheek or neck cleanup. Mark both jaw turns and the lowest central chin point as protected anchors.
The long-beard touch-up guide covers isolated silhouette corrections. Use it only when a true outer-length target has been mapped. Do not let an edge session cross into those targets merely because the trimmer is already in hand.
Trace Crossing Hair to Its Source
A long strand can lie above the cheek line or across the neck while originating inside the retained beard. Support the strand near its middle, trace it toward the root, and release it. If it returns to the beard after normal combing, it belongs to the source zone rather than the clear-skin edge.
Cutting a crossing strand at the boundary can create a short end that later projects from the beard. The long-beard grain guide explains root, middle, and released-end ownership. Boundary decisions should follow the root zone, not the temporary position of an end.
Choose One Edge for the Session
Start with one cheek, the neckline, or one sideburn transition. Do not move between all edges without a full release and comparison. A cheek line uses a visible face-side path; a neckline often requires protected lifting; a sideburn transition may need a comb or guarded attachment. They are different tasks.
Finishing one target creates a clean feedback point. If several boundaries need work, record each as a separate stage. The goal is not to maximize the amount removed in one setup but to restore each known line without losing its reference.
Verify the Exact Tool and Attachment
Read the complete model and regional suffix. Check the manufacturer’s current manual for the detail head, bare blade, comb, wet-use status, contact direction, and cleaning method. A head called a detailer on one system may have a different exposed width or intended role on another.
Philips’ current OneBlade support guidance says comb type and quantity vary by model and tells users to check the specific manual. That supports model verification; it does not make one tool or cutting direction universal for long-beard edges.
Inspect the Tool With Power Disconnected
Clear visible debris as the manual allows. Inspect cutter and guard teeth, foil or blade condition, attachment tabs, housing, cable, charger, and controls. Confirm that the selected head locks without rocking or exposing a damaged edge. Use only the charger and parts specified for the model.
Switch on away from hair and stop for new rattle, impact, uneven speed, odor, smoke, heat, or attachment movement. The cleaning and oiling guide explains general maintenance boundaries. Do not add oil to a head unless its exact instructions call for it.
Mark the Boundary With the Tool Off
Use a washable skin-safe marker only if appropriate for you, or rely on small visual landmarks. With the trimmer off, rehearse the path above the skin without touching the retained beard. Confirm the start point, end point, curve, and stop point at the jaw or mustache connection.
Do not stretch the skin aggressively while mapping. Stretch can move follicles relative to the line and release them into a different position afterward. A gentle neutral expression gives a more repeatable cheek reference.
Use Short Sections Instead of One Long Sweep
Work in short visible sections from a stable landmark. Place the approved cutter as the manual directs, remove only hair outside the recorded line, then lift the tool away. Keep the next section overlapping visually with the previous endpoint without repeatedly cutting the same skin area.
A single long sweep can drift when the face curves, the beard hides the endpoint, or the wrist changes angle. Wahl’s guide-comb and freehand overview distinguishes guarded bulk trimming from freehand edge work. Use that distinction as general context, while the exact model manual controls your tool.
Restore the Cheek Line Conservatively
Begin at the clearest established landmark and approach the soft or uncertain area last. Remove isolated outgrowth above the line rather than carving downward into density. Clear clippings and compare the line at normal viewing distance after each small section.
Do not chase equal height by automatically lowering the higher-looking side. Facial structure, density, curl, and camera angle can create apparent differences. Use matched endpoints and the long-beard symmetry workflow before deciding that either side needs another cut.
Restore the Neckline Without Raising It
Keep protected long hair away from the cutter and remove only short growth below the recorded boundary. Work from visible outer landmarks toward the center, stopping before the dense lower connection. Release the beard after a small section to confirm that the line remains covered and connected as intended.
Do not tilt the head farther back with every pass; changing posture changes the apparent boundary. If loose beard hair falls into the path, switch off, reposition it, and restart from the last verified point. Never run a powered cutter blindly beneath the bulk.
Handle Sideburn Transitions Separately
Identify where scalp hair, sideburn hair, and the long side panel meet. Decide whether the target is an existing outline, a short transition area, or bulk length. Use only the documented attachment that matches that task and preserve the long panel below it.
Do not fade progressively into the beard unless a fade has been deliberately mapped. A maintenance pass can restore stray growth around a known transition without changing its gradient. If several lengths or lever positions are required, treat it as a separate blending workflow.
Clear Clippings Before Judging the Line
Switch off and clear cut hair from the face, beard, and non-powered attachment according to the manual. Loose clippings can sit on the clear side of a boundary or hold retained hair outward, making the edge look unfinished or uneven.
Do not tap a powered head against a sink or hard surface. Philips’ support guidance specifically warns against tapping the blade during cleaning. Follow the current instructions for removal, rinsing, brushing, drying, and storage for the exact device.
Release the Beard and Check Three Views
Remove clips or hand support, recomb gently into the baseline position, and let the beard settle. Check the front for cheek height and central balance, the profile for lower connection and jaw-corner continuity, and the three-quarter view for curves that a straight-on mirror can hide.
If the edge looks correct while lifted but too high after release, stop. Do not compensate by removing more surrounding hair. Record the outcome and let the beard return to its ordinary state before deciding whether a professional correction or a redesigned boundary is appropriate.
Keep a Strict Edge-Cleanup Budget
Allow one mapped edge, one controlled cleanup, and one complete release and reassessment before any additional correction. A second correction must address the same known boundary, not a newly noticed length, corner, or opposite side.
The long-beard mistake guide explains how scope expansion removes recovery margin. Stop when the boundary is visible again. A sharper or more dramatic line is not automatically a better maintenance result.
Do Not Diagnose Skin Through an Edge Session
Flaking, redness, bumps, pain, swelling, or broken skin can have different causes. Do not repeatedly shave closer, apply an unverified product, or move the line to treat the appearance. Pause grooming over actively irritated or damaged skin and seek appropriate guidance when needed.
The razor bumps versus acne guide provides non-diagnostic observation boundaries. This page does not diagnose a condition or prescribe treatment; it only defines when a cosmetic edge-maintenance task should stop.
Stop Conditions
Stop for damaged teeth, a loose attachment, pulling, abnormal sound, heat, odor, smoke, slowing, electrical damage, uncertain wet-use status, or an unclear model identity. Also stop over painful, broken, bleeding, swollen, or actively irritated skin.
Stop when the old edge cannot be traced, when crossing hair cannot be assigned to its source, when the path enters dense beard structure, when the lower connection would be exposed, when a jaw corner or central chin anchor would change, or when each pass creates a new target.
Long-Beard Edge Cleanup Checklist
- Fully release the beard and record front, profile, and three-quarter views.
- Name one existing cheek, neck, or sideburn boundary.
- Separate boundary hair from crossing strands and beard bulk.
- Protect the lower connection, central chin, jaw corners, and long layers.
- Verify the exact model, head, condition, and approved use.
- Mark and rehearse the line with the tool off.
- Remove only hair clearly outside the recorded boundary.
- Use short visible sections and clear clippings between decisions.
- Fully release and reassess before any second correction.
- Stop when the existing line is restored or the reference becomes uncertain.
Frequently Asked Questions
Where should the cheek line sit on a long beard?
There is no universal height. Restore the stable line already visible in the normal released beard unless a separate redesign has been planned. Mark the existing boundary with the tool off and remove only isolated hair clearly outside it.
How low should the neckline be under a long beard?
Keep the neckline low enough to preserve the beard’s lower connection and coverage. Lift or secure only enough hair to see the existing line, check the front and profile, and do not move the boundary upward merely because hanging length hides it.
Should I trim the beard bulk while cleaning the edges?
No. Edge cleanup removes hair outside a previously defined cheek, neck, or sideburn boundary. Bulk length, central chin, jaw corners, and supporting layers are separate targets and should remain released or protected.
When should I stop cleaning up a long-beard edge?
Stop when the recorded boundary is visible again, when its position becomes uncertain, or when the tool path would enter dense beard structure. Also stop for pulling, heat, damaged equipment, broken skin, or a line that looks different after the beard is fully released.
Sources and Claim Boundary
- Philips OneBlade trimming guidance for covered-model comb variation, attachment contact, shutdown, and cleaning.
- Philips Multigroom instructions for covered-model attachment roles, contact, safety, and cleaning.
- Wahl trimming with and without guide combs for general guarded-bulk and freehand-edge role distinctions.
Claim boundary: This page provides a generic long-beard boundary-restoration workflow. It does not prescribe a universal cheek height, neckline, tool, attachment, direction, pressure, pass count, wet-use method, or schedule; report hands-on testing; diagnose skin or hair conditions; promise symmetry, comfort, performance, recovery, or a result; or replace the exact model manual and current equipment checks.
