
Disclosure: This site may use affiliate links. Product specifications should be checked against manufacturer or retailer pages before purchase.
Direct Answer
Direct answer: If a beard trimmer guard keeps coming loose, switch the tool off, confirm the exact model and guard, remove trapped hair, inspect every tooth, rail, and locking tab, then reattach it only as the manual shows. Replace the guard if it is cracked, bent, stretched, or will not stay seated. Never hold, tape, glue, or wedge it in place while trimming.
A loose guard can change cutting length without warning and expose the blade more than intended. The fault may be simple debris or incomplete seating, but it can also be an incompatible attachment, a broken guard tab, a worn mount, or damage to the cutting head. Treat it as a mechanical fit problem, not something to overcome with more pressure.
Guard-Looseness Checklist
| Check | Acceptable condition | Stop condition |
|---|---|---|
| Model match | Exact guard part or documented compatible attachment | Similar-looking guard with no verified compatibility |
| Guard frame | Straight, rigid, and evenly shaped | Warping, spreading, heat damage, or stress whitening |
| Locking tabs | Intact and symmetrical | Crack, chip, missing tab, or weak flex |
| Teeth | Complete and evenly spaced | Bent, sharp, shortened, or missing tooth |
| Tool rails | Clean, aligned, and secure | Cracked housing, loose rail, or damaged blade mount |
| Seating | Square, fully engaged, and stable when off | Rocking, lifting, sliding, or releasing under light touch |
1. Confirm the Exact Guard and Trimmer
Read the complete model number from the handle, rating plate, packaging, or manufacturer account. Include every letter, number, and regional suffix. A brand may use several guard systems across products that share a family name, color, blade width, or marketing photograph. Visual similarity is not compatibility evidence.
Find the guard part number or the exact attachment list in the product manual or manufacturer parts catalog. Braun’s official Beard Trimmer 5 and 7 service page, for example, identifies different beard-comb and precision-comb part numbers for that supported family. That page demonstrates why parts should be matched by model and part identity; it does not establish compatibility with another Braun family or any other brand.
Do not test an unknown guard on a running tool. A comb that appears to clip on can still sit at the wrong angle, release under load, or place plastic close to moving teeth. Use the beard trimmer guard-size guide to interpret documented lengths, but verify attachment fit separately.
2. Switch Off and Remove the Guard Correctly
Turn the trimmer off and disconnect charging power before touching the guard or cutting head. Remove the attachment only from the points identified in the manual. Pulling on long comb teeth can bend them; twisting a slide-on guard can spread its rails; levering against the blade can damage both parts.
Philips’ official OneBlade attachment guide tells users of the listed system to press a single-length comb onto the blade until it clicks so it does not fall off during use. That click instruction is model-family evidence, not a universal rule. Other guards slide, hook, clamp, or lock through an adjustment mechanism. Follow the exact attachment motion instead of forcing a click from a design that does not use one.
Place the removed guard on a bright, flat surface. Keep the cutting edge protected and do not touch moving teeth. If the guard can be removed only by unusual force, stop and recheck the manual; forcing the wrong direction may create the latch damage causing the loose fit.
3. Clean the Guard and Mounting Area
Loose cut hair can collect inside guard channels, behind locking tabs, along blade shoulders, or in adjustment tracks. Brush dry debris away with the supplied cleaning brush or another method allowed by the manual. Do not use a pin, knife, or metal pick near plastic latches or moving blades.
If the manual permits rinsing the detached guard, rinse only that approved part, shake off excess water, and let it dry fully before reassembly. Water rules differ between the guard, blade, cutting head, handle, charging port, and power components. The cleaning and oiling guide provides a general maintenance sequence, but it cannot make an unapproved component washable.
Do not use oil, petroleum jelly, soap residue, adhesive remover, or silicone spray to make a guard stay on. Lubricants belong only where the model instructions specify and can reduce friction at a latch, collect debris, attack plastic, or migrate toward skin and the cutting system.
4. Inspect Tabs, Rails, Teeth, and Frame
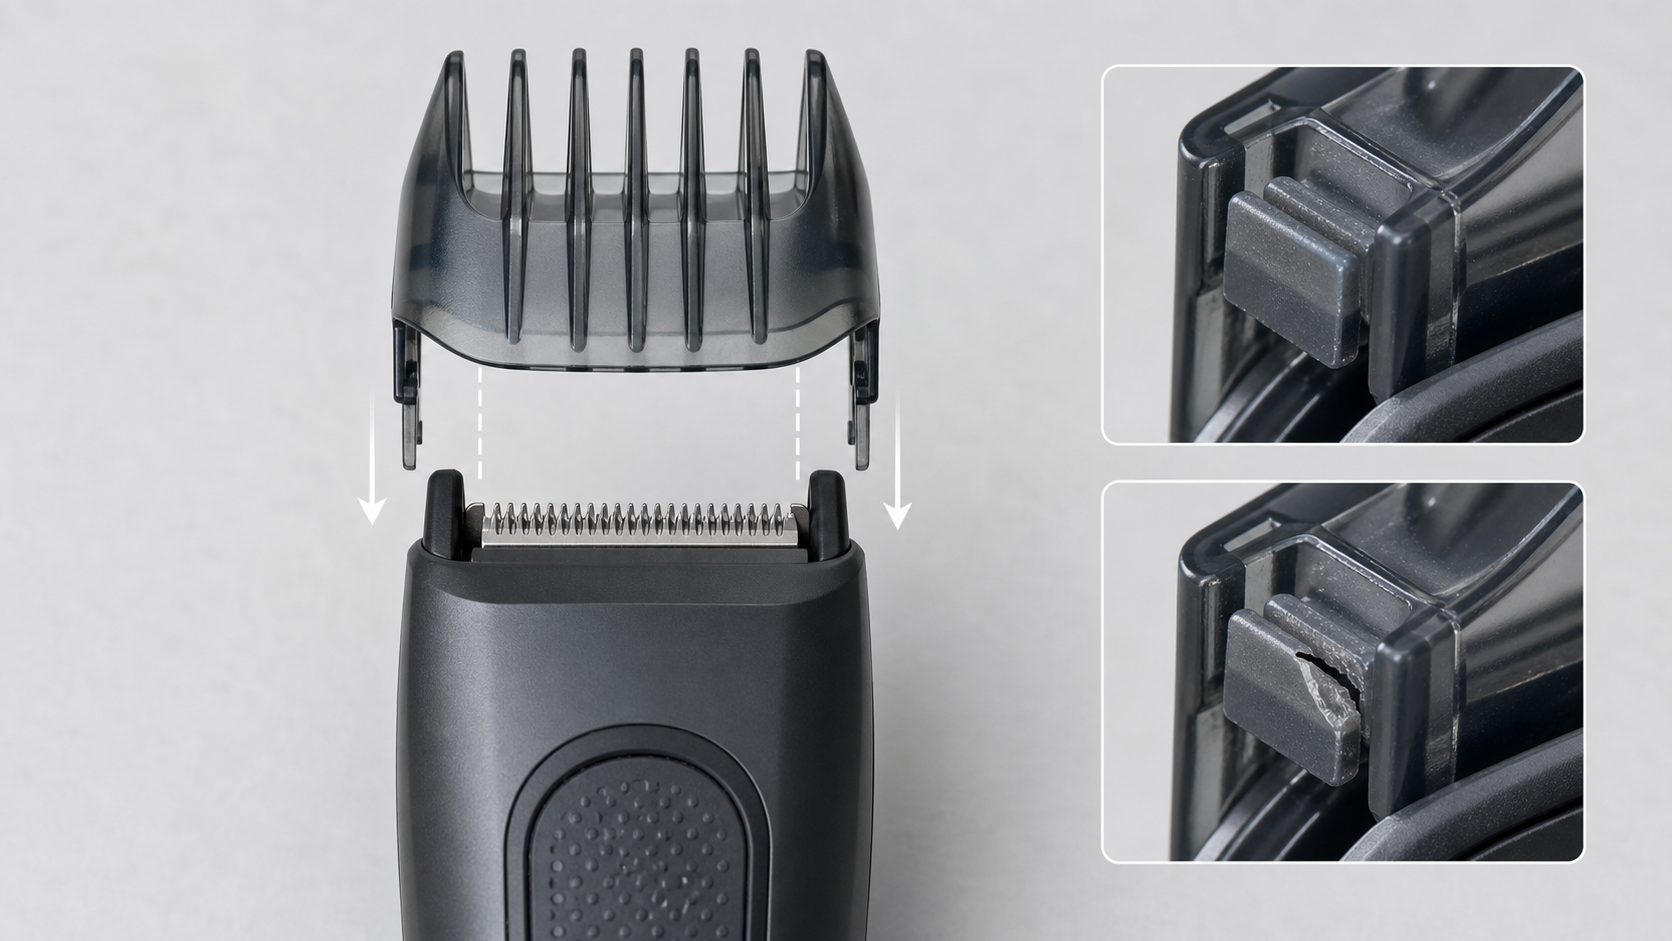
Use bright side lighting and inspect both sides of the guard. Compare left and right locking tabs for the same shape, thickness, and angle. Look for cracks, chips, whitening around stressed plastic, enlarged slots, softened edges, or a tab that flexes more easily than its matching side.
Set the guard on a flat surface without forcing it. A warped frame may rock or place one rail higher than the other. Inspect every comb tooth for bending, sharp edges, or missing material. A damaged tooth can expose a smaller gap and produce an uneven or unexpectedly short cut even if the guard remains attached.
Then inspect the trimmer’s attachment rails, latch points, blade shoulders, and housing. Stop if the mount is loose, cracked, visibly uneven, or moving independently of the blade assembly. Replacing a guard cannot correct a broken tool-side mount. Manufacturer support should determine whether that component is user-serviceable.
5. Reattach and Test With the Tool Off
Orient the guard exactly as the manual shows. Align both rails or hooks before applying light, even pressure. Do not attach one side fully and then twist the other side into place unless the instructions explicitly show that motion. The guard should reach its normal seated position without bending.
With the trimmer still off, look from the front and both sides. The guard should sit squarely relative to the blade and maintain the intended space between comb surface and cutting teeth. Apply a light check at the body of the guard, not at the ends of long teeth. It should not rock, lift, slide, or release.
The image on this page is a generic illustration of rail alignment and intact versus cracked latch tabs. It is not a fit diagram for a particular product. Some guards have no visible side tabs, and some adjustment combs are captive parts of the tool. Use the exact manufacturer’s orientation and engagement test.
6. Make a Controlled First Pass
After the off-tool fit check passes, prepare dry or wet hair only as the model permits. Select a setting longer than the final target and make one short pass on a low-visibility area using light pressure. Keep the guard surface in the orientation shown by the manual rather than lifting the comb teeth into the beard.
Stop immediately if the guard moves, clicks loose, changes angle, rattles, exposes the blade, or leaves an unexpectedly short patch. Do not continue to see whether it settles in. Repeated movement can enlarge a damaged latch and create a more abrupt failure on the next pass.
The stubble preparation guide explains how to dry, comb, and test a longer setting before a full trim. If the guard remains secure but the tool pulls hair, use the pulling-hair troubleshooting guide; pulling and guard retention are related only when packed hair or a misseated attachment affects both.
Do Not Use Tape, Glue, or Improvised Wedges
Tape can stretch, collect hair, move toward the blade, and hide whether the guard is fully seated. Glue can attack plastic, prevent cleaning, lock an attachment at an unverified angle, or contaminate the cutting area. Rubber bands, folded paper, wedges, and continuous hand pressure also cannot preserve a documented length.
Do not heat or bend a guard back into shape. Plastic geometry controls both fit and cutting distance, and a visibly straightened part may retain cracks or weakened tabs. Replacement with an exact compatible guard is the controlled remedy for attachment damage.
Replace the Guard or Contact Support?
Replace the guard when its frame, teeth, rails, or locking tabs are damaged and the tool-side mount remains clean, intact, and secure. Buy by exact part number or manufacturer-confirmed compatibility. Keep the old part only long enough to compare identity; do not return it to the active guard set.
Contact manufacturer support when multiple verified guards come loose on the same tool, the mount or blade housing moves, the adjustment mechanism skips settings, the exact replacement cannot be identified, or a captive comb cannot be serviced according to the manual. Provide the model number, guard part number, photographs of both mounting sides, and a description of when the release occurs.
Replace or professionally service the tool when the manufacturer does not offer a user-safe repair and the mount cannot hold a confirmed guard. A functioning motor does not make an unstable length-control system safe or predictable.
Frequently Asked Questions
Why does my beard trimmer guard keep falling off?
Common causes include the wrong guard, incomplete seating, trapped hair, a cracked locking tab, bent teeth, worn rails, or an attachment made for another model. Switch the tool off and verify the exact model and guard before using it again.
Can I tape a loose trimmer guard in place?
No. Tape, glue, wedges, or hand pressure cannot provide a verified cutting length and may move into the blade area. Replace the damaged or incompatible guard with the exact manufacturer-confirmed part.
How do I know when a guard is fully attached?
Follow the exact model manual. A compatible guard should sit squarely on its intended rails or attachment points and remain secure under a light off-tool check; some models also provide a click or other documented engagement cue.
Should I replace the guard or the trimmer?
Replace the guard when its tabs, teeth, or frame are damaged and the trimmer mount is intact. Seek manufacturer support when the blade housing, rails, latch points, or adjustment mechanism on the tool are cracked, loose, or worn.
Claim and Safety Boundary
This page provides general guard-fit troubleshooting and does not identify a compatible part, authorize a repair, report hands-on testing, or guarantee a cutting length. The exact model manual controls attachment identity, installation, removal, cleaning, water exposure, testing, and service. Stop using any guard or mount that is damaged or cannot remain securely seated.
