
Disclosure: This site may use affiliate links. Product specifications should be checked against manufacturer or retailer pages before purchase.
Direct Answer
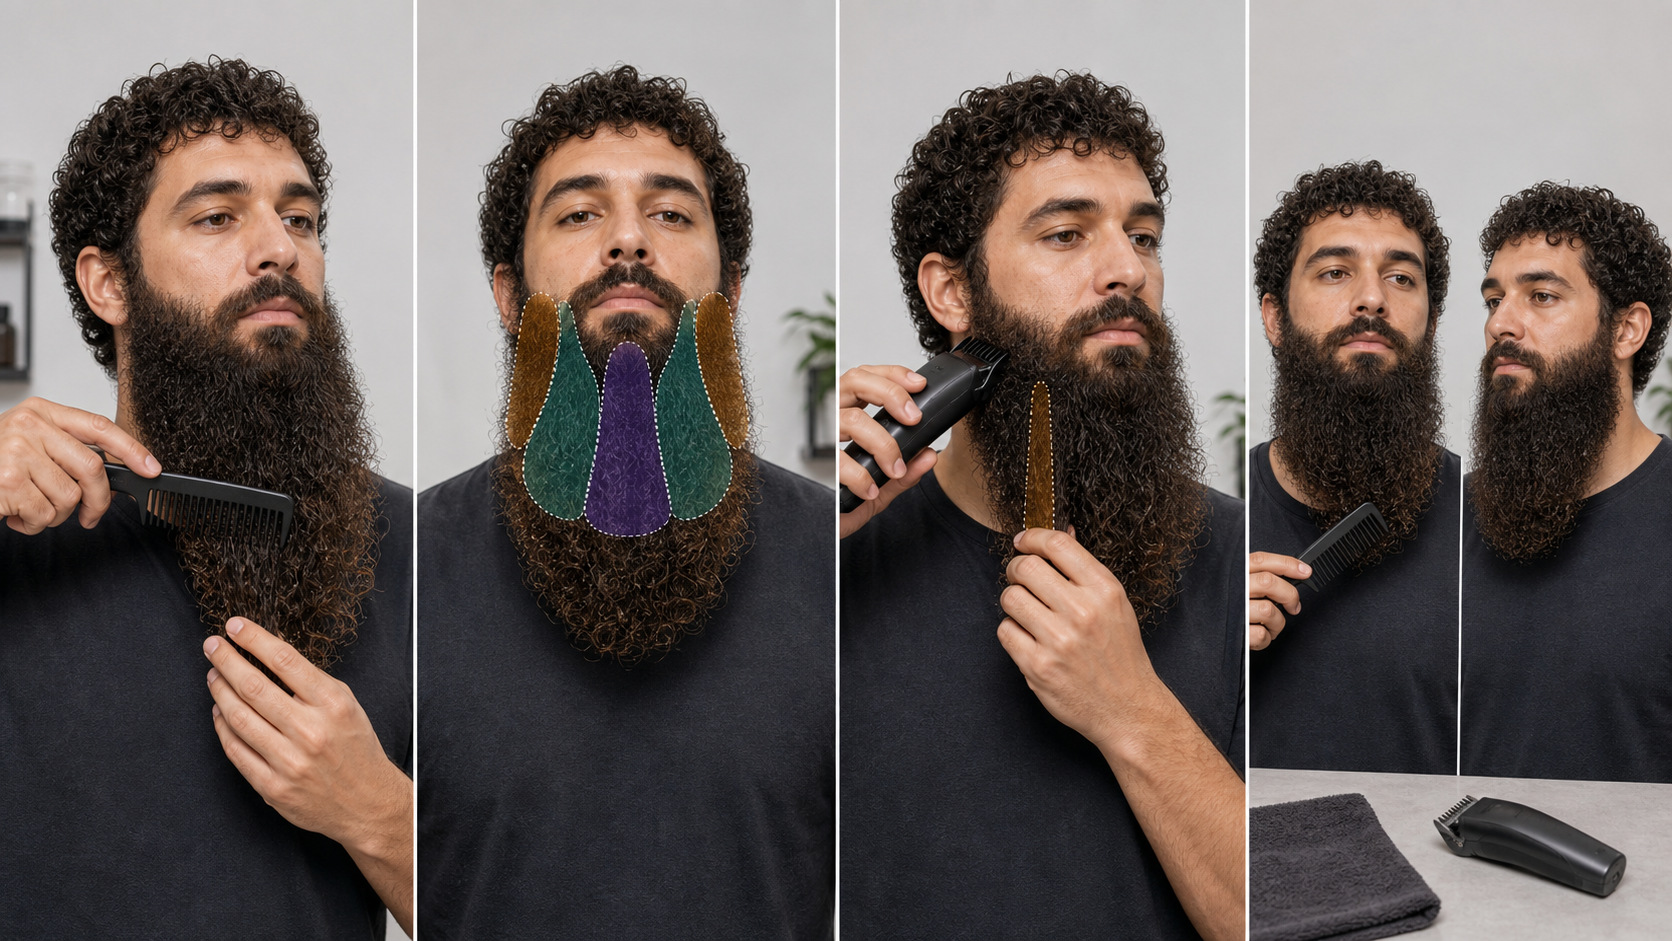
Direct answer: Trim a curly long beard with better control by drying and fully releasing it, detangling from the ends, mapping root direction and curl groups, and separating outer, supporting, and crossing layers. Protect the central chin and jaw corners, verify a longer guard and one small target, make one controlled pass, then recomb, release, wait for spring-back, and reassess before any correction.
This workflow manages uncertainty; it does not straighten hair, change curl type, create density, or promise an even, comfortable, symmetrical, or specific result. “Curly” describes visible grouping and spring-back in this grooming task. The exact tool manual controls guard identity, contact, direction, cleaning, lubrication, wet use, charging, and safety.
Curly Long-Beard Control Map
| Observation | Control question | Conservative response |
|---|---|---|
| Ends sit lower while held than after release | Is tension hiding spring-back? | Release fully and use the shorter natural position as the reference |
| Several curls enter one guard opening | Are outer and supporting layers being combined? | Switch off and isolate a smaller owned group |
| One side appears darker | Is the difference length, density, light, or curl grouping? | Compare landmarks and projection, not darkness alone |
| A curl crosses from jaw to chin | Which root zone owns the visible end? | Trace it to the root before assigning a cutting section |
| The shape changes after recombing | Has the beard fully settled? | Wait, release again, and delay another pass |
Keep This Intent Separate From Coarse-Hair Pulling
This page owns curl grouping, released-length reference, spring-back, layer ownership, and silhouette reassessment. The coarse long-beard guide focuses on cutter load, section admission, pulling stops, and equipment troubleshooting. A beard may be described as both curly and coarse, but the two workflows solve different uncertainties.
Use the long-beard preparation guide for the full baseline of cleaning, dry-state recording, end-first detangling, guard inspection, and staged work order. This page starts with that preparation and adds curl-specific controls rather than repeating a general trim.
Define the Shape Change Before Handling the Beard
Write one narrow objective in observable terms. Examples include reducing one lower outer curl group, restoring the transition at one jaw corner, or bringing a side projection back inside an already defined silhouette. Also write what must remain unchanged: central chin length, side width, cheek coverage, mustache connection, neckline, and lighter-density areas.
Do not begin with “make every curl even.” Individual curl groups can retain different natural lengths and rest at different heights. The useful target is a controlled overall shape with protected anchors, not identical strands or identical darkness on both sides.
Record the Natural Dry and Released Baseline
For a dry workflow, allow the roots, inner support layers, and free ends to dry completely. Remove bands, clips, tight collars, and prolonged hand tension. Let the beard settle in its ordinary worn position, then record front, profile, and three-quarter views under stable light.
Philips’ current beard-trimming support guidance tells users of the covered products to wash and dry the beard and face and begin with a higher or maximum setting while learning the tool. That is a model-specific example supporting a dry, longer-first setup; it is not a universal rule for every device or method.
Do Not Use Heat or Tension as a Hidden Measuring Tool
Heat styling, tight brushing, bands, and sustained pulling can temporarily change how curl groups hang. If the intended result is the natural dry shape, do not select final length while the beard is stretched. The released endpoint, not the longest pulled endpoint, controls the protected floor.
If a professional method deliberately uses a different reference state, define it explicitly and understand how the beard will behave afterward. This page does not prescribe heat, a straightening product, or a tension-cutting technique.
Detangle From the Ends in Supported Sections
Support a small section above a snag and work from the free ends upward with clean fingers or a suitable wide-tooth comb. Reduce the section when resistance increases. Stop rather than pulling a knot through the comb or forcing several curl groups into one bundle.
The American Academy of Dermatology’s healthy-beard guidance discusses washing, moisturizing, and combing a beard while caring for the skin beneath it. Use that source for general care boundaries, not as a universal cutting, product, or curl-treatment prescription.
Release Every Section After the Comb Passes
Remove hand and comb tension, allow the section to regroup, and observe where its ends sit. A section is not ready for length comparison while it is still elongated between fingers or pulled by a comb. Repeat the release after every clip, parting, product change, or tool contact.
Wait long enough to see whether the group retracts, rotates, or joins a neighboring curl. The pause provides information that a rapid series of passes would erase.
Map Root Direction, Middle Travel, and Released Ends
Trace representative groups from where they grow, through the middle of the beard, to their released endpoints. Cheek hair can travel toward the jaw, jaw hair can cross toward the chin, and under-jaw hair can contribute to the lower silhouette. The visible end does not always identify its root zone.
The long-beard grain guide explains this three-part map. Use it to assign ownership, not to prescribe one universal cutting direction. The exact tool and guard instructions remain controlling.
Identify Curl Groups Without Forcing Perfect Sections
A curl group is a small cluster that naturally travels and releases together. Identify only the groups relevant to the planned correction. Do not create rigid geometric sections that require stretching, flattening, or separating every strand.
Mark the group’s root zone, outer path, released endpoint, neighboring support, and protected anchor. If those boundaries cannot remain visible without sustained tension, the target is not ready for a powered pass.
Separate Outer, Supporting, and Crossing Layers
The outer layer carries visible projection. Supporting layers create volume beneath it. Crossing hair begins in one zone and rests in another. Lift and release each function separately so a guard does not collect several layers whose protected lengths differ.
The long-beard mistake guide covers hidden-layer admission and crossing-hair ownership. Keep non-target layers outside the cutting path rather than compressing them behind the target curl group.
Protect Structural Anchors
Mark the lowest central chin point, forward chin projection, two jaw-corner turns, maximum side width, mustache connection, cheek boundary, and neckline. Keep these anchors outside the first test unless one is the specifically mapped target.
A curl group can spring outward after nearby weight is removed. That change does not authorize repeated shortening of the central chin or jaw corner. Restore the complete released shape before deciding whether an anchor actually needs work.
Compare Sides by Landmarks, Not Curl Count
Use matched landmarks such as jaw corner height, side projection, central chin relationship, and the lower silhouette. Do not compare the number of visible curls or the darkness of each side. Density, grouping, light, and natural growth can make equal structural lengths look different.
Keep one side untouched during the first test. It serves as a reference for overall width and anchor position, not as a template that the other side must copy strand by strand.
Define a Protected Released-Length Floor
For the target group, write the shortest natural released length you are unwilling to lose. Compare that floor with the exact documented guard or adjustment range. A setting longer than the floor is a starting check, not proof that every curved strand will enter or remain at the same endpoint.
The long-beard guard guide explains layer floors, outer-layer admission, and longer-first testing. If the verified longest setting is already shorter than the protected floor, reject the guarded setup.
Verify the Exact Tool and Guard
Confirm the model, cutter, compatible attachment, setting mechanism, power mode, cleaning rule, and wet-use boundary. Install the guard with power off and check teeth, rails, locks, side seating, adjustment travel, and clearance. A similar-looking guard or printed number does not establish compatibility or retained length.
Stop for bent, chipped, corroded, loose, cracked, contaminated, or misaligned parts. Follow exact-model maintenance and lubrication instructions. The cleaning and oiling guide provides general boundaries but does not override the manual.
Test Operation Away From the Beard
After correct assembly, run the tool briefly away from hair. Stop for abnormal rattle, impact, surging, slowing, odor, smoke, heat, unstable power, or guard movement. Switch off before touching or readjusting the head.
A normal off-face run does not prove that the tool can preserve the planned long-beard length. It only removes obvious equipment problems from the immediate workflow.
Choose One Low-Visibility Outer Curl Group
Select one group that remains beyond the intended silhouette after detangling, recombing, full release, and a short settling pause. Keep its root path, supporting layer, protected floor, and neighboring anchors visible. Avoid the central chin, mustache, cheek line, neckline, and lighter-density areas for the first test.
The group should enter the verified guard without squeezing, twisting, or stretching. If admission requires combining several groups or pushing support hair into the path, reduce the section or stop.
Rehearse Contact With Power Off
Place the guard against the selected group only in an orientation allowed by the exact instructions. Confirm that the target remains visible and that the path does not capture a jaw corner, central chin hair, crossing group, or shorter support layer.
A powered-off rehearsal cannot prove the result, but it can reveal a hidden-layer or visibility problem before hair reaches moving teeth. Reject any path that depends on pressure or hand-held guard stabilization.
Make One Short Longer-Setting Pass
Use the verified longer setting and one short controlled movement through the selected outer group. Maintain only the contact required by the manual. Do not scoop, rock, press, repeatedly tap, or follow a curl around several zones in one powered movement.
Stop at pulling, snagging, stalling, guard movement, lost visibility, or unexpected section movement. The trimmer-pulling guide covers equipment troubleshooting; this page does not solve pulling by changing curl tension.
Clear, Recomb, Release, and Wait
Switch off and clear clippings only as the manual permits. Reinstall and reconfirm the guard when required. Gently recomb the complete beard, release every layer, restore ordinary posture and clothing clearance, and wait for the target and neighboring curls to settle.
Do not judge while holding the target or immediately after lifting support layers. Compare front, profile, and three-quarter views. A change that disappears after release needs no second pass.
Assess Spring-Back Before Correcting
Compare the group’s released endpoint with the protected floor and complete silhouette. Check whether nearby support expanded, the jaw corner changed, or the side projection moved. Record what changed rather than assuming the target became too short or remains too long.
If the group sits inside the plan, stop. If it remains outside but the reason is uncertain, stop and remap. Spring-back is an observation to manage, not a defect that trimming can remove.
Use a Strict Correction Budget
Allow one initial pass, one full clearing and release cycle, and at most one additional justified correction on the same owned group. Do not move the correction to the opposite side, hidden support, central chin, neckline, mustache, or jaw corner.
If several groups, directions, settings, or both sides now appear to need work, schedule a complete mapped trim. A strict budget preserves length and information while the released behavior is still being learned.
Know When Scissors Are a Separate Workflow
Scissors may be considered when a few visible released ends exceed the contour but cannot enter a verified guard without collecting protected layers. This is a task boundary, not a claim that scissors are safer, easier, or more accurate.
The scissors versus clippers guide compares roles. A scissor method requires clear visibility, very small sections, protected skin, stable control, and its own stop conditions.
Stop Conditions
Stop for pulling, snagging, stalling, abnormal noise, odor, smoke, heat, impact, guard movement, damaged teeth, loose parts, cracked housing, unstable power, uncertain wet-use status, or any curl group that cannot remain visible and released without tension.
Also stop over painful, broken, bleeding, swollen, infected-looking, or otherwise concerning skin and seek appropriate care. Pause for sudden or unexplained hair loss. This guide does not diagnose a skin, hair, or equipment condition.
Curly Long-Beard Checklist
- Define one observable change and protected anchors.
- Record the fully dry, released natural shape.
- Detangle end-first in supported sections.
- Release after every comb, clip, and hand position.
- Map root direction, middle travel, and released ends.
- Separate outer, supporting, crossing, and protected layers.
- Compare sides by landmarks rather than darkness or curl count.
- Set a protected released-length floor.
- Verify the exact tool, guard, maintenance, and power.
- Rehearse one low-visibility outer group with power off.
- Make one short longer-setting pass.
- Clear, recomb, release, wait, and use a strict correction budget.
Frequently Asked Questions
Should I straighten a curly long beard before trimming?
Do not make straightening a universal step. For a dry natural-shape workflow, detangle gently, let every layer release, and judge length without heat or sustained tension. A stretched reference can hide spring-back and change where the ends sit after release.
Why does a curly long beard look shorter after trimming?
A curl group can retract after hand or comb tension is removed, and removing outer weight can change how nearby layers rest. Make one small test, clear the tool, recomb, release fully, wait, and inspect the complete silhouette before deciding whether another correction is needed.
Should I trim a curly long beard with or against the grain?
Map root direction, middle travel, and released ends by zone, then follow the exact trimmer instructions. Use only a direction that admits one identified section predictably. Change one variable at a time after switching off, clearing, recombing, and releasing the beard.
Can trimming make both sides of a curly long beard identical?
No. Curl grouping, density, growth direction, facial structure, and spring-back can remain different. Compare protected landmarks and the released silhouette, correct only confirmed excess, and do not chase identical darkness, curl shape, or strand count.
Sources and Claim Boundary
- Philips beard-trimming support guidance for covered-model dry preparation, comb use, and longer-first familiarization.
- American Academy of Dermatology healthy-beard guidance for general beard and underlying-skin care boundaries.
- Philips Multigroom manual as a model-family example for clean dry hair, combing, guard contact, direction changes, and clearing.
Claim boundary: This page provides a generic curly long-beard release, grouping, layer-ownership, longer-setting test, spring-back, and reassessment workflow. It does not straighten hair, change curl type, diagnose skin or hair, prescribe a universal guard, direction, pressure, speed, pass count, product, wet-use method, maintenance schedule, or replacement interval; rank products; report hands-on testing; promise comfort, symmetry, density, growth, safety, control, or a result; or replace exact-model instructions and qualified care.
