
Disclosure: This site may use affiliate links. Product specifications should be checked against manufacturer or retailer pages before purchase.
Direct Answer
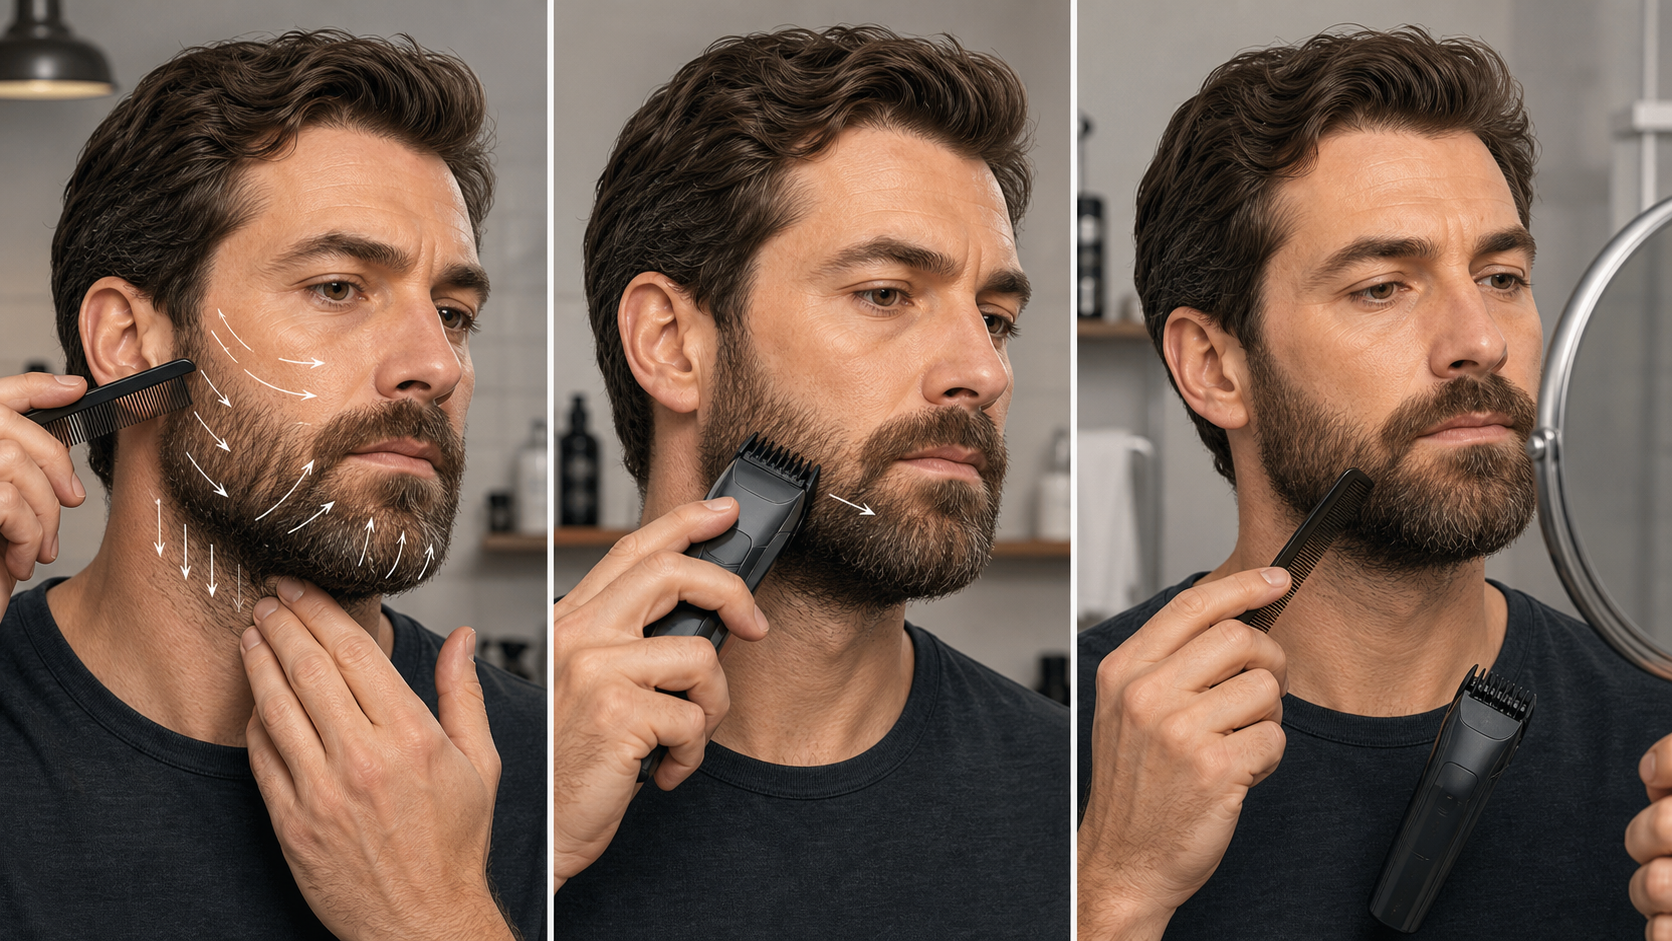
Direct answer: Trim a medium beard with the grain by mapping the direction of each cheek, jaw, chin, mustache, and under-jaw zone, attaching a longer verified guard, and making one light pass in the direction the hair naturally lies. Clear clippings, recomb the beard, and reassess before another pass. With-the-grain trimming preserves correction room but may leave low-lying hairs longer.
With the grain means moving in the same direction that a local section of beard naturally lies. It is a conservative length-reduction method, not a universal finishing rule. Some guarded trimmers instruct users to move against growth for a more even result. The exact model manual controls direction, guard contact, pressure, attachments, wet or dry use, cleaning, and safety.
Medium-Beard Grain Decision Map
| Decision | What to observe | Conservative action |
|---|---|---|
| Local grain | The direction hair lies flatter after light combing | Draw a separate direction for each beard zone |
| Starting length | Exact-model guard value and shortest zone to preserve | Begin longer than the estimated final target |
| First pass | One small, denser cheek or side zone | Move with local growth using light, flat guard contact |
| Assessment | Relaxed dry hair after clippings are cleared | Recomb before changing any variable |
| Remaining long hairs | Direction, spring-back, density, and guard loading | Remap the zone before moving shorter or reversing direction |
Philips’ official OneBlade trimming instructions tell users to keep the comb in full contact and trim against growth for the best result. A current Philips groomer manual notes that hair does not all grow in one direction and recommends trying different directions with smooth, gentle strokes. These sources establish why grain must be mapped and why a conservative with-grain pass may not be the final pass for every guarded tool.
Prepare a Stable Medium-Beard Baseline
Begin with a beard that is clean enough to comb, fully dry, and resting in its normal shape unless the exact model instructions specify another method. Remove heavy product that groups or stiffens hair. Do not map direction while the beard is damp, pulled straight, or compressed from sleep.
Use even front and side lighting. Photograph the front, both profiles, and under-jaw area before removing length. The purpose is to preserve a reference for zone shape and projection, not to promise symmetry.
The medium-beard preparation guide covers target definition, complete drying, detangling, length zoning, tool inspection, and a one-variable first-pass plan. This page begins after that baseline is stable.
Map Grain by Local Zone
Divide the beard into right and left upper cheek, lower cheek, sideburn, jaw corner, chin center, mustache, under-jaw, and neck. Lightly stroke or comb a small section in several directions. The direction that feels smoother and lets the hair settle flatter is generally with the grain; the opposite movement lifts toward the roots.
Draw arrows on a private reference image or write a simple zone list. Do not draw one downward arrow for the whole face. Cheek hair may angle toward the jaw, jaw hair may sweep backward, chin hair may turn inward, and under-jaw hair may grow upward or form a swirl.
Curly hair can change direction within a small area and spring back after tension is released. The curly-beard direction guide explains relaxed-state judgment and spring-back; use those principles without treating a medium beard as a stretched straight measurement.
Distinguish Grain From Beard Shape
Grain describes how hair grows and lies. Beard shape describes the visible silhouette created by length, density, curl, and boundaries. A chin can project forward even when its local hair points downward or inward. A broad jaw can come from density rather than a different growth direction.
Do not shorten a zone merely because it appears darker or fuller. Confirm whether the hairs are actually longer after they are recombed and relaxed. A with-the-grain pass should follow the mapped direction while preserving the structural length assigned to that zone.
Keep final cheek-line, neckline, and mustache-edge redesign outside this pass. Boundaries are separate decisions and should not be changed automatically because the trimmer reaches an edge.
Verify the Guard and Exact Model
Record the complete trimmer model, attachment, millimeter value, dial position, and lever position if applicable. Guard numbers are not universal across brands. Attach the comb while the tool is off and confirm that it sits level, locks securely, and does not rock.
Choose a setting that protects the shortest important zone included in the pass. The medium-beard guard guide covers exact-model identity, preservation zones, zone-specific settings, and a longest-to-shorter calibration ladder.
Stop for a cracked, bent, loose, cross-model, or unidentified guard. Do not hold an unstable attachment in place with a finger or press harder to make a longer setting behave like a shorter one.
Choose a Conservative Test Zone
Use a small, visible, denser lower-cheek or side zone where leaving extra length would not damage the plan. Avoid the central chin, a sparse patch, mustache edge, sharp jaw transition, or area with painful or broken skin.
The test zone should have one mapped direction and enough room for one smooth pass. Keep all other zones untouched until the result is cleared, recombed, and assessed. Testing both cheeks or several directions at once removes the ability to identify what changed.
Switch the trimmer on away from the face and listen for normal operation. Stop for abnormal blade contact, rattle, vibration, odor, pulling, or rapid heat.
Make One With-the-Grain Pass
Place the documented guard surface against the test zone using light pressure. Move in the same direction that the local hair naturally lies. Keep the pass smooth and confined to the mapped zone. Do not tilt the front teeth into the skin or force the tool through resistance.
A with-the-grain pass may remove projecting ends while leaving hair that lies flat. That is useful information. The purpose is to make a controlled first reduction and observe how the guard interacts with the natural direction, not to prove the final length is already uniform.
Do not make repeated fast passes over the same strip. More passes can remove additional hairs and change the comparison even when the setting is unchanged. The basic beard-trimmer workflow covers broader pass planning, guard contact, clipping removal, and post-trim care outside this direction-specific guide.
Clear Clippings and Recomb Before Judging
Switch the tool off, remove loose clippings from the beard, and clear the guard as the manual allows. Let compressed hair settle, then comb the test zone into its natural resting position. Inspect it in ordinary room light as well as close mirror light.
Compare the zone with the starting photograph and adjacent untouched hair. Check visible length, projection, density, and transition. Do not judge while cut hair remains trapped in the beard or guard.
If the zone still looks long, first ask whether the hairs escaped because they lie flat, curl away, or changed direction. The guard setting may be correct even when a few hairs need a different model-approved direction later.
Change One Variable at a Time
Keep the same guard and test zone if direction is the uncertain variable. Keep the same direction if the verified length setting is the uncertain variable. Do not move shorter, press harder, reverse direction, and widen the zone in one step.
If the with-grain pass removed too little and the manual permits other directions, remap the local hair before a separate across- or against-grain test. If the actual length remains above the target, move only one documented guard step shorter and repeat a small controlled test.
Record the model, guard, zone, direction, and useful stop point. That record supports repeatability better than a generic statement such as “use guard two and go downward.”
Work Through Cheek and Side Zones
Once the test is accepted, continue through one cheek or side in small mapped sections. Follow local arrows instead of drawing the trimmer from top to bottom across every section. At a direction change, lift away, reposition, and begin a new pass.
Alternate matched right and left zones rather than finishing one entire side first. The left-right comparison workflow provides a useful sequence for matched lighting, camera position, and stop points even though a medium beard retains more structural length.
Do not chase a natural density difference by repeatedly shortening both sides. Stop trimming a side that already meets its planned length.
Handle Jaw Corners Without Crossing Zones
Jaw corners often contain a growth-direction change and a structural length transition. Turn the head enough to see the surface without aggressively stretching the skin or beard. Map the cheek side and under-jaw side separately.
Finish the with-grain pass in one zone, lift the trimmer, then reposition for the neighboring direction. Do not arc a single pass around the corner while the guard contact changes from flat to its front teeth.
Keep blending outside this first pass. The jaw-corner blending guide explains narrow transitions; medium-beard work should preserve the planned chin and jaw structure before any shorter blend is introduced.
Preserve Chin Projection
The chin is often longer or denser than the cheeks in a medium-beard design. Map center, left, right, and under-chin directions separately. Keep the chin out of a cheek setting unless the same verified target is intentional.
Use a longer guard or no bulk reduction where projection must remain. A with-grain pass can control obvious projecting ends, but it should not flatten the entire chin into the cheek length by default.
Recomb after every limited pass and view both profiles. Stop when the planned projection remains stable, even if natural density makes one area appear darker.
Treat the Mustache as a Separate Task
Mustache hair can point down, outward, sideways, or toward the center. Map both halves and the center separately. Use only the guard or detail attachment documented for the exact tool and planned mustache length.
Keep the lip protected with light pressure and stable attachment contact. Do not include the mustache in a cheek pass simply because both hair zones are on the face. Lip clearance, bulk reduction, and outline work are separate decisions.
If visibility is blocked or the attachment will not seat securely, stop. Do not remove the guard by default to complete a length-setting pass.
Map the Under-Jaw and Neck Carefully
Under-jaw and neck hair often turns upward, sideways, or into a swirl. Use a second mirror and divide the area into smaller sections. A downward movement can be against the grain in one section and with it in another.
Keep the guard flat over curves and reduce pressure. Do not stretch skin or beard so far that the mapped direction changes. Finish one local section, clear clippings, and reassess before moving across a swirl.
This pass does not define a new neckline. The neckline guide covers boundary placement and edge work separately.
Know When a Model-Approved Finishing Direction Is Needed
A with-the-grain pass can leave low-lying hairs longer because the guard moves in the same direction they lie. If the exact manual directs guarded trimming against growth, use that instruction in a separate controlled finishing step after the conservative pass has been assessed.
Philips’ OneBlade instructions cited above specify against-growth movement with the comb in contact. Philips’ groomer irritation guidance also cautions against repeatedly covering the same area. The correct response to missed hair is therefore not unlimited with-grain passes or harder pressure.
This page does not prescribe one finishing direction for every tool. Follow the exact model’s instructions and stop if another direction causes pulling, unstable guard contact, or skin discomfort.
Common Direction Mistakes
- Assuming the entire medium beard grows downward.
- Confusing the grain map with the final beard silhouette.
- Using one cheek direction around the jaw and under the neck.
- Pressing harder when low-lying hairs remain after a with-grain pass.
- Tilting the guard so only its front teeth contact the face.
- Repeating one strip before clearing clippings and recombing.
- Changing direction, guard, pressure, and zone at the same time.
- Including chin, mustache, or neckline boundaries in a broad cheek pass.
Repeatable With-the-Grain Sequence
- Prepare the medium beard in a clean, fully dry, relaxed state.
- Map local growth in cheek, jaw, chin, mustache, under-jaw, and neck zones.
- Record the exact model, guard, setting, and zones to preserve.
- Choose one small dense test zone and a longer verified setting.
- Make one light pass in the direction that local hair naturally lies.
- Switch off, clear clippings, and recomb the relaxed zone.
- Compare with the starting shape and adjacent untouched hair.
- Change only direction, setting, or zone in the next test, never all three.
- Continue through matched local zones while preserving chin and boundary structure.
- Use another direction only when the exact manual permits it and the assessed result requires it.
Stop Conditions
Stop if the guard is cracked, loose, tilted, or changes setting; the blade has bent or broken teeth; or the trimmer rattles, stalls, pulls, shifts, smells abnormal, or becomes unexpectedly hot. Also stop for a damaged cable, charger, port, battery, housing, or water exposure outside the model rating.
Do not tape a guard in place, reshape it, substitute a similar-looking attachment, open a sealed handle, or continue over painful, broken, bleeding, or actively irritated skin. If the tool pulls despite correct direction and light contact, use the trimmer-pulling checks before another pass. This workflow does not diagnose skin or hair conditions, change beard growth, or guarantee symmetry, comfort, density, or a particular result.
Frequently Asked Questions
Should I trim a medium beard with or against the grain?
A with-the-grain pass can make a conservative first reduction and preserve correction room. Some guarded trimmers direct users to finish against local growth for a more even length, so follow the exact model manual.
How do I find the grain direction in a medium beard?
Let the clean, dry beard settle, then lightly comb or stroke small cheek, jaw, chin, mustache, and under-jaw zones. The direction in which hair lies flatter is generally with the local grain.
Why does a with-the-grain pass leave longer hairs?
Some hairs lie down in the same direction as the moving guard and may not enter the cutter consistently. Recomb and reassess before changing the guard, pressure, or direction.
Can I use one grain direction for the whole beard?
Usually not. Medium-beard growth can change across cheeks, jaw corners, chin, mustache, and neck. Map and trim one local zone at a time instead of assuming every hair points downward.
Sources and Claim Boundary
Primary references reviewed in July 2026 are the Philips OneBlade trimming instructions, current Philips groomer manual, and Philips groomer irritation guidance linked above. This page provides a generic medium-beard grain-mapping and conservative with-grain workflow. It does not report hands-on testing, prescribe one final direction for every trimmer, guarantee an even result, diagnose skin or hair conditions, or replace the exact model’s direction, attachment, pressure, cleaning, lubrication, wet-use, charging, and safety instructions.
