
Disclosure: This site may use affiliate links. Product specifications should be checked against manufacturer or retailer pages before purchase.
Direct Answer
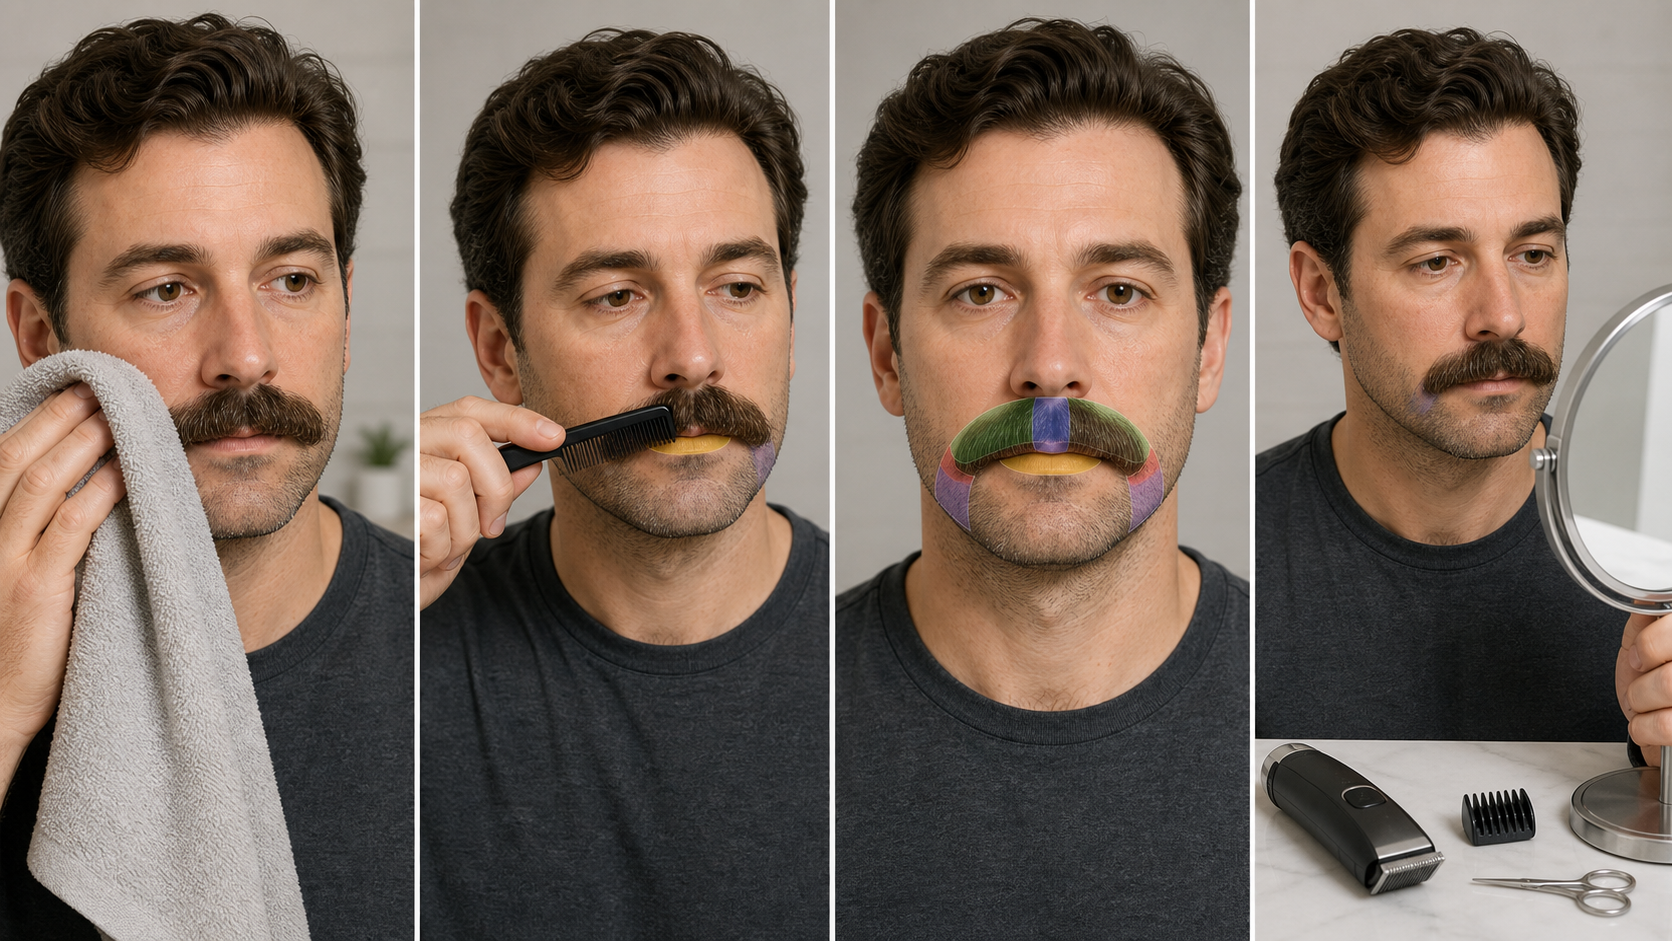
Direct answer: Prepare a mustache before trimming by defining the intended change, cleaning it only when needed, drying the hair and skin fully for a dry method, and gently combing it into its natural resting position. Map the center, upper boundary, lip opening, mouth corners, and beard connections; inspect the exact tool and attachments; record an untouched baseline; then stop before cutting.
This page ends at readiness. It does not choose the final guard, prescribe a cutting direction, correct symmetry, define a style, or perform edge cleanup. Those are separate decisions after the mustache, skin, workspace, tool, and protected boundaries are observable.
Mustache Preparation Map
| Area | Record before trimming | Protect from accidental change |
|---|---|---|
| Center | Natural split, overlap, direction, density difference | Do not invent or widen a gap during preparation |
| Upper boundary | Natural hairline below the nose | Do not redraw it while combing |
| Lip opening | Where released ends rest relative to the lip | Do not choose clearance under tension |
| Mouth corners | End position and connection to surrounding hair | Do not shorten one side from a tilted view |
| Beard connection | Whether the mustache joins, overlaps, or remains separate | Keep non-target beard hair out of the future path |
Keep Preparation Separate From the Next Mustache Tasks
This page owns the no-cut setup: current-state observation, dry natural reference, center and lip mapping, tool inspection, workspace, baseline photographs, and stop conditions. It does not own guard choice, with- or against-grain technique, side-to-side correction, mistake recovery, touch-ups, edge cleanup, patchy-growth decisions, coarse-hair loading, or curly-hair release.
The distinction prevents one vague “mustache trimming” page from duplicating a series of separate user tasks. Use the beard trimmer buying guide if the tool category or model has not been selected. Preparation begins only after the intended tool and mustache task can be named.
Define One Intended Change
Write one narrow objective before washing, combing, or handling a cutter. Examples include preparing to reduce overall bulk while preserving the current outline, preparing to clear only hair that naturally rests over the lip, or preparing to inspect projecting ends without changing the center or mouth corners.
“Make it neat” is not a usable preparation target. It does not identify length, lip clearance, outline, center, side endpoints, or beard connection. A narrow statement makes it possible to mark protected areas before anything irreversible occurs.
List What Must Not Change
Record the center position, upper boundary, desired lip coverage, both mouth-corner endpoints, side width, curl or wave pattern, and mustache-to-beard connection. Note any intentional asymmetry, lighter-density area, scar, mole, or skin area that must remain outside the tool path.
Do not assume every mustache needs a visible center gap or a straight lower edge. The mustache middle-gap guide discusses the appearance and maintenance implications of a center opening. Preparation should preserve the current decision unless redesign is explicitly planned as another task.
Record the Untouched Baseline First
Before changing moisture, product, comb direction, or posture, view the mustache in even front and side light. Record a straight-on image and both three-quarter views at a consistent distance. Keep the head level, lips relaxed, and ordinary beard or stubble visible.
Note whether the hair was recently washed, damp, waxed, brushed, compressed during sleep, or exposed to a mask or clothing. The baseline is an observation record, not proof of a result. It helps distinguish the normal state from changes caused by preparation.
Check the Skin Before Handling Hair
Use bright neutral light to inspect the upper lip, philtrum, mouth corners, and skin beneath accessible hair. Stop over painful, broken, bleeding, swollen, crusted, infected-looking, or otherwise concerning skin. Pause for a changing lesion, unexplained hair loss, or symptoms that require qualified care.
The American Academy of Dermatology’s healthy-beard guidance emphasizes care for facial hair and the skin beneath it. This page uses that source for general cleaning and skin-observation boundaries, not to diagnose a condition or prescribe a product.
Remove Heavy Product Only When Needed
Wax, balm, oil, food residue, and dried cosmetic product can hold several hairs in a false group or hide the natural lip position. Clean the mustache using a method and finished product already suitable for the person, then rinse as directed. Avoid aggressive scrubbing or introducing a new styling product immediately before a precision task.
If the current style depends on waxed handlebars or another deliberately trained position, record both the unstyled and intended styled references. Do not assume the dry natural position and the styled endpoint are interchangeable.
Dry the Roots, Center, and Ends Fully
For a dry trimming plan, dry the skin, root area beneath the nose, center, lower ends over the lip, and mouth-corner sections. Pat rather than rubbing when appropriate, then allow the hair to return to its ordinary resting position. Surface-dry hair can still retain moisture near dense roots or product-bound groups.
The current Philips MG3900 manual tells users of the covered products to use clean, dry hair and comb before trimming. Treat that as exact-product guidance and a bounded preparation example; another tool’s manual controls its wet or dry use.
Do Not Judge Length Under Tension
Pulling the ends downward can make the mustache appear longer and create a false cutting reference. Holding the lip tight, stretching one mouth corner, or pressing a comb against the skin can also change where the hair rests after release.
Use hand contact only to separate and observe. Release the hair and facial expression before recording length, center position, or lip coverage. Preparation should reveal natural behavior, not force the mustache into a temporary geometry.
Choose a Suitable Clean Comb
Select a comb whose tooth spacing enters the mustache without scraping skin or forcing dense sections. Inspect for cracks, sharp seams, broken teeth, residue, and snagging. A very fine comb may be unsuitable for the first pass through longer, curly, or product-bound hair.
The bone mustache comb guide and folding mustache comb guide explain material, tooth, hinge, cleaning, and storage checks. Neither comb type is universally best; condition and task fit matter more than the label.
Comb in Small Released Sections
Begin near one side and move gently through a small section in the direction it naturally rests. Support above a snag and work from free ends when needed. Reduce the section instead of pulling the entire mustache through resistance.
After the comb passes, remove tension and let the section settle. Repeat through the center and opposite side. This is not the final cutting-direction decision; it is a way to reveal crossed hairs, product grouping, natural travel, and protected boundaries.
Map the Center Without Creating a Gap
Observe whether hair naturally separates at the philtrum, overlaps across the center, grows in different directions, or remains visually continuous. Record the position under relaxed posture. Do not press a line into the hair or remove strands to make the center look more obvious.
Center mapping is especially important because a small change can become a visible focal point. Preparation should identify the existing pattern and the intended protected width, leaving any actual center shaping for a deliberate later task.
Map the Upper Boundary
Observe the natural hairline beneath the nose and how it changes from the center toward each side. Note sparse points, irregular growth, scars, skin folds, and hairs that originate above or below the apparent line. Do not draw a new top boundary merely because a reference image shows one.
Keep the nose and nostril area outside a powered-tool path unless the exact device and task explicitly support that work. Mustache preparation is not nose-hair trimming.
Map the Lip Opening in a Relaxed Position
With lips relaxed and closed naturally, record where the released ends sit relative to the upper-lip edge and mouth opening. Then speak, smile lightly, and return to neutral to observe movement. Do not select final clearance while stretching the lip or pressing hair flat.
Separate hair that rests over the lip from hair that curls outward or joins the side. A visible end may originate farther toward the center or corner than it appears. Trace it before assigning it to a future section.
Map Both Mouth Corners Separately
Observe where each side ends, whether it turns downward, joins beard growth, curls outward, or becomes lighter. Compare using a level head and matched light. One corner may move differently with speech or expression.
Do not shorten the lower-looking side during preparation. Apparent height can change with head tilt, lighting, density, curl, or a temporary comb position. Record the difference and preserve both corners until the full trimming plan addresses it.
Separate Mustache Hair From Beard Connections
Trace side hair to determine whether it belongs to the mustache, cheek, goatee, or beard connection. Comb surrounding hair away only long enough to identify ownership, then release it. Protect non-target beard and stubble from the future path.
The scissors versus clippers guide explains task boundaries between isolated visible ends and broader guarded length work. Preparation can identify the likely method but should not combine a new scissor and powered-tool technique in one uncertain plan.
Identify the Shortest Natural Section
Find the naturally shortest visible section that the planned bulk pass might cross. Record its released length and location without pulling it straight. This becomes a protected floor for later guard selection, but it does not select the guard by itself.
The guard-size guide explains why guard numbers, colors, and millimeters must be verified for the exact system. Sequence42 owns the actual mustache guard choice; this preparation page only provides the observations it needs.
Choose Stable Visual Landmarks
Use the center, nostril positions, lip peaks, mouth corners, and beard connections as reference landmarks. Mark them mentally or on a private baseline image. Do not place ink, adhesive, or another product on the skin merely to create a cutting guide.
Landmarks support repeatable observation; they do not promise symmetry. Facial structure, hair density, and natural growth can remain different on each side.
Prepare Even Lighting and Mirror Angles
Use diffuse front light plus enough side light to reveal projecting ends without deep shadows. Clean the mirror and position it so the head can remain level. A second mirror can help inspect side endpoints without twisting into an unstable posture.
Do not rely on a close wide-angle phone view alone. It can exaggerate the center or corners. Use the same viewing distance before and after preparation and avoid changing the plan from one shadowed angle.
Protect the Workspace
Clear the counter, stabilize the mirror, and keep water away from electrical equipment as required. Place the clean comb, exact tool, verified attachments, brush, towel, and storage tray within reach. Keep loose blades and scissors closed or protected until their task is confirmed.
Use a towel or collection method for future clippings without blocking the mirror or forcing an unstable posture. Workspace preparation reduces interruptions but does not guarantee a safe or successful trim.
Verify the Exact Trimmer and Manual
Read the complete model and regional suffix from the tool. Confirm whether it is a beard trimmer, multigroomer, detail trimmer, clipper, shaver, or another device. Locate the matching manual and identify controls, supported attachments, power mode, wet-use limits, cleaning route, and stop warnings.
Do not transfer settings or attachments from a similar product family. The buyer framework covers exact-model identity, parts, support, and seller checks when the current tool cannot be verified.
Inspect the Cutter With Power Off
Switch off and disconnect charging power where instructed. Inspect fixed and moving teeth, blade seating, fasteners, housing, switch, port, cable, and battery area. Stop for bent, chipped, contacting, corroded, loose, cracked, contaminated, leaking, swollen, or unusually hot components.
Follow the exact cleaning and lubrication route. The cleaning and oiling guide provides general model-boundary checks. Philips’ groomer-cleaning guidance illustrates why washable, showerproof, and non-washable products require different procedures.
Inspect Attachments Without Choosing the Final Guard
Identify every candidate attachment by model support, not appearance. Check teeth, rails, clips, locks, adjustment controls, side seating, cracks, and residue. Install and remove only as the manual permits, with the cutter off.
Preparation can reject a damaged or incompatible guard. It should not decide the final length by guesswork. Record the available verified range and leave the actual choice to the dedicated guard-selection step.
Test Tool Operation Away From the Face
After correct assembly, run the tool briefly away from hair if the manual permits. Stop for abnormal rattle, impact, surging, slowing, odor, smoke, heat, unstable power, or attachment movement. Switch off before touching or adjusting any part.
A normal off-face run proves only that no obvious operational fault appeared during that check. It does not prove suitability for the mustache, comfort, retained length, battery health, or a result. Use the trimmer-pulling guide if the equipment has an unresolved cutting problem.
Create a No-Cut Readiness Record
Record the objective, protected areas, current dry state, center pattern, upper boundary, lip opening, corners, beard connections, shortest natural section, tool model, inspected attachments, workspace, and stop conditions. Keep the baseline images private when they contain identifiable personal information.
The record creates a clean handoff to guard choice or another method. If the later plan differs from these observations, return to preparation rather than forcing the new plan onto an outdated baseline.
Stop Conditions
Stop for painful, broken, bleeding, swollen, infected-looking, or concerning skin; unexplained hair loss; a knot that requires force; poor visibility; unstable posture; uncertain hair ownership; or an unclear center, lip, corner, or connection plan.
Stop for damaged teeth, loose or incompatible attachments, cracked housing, damaged power parts, abnormal sound, vibration, odor, smoke, heat, unstable power, uncertain wet-use status, or a tool without a matching manual. Do not tape a guard, force a head, substitute a charger, or open a sealed housing.
Mustache Preparation Checklist
- One intended change and all protected areas are written.
- The untouched front and three-quarter baseline is recorded.
- Skin stop conditions are absent.
- Heavy product is removed only when needed.
- Hair and skin are fully dry for the planned dry method.
- The mustache is combed gently and released without tension.
- Center, upper boundary, lip opening, corners, and connections are mapped.
- The shortest natural section and stable landmarks are recorded.
- Lighting, mirrors, posture, and workspace are stable.
- The exact tool, manual, attachments, power, and cleaning rules are verified.
- The cutter and attachments pass powered-off inspection.
- The tool is switched off and no hair has been cut.
Frequently Asked Questions
Should a mustache be wet or dry before trimming?
Follow the exact tool and method instructions. For a conventional dry guarded trim, clean the mustache when needed, then let the roots, center, ends, and skin dry fully before judging length. Moisture can group hair and change where it rests over the lip.
Should I comb a mustache before trimming?
Yes, when the comb moves without force. Use a clean suitable comb to release product-bound or crossed hairs, then let the mustache settle naturally. Combing is for observation and section mapping, not for stretching hair to choose a shorter cutting reference.
How do I choose a mustache guard during preparation?
Preparation should identify the current shortest natural length, exact trimmer model, compatible attachments, and protected areas. Make the actual guard choice in a separate verified step; do not infer retained length from a guard number, color, or similar-looking attachment.
When should I stop before trimming a mustache?
Stop for painful, broken, bleeding, swollen, or concerning skin; a tangle that requires force; damaged teeth, loose attachments, abnormal heat, odor, noise, or power behavior; poor visibility; or an unclear plan for the lip opening, center, corners, or beard connections.
Sources and Claim Boundary
- Philips MG3900 manual for the covered models’ clean dry hair, combing, beard-and-mustache guard, and switch-off/clean instructions.
- Philips groomer-cleaning guidance for model and water-resistance boundaries.
- American Academy of Dermatology healthy-beard guidance for general facial-hair and underlying-skin care boundaries.
Claim boundary: This page provides a generic no-cut mustache preparation, observation, boundary-mapping, tool-inspection, workspace, baseline, and handoff workflow. It does not select a universal guard, prescribe cutting direction, define a style, correct symmetry, diagnose skin or hair, prescribe a product, rank tools, report hands-on testing, promise comfort, safety, density, growth, or a result, or replace exact-model instructions and qualified care.
