
Disclosure: This site may use affiliate links. Product specifications should be checked against manufacturer or retailer pages before purchase.
Direct Answer
Direct answer: Prepare a medium beard for trimming by defining the intended length and boundaries, washing only as your routine permits, drying the hair completely, removing heavy product, gently detangling without stretching, and mapping growth direction and natural length by zone. Inspect the blade and guards, choose a longer verified first setting, photograph the starting shape, and write a one-variable first-pass plan before switching on the trimmer.
This preparation stage does not remove beard length. It creates a reliable baseline so that later guard, direction, and outline choices are based on the beard’s natural dry state rather than tangles, water, product, or a stretched measurement. The exact tool manual controls attachments, wet or dry use, cleaning, lubrication, charging, and safety.
Medium-Beard Preparation Map
| Preparation check | What to record | Why it matters |
|---|---|---|
| Target | Length to preserve, bulk to reduce, and boundaries to keep or change | Prevents an undefined “tidy up” from becoming an accidental reset |
| Natural state | Cleanliness, dryness, product, tangles, compression, and spring-back | Shows the visible length that will remain after grooming |
| Zones | Cheeks, sideburns, jaw, chin, mustache, under-jaw, and neck | A medium beard rarely has one length or direction everywhere |
| Tool | Exact model, blade, guard identity, documented lengths, and condition | A guard number alone is not a universal measurement |
| First pass | One zone, one longer setting, one direction, and one stop point | Keeps the first result observable and reversible |
The current Philips Multigroom manual instructs users to comb hair before trimming, use the product on clean dry hair, and keep the guard surface in contact as directed. Philips’ OneBlade trimming guidance recommends beginning with the longest setting while learning the adjustable comb. These are model-specific examples that support a conservative preparation sequence; they do not make every guard, beard, or trimmer identical.
Define the Intended Result Before Cleaning
Write down what the trim is meant to change. Separate overall length, local bulk, sideburn transition, cheek line, neckline, mustache clearance, and projecting ends. “Shorter” and “neater” are not usable settings. A medium beard can lose its structure quickly when several goals are combined without a sequence.
Identify the areas that must remain longest. The chin may provide forward structure, the jaw may create width, and the cheeks may need only loose-end control. Also identify areas that can be shorter without changing the main silhouette. This preservation map determines the safest first guard and zone.
If the desired result is uncertain, plan a maintenance trim rather than a redesign. Preserve the existing longest zones, remove only clearly planned bulk, and postpone major boundary changes. The touch-up guide explains the one-problem-at-a-time principle; a medium beard applies it over larger and less uniform zones.
The stubble preparation guide covers a much shorter baseline with less structural length. Use the medium-beard workflow here when chin, jaw, cheek, or mustache zones need to be preserved and planned separately before the first pass.
Record the Starting Shape
Stand upright in even front and side lighting. Take a front view, both profiles, and an under-jaw view before manipulating the beard. Keep the camera distance and head position consistent. The purpose is not to rate appearance; it is to preserve evidence of the original silhouette and boundary locations.
Note the lowest chin point, widest jaw area, sideburn connection, mustache edge, cheek height, and neckline center. Mark whether each is to remain, move, or be reassessed after the main length pass. A photograph cannot measure density or guarantee repeatability, but it can reveal that a later change occurred in a different zone than intended.
Do not use a close selfie alone. Perspective and wide-angle distortion can change apparent jaw width and left-right balance. Include at least one normal-distance mirror or camera view.
Clean Without Changing the Baseline
Remove dirt, loose hair, and heavy styling residue before trimming. Follow the beard-care product labels and allow sufficient time for rinsed facial hair to dry completely. Do not begin while the beard is damp simply because the surface feels dry; moisture can remain near the skin or inside denser chin and jaw areas.
Avoid adding oil, balm, wax, or styling cream immediately before the baseline assessment unless the exact grooming method requires it. Product can group hairs, weigh down curls, stiffen ends, or coat a guard. If daily product is needed for comfort, use the minimum compatible amount and record that the prepared state includes it.
The beard washing guide covers washing and complete drying in more detail. This page begins the trimming plan only after the beard has returned to a stable state.
Dry the Beard Completely
Pat or towel the beard without aggressive rubbing, then let it air-dry or use only a method appropriate for the hair and skin. Check the dense underside of the chin, jaw corners, mustache, and roots near the skin. A medium beard can appear dry at the outer surface while remaining damp underneath.
Judge the resting length only after the beard stops changing shape. Wet hair may clump, stretch, or lie closer to the face. Heat and tension can also alter the visible baseline. This guide does not prescribe heated styling or claim that a temporary straightened shape represents the natural trimming length.
Philips’ official guidance uses clean, dry hair for the cited products. Another trimmer may permit a different wet-use routine, so verify the exact manual rather than extending one manufacturer’s rule to every device.
Detangle Without Stretching the Beard
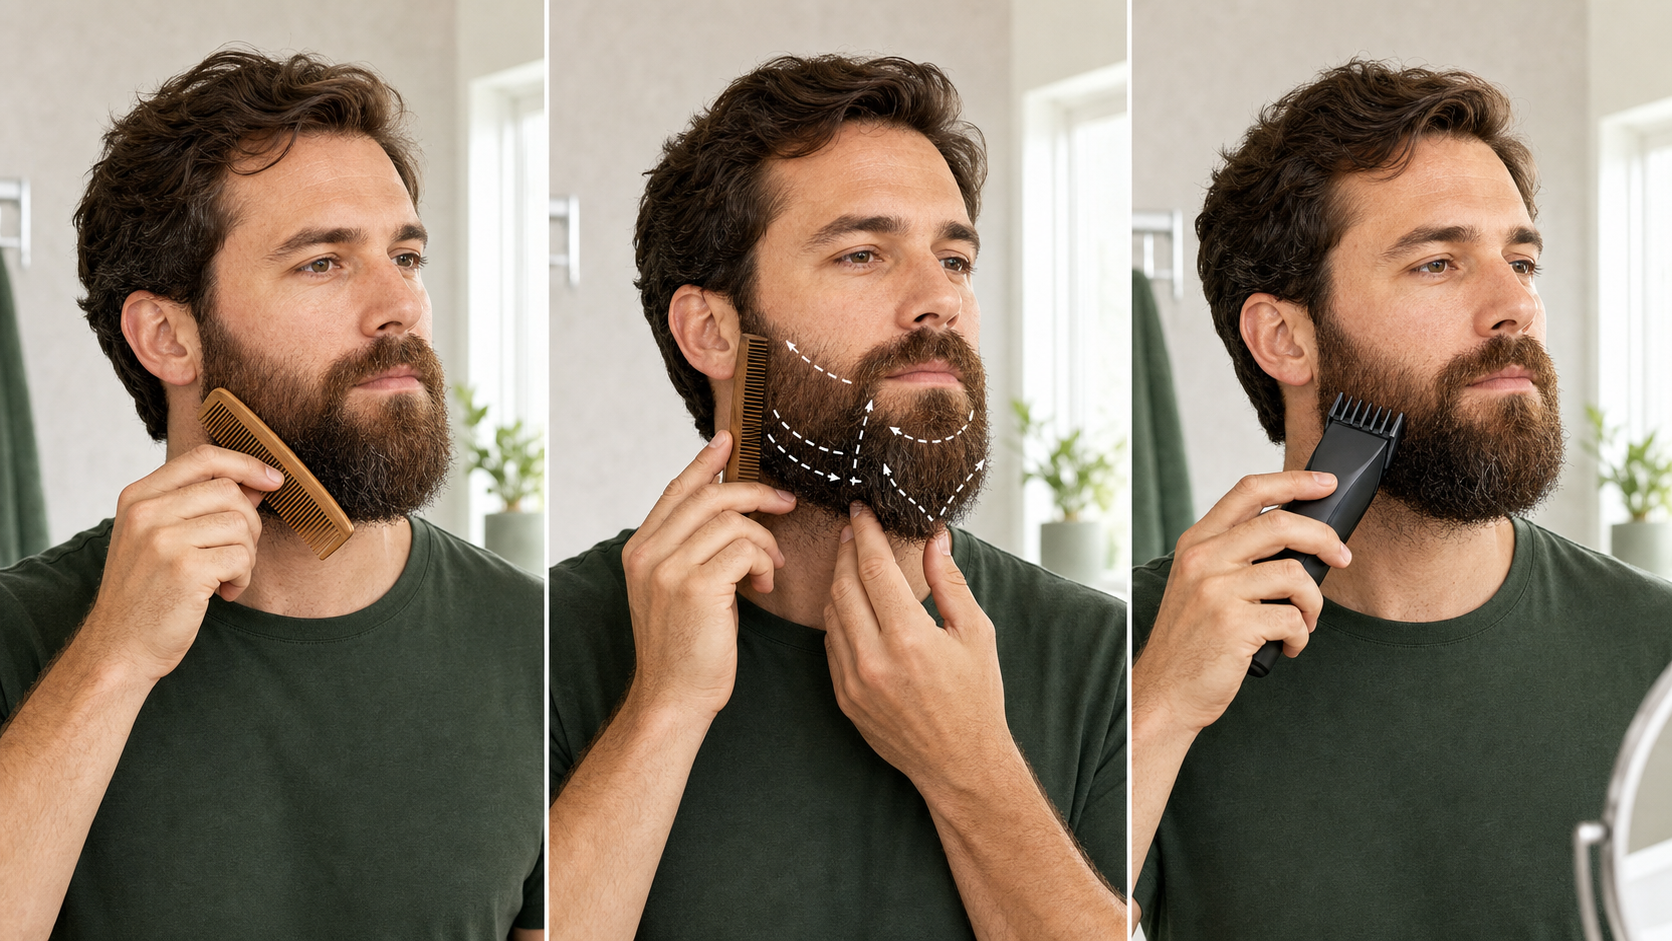
Use clean fingers or a suitable wide-to-fine comb sequence, beginning at the ends and working toward the roots in small sections. Support the beard with the other hand when needed. Stop and separate a knot rather than pulling the comb through resistance.
Comb downward and outward enough to release crossed hairs, then let the beard settle into its normal position. Do not hold the hair fully extended while choosing a guard. The distance from skin to a stretched end is not the same as the visible length after the hair relaxes.
Braun’s official beard trimming guide describes combing against growth to expose knots and uneven areas. Use that as an inspection technique, then return the beard to its natural resting pattern before recording the baseline.
Map Growth Direction by Zone
Divide the beard into sideburns, upper cheeks, lower cheeks, jaw corners, chin center, mustache, under-jaw, and neck. In each zone, lift a small section and observe the direction in which it settles. Draw arrows on a private reference image or write a short map.
Do not assume that every hair points down. Growth can turn toward the mouth, sweep backward along the jaw, rotate around the chin, or reverse under the neck. A later guarded pass should stay within a mapped zone rather than crossing several direction changes.
The with-the-grain guide explains how direction changes affect a pass. Medium-beard preparation adds length, tangles, and structural zones to that map but does not yet decide the final cutting direction.
Measure Natural Length by Zone
Use the documented guard lengths as comparison references rather than forcing the guard into the beard. Estimate which zones already sit below, near, or above the possible first setting. Record the shortest area that must be preserved and the longest area planned for reduction.
Do not average the entire beard into one number. A medium beard may have shorter cheeks, a longer chin, compressed under-jaw hair, and a mustache that needs clearance rather than bulk reduction. The first setting must protect the shortest important zone or exclude it from the initial pass.
The guard-size guide explains why printed guard numbers and millimeter values must be verified for the exact system. Never infer that two brands leave the same length because their combs share a number.
Inspect Skin and Beard Stop Conditions
Use bright light to check for cuts, active bleeding, painful bumps, raw areas, or anything that would make blade or guard contact inappropriate. Do not trim directly over a painful or broken area merely to complete the planned shape. Postpone that zone and seek appropriate advice for a concerning or persistent change.
Separate styling observations from health conclusions. Density, curl, color, and left-right difference can affect appearance, but this preparation process does not diagnose hair loss or skin conditions. Do not promise that trimming will increase growth, fullness, or health.
Stop detangling if the beard cannot be combed without force or if a knot is close to painful skin. Reassess the grooming method rather than using the trimmer as a detangling tool.
Inspect the Trimmer and Blade
Confirm the exact model and manual. Switch the tool off and disconnect charging power before handling the blade or attachments. Brush visible debris from the cutter and inspect every tooth, screw, moving part, adjustment control, housing seam, charging port, cable, and battery area.
Stop for chipped, bent, corroded, loose, or misaligned teeth; cracked housing; a damaged cable; swollen battery; unusual smell; or a control that will not hold its position. Reinstall only compatible parts by the documented method.
Run a visually safe tool briefly away from the face. Stop for abnormal blade contact, rattle, vibration, odor, or rapid heat. The cleaning and oiling guide covers generic maintenance while preserving the exact model’s water and lubrication rules.
Verify Every Guard Before Choosing One
Lay out the guards intended for beard use and match each to the manual. Inspect teeth, rails, locking tabs, adjustment wheels, and printed length markings. Attach the candidate guard while the tool is off and confirm that it sits level, locks securely, and does not rock.
Reject a cracked, bent, loose, mislabeled, or cross-model attachment. Do not hold an unstable guard in place with a finger while the blade moves. Check whether a dial or lever changes the documented length and whether removing the guard resets that setting.
Choose a longer first setting than the apparent final target, especially when the beard or tool is unfamiliar. The setting should protect the shortest structural zone included in the first pass. Exclude shorter zones instead of exposing them to a guard chosen for the longest area.
Plan Structural Zones Separately
Mark the chin, jaw corners, and sideburn transitions as structural zones if they define the current beard shape. They may need a different guard, direction, or no bulk reduction. Plan the broad cheek and side areas separately from these anchors.
Decide whether the mustache belongs in the main length pass. Mustache hair can have a different target, direction, and lip-clearance requirement. Keep it out of the first pass unless the same verified setting and direction are deliberately intended.
Record the neckline and cheek line but postpone final edging until after the bulk length is assessed. The neckline guide provides boundary vocabulary. Redefining a line before the beard settles at its new length can remove more structure than intended.
Build a One-Variable First-Pass Plan
Write the exact first zone, guard, setting, direction, and maximum area. Choose a visible, denser zone that can safely remain longer if the setting removes little hair. The first pass is a calibration step, not a commitment to use the same setting everywhere.
Plan to make one short pass, switch off or lift away as appropriate, clear clipped hair, comb the zone back into its natural position, and compare it with the starting photograph. Change only one variable afterward: setting, direction, or zone.
Do not combine a lower guard, harder pressure, a new direction, and a wider area in the second pass. When several variables change together, the result cannot show which decision removed the length.
Medium-Beard Preparation Checklist
- Define the target length, preserved structure, and boundaries to keep or reconsider.
- Photograph the natural front, profiles, and under-jaw shape.
- Remove heavy product and clean the beard using a compatible routine.
- Dry the roots, dense underside, and outer hair completely.
- Detangle from ends toward roots without stretching the beard.
- Let the beard settle and map growth direction by zone.
- Record natural length differences and the shortest zone to preserve.
- Check skin and beard stop conditions without making a diagnosis.
- Inspect the exact trimmer, blade, controls, power parts, and guards.
- Choose a longer verified first setting and exclude shorter structural zones.
- Write a one-zone, one-setting, one-direction first-pass plan.
Frequently Asked Questions
Should a medium beard be wet or dry before trimming?
Follow the exact tool instructions. For a conventional dry guarded trim, prepare the beard clean and fully dry because water and heavy product can change how the hair lies and feeds into a guard.
Should I comb a medium beard before choosing a guard?
Yes. Gently remove tangles, then let the beard settle without stretching it. Choose a first guard from the natural dry length and the shortest area you intend to preserve.
Do I need to shape the neckline before reducing beard length?
Not necessarily. Record and assess the existing neckline first. Many routines are easier to control when bulk length is established before a final neckline or cheek-line refinement.
What should stop the preparation process?
Stop for a damaged or loose blade, cracked or unstable guard, unidentified power part, abnormal heat or smell, painful or broken skin, or a beard that cannot be detangled without force.
Sources and Claim Boundary
Primary references reviewed in July 2026 are the current Philips Multigroom manual, Philips OneBlade trimming guidance, and Braun beard trimming guide linked above. This page covers preparation before a medium-beard trim; it does not report hands-on testing, rank products, prescribe a finished style, diagnose hair or skin conditions, or promise symmetry, comfort, growth, density, or a specific result. The exact model manual controls attachments, direction, pressure, wet use, cleaning, lubrication, charging, and safety.
