
Disclosure: This site may use affiliate links. Product specifications should be checked against manufacturer or retailer pages before purchase.
Direct Answer
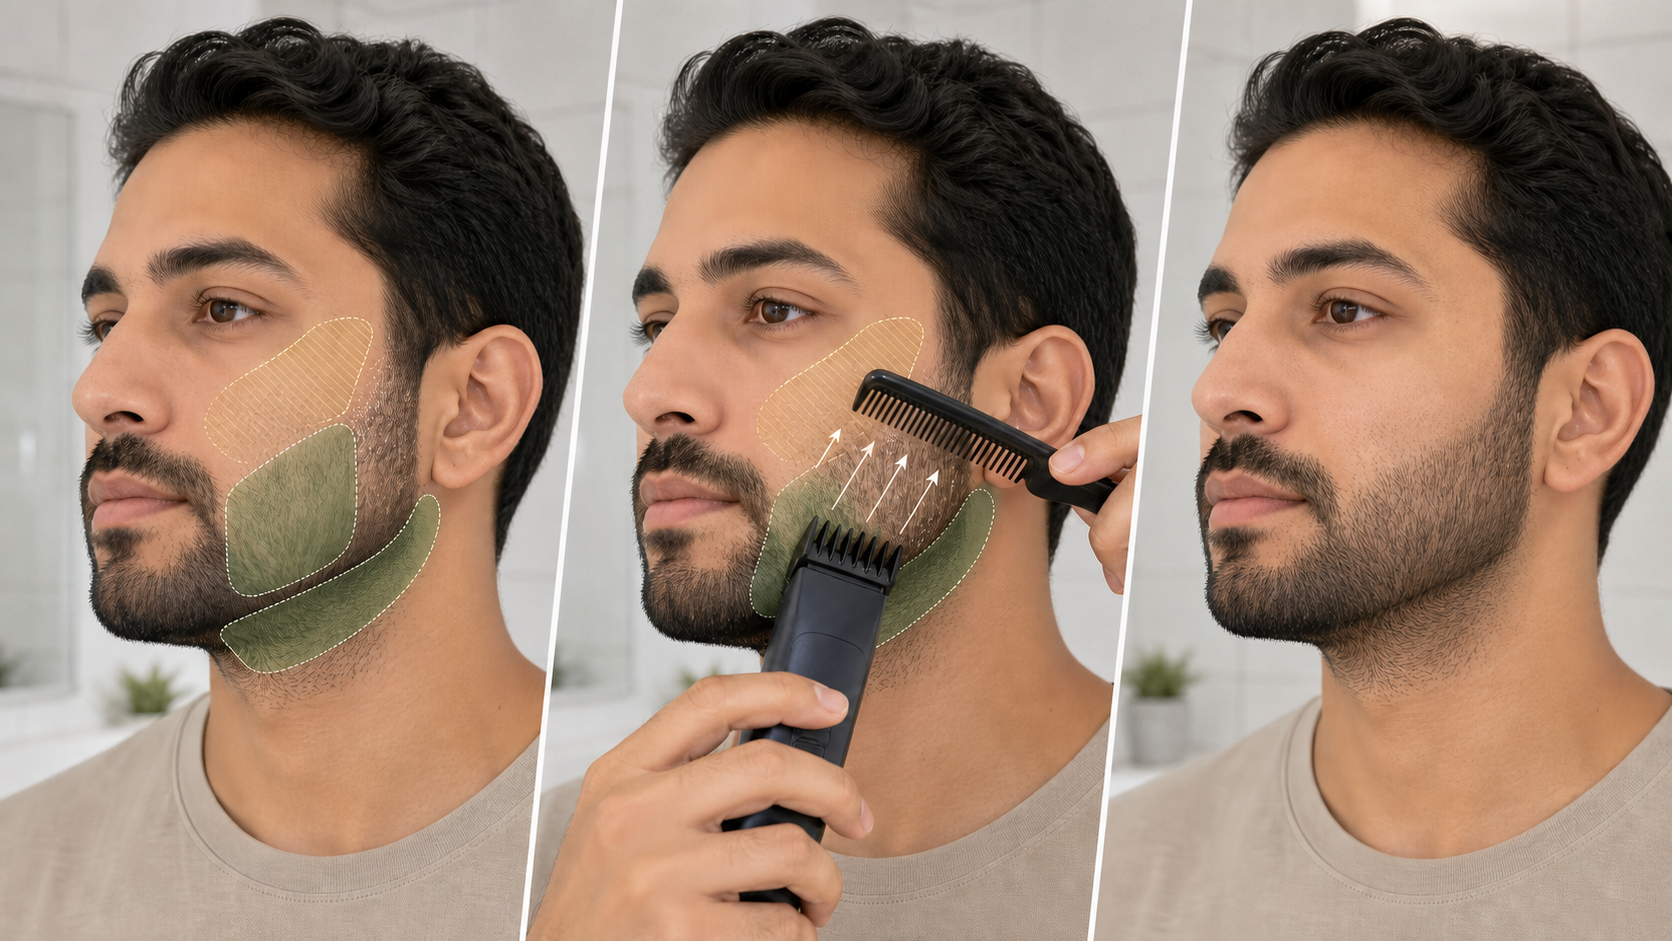
Direct answer: Trim a patchy short beard more evenly by mapping sparse and dense zones before cutting, preserving length where coverage is light, and reducing only genuinely longer or heavier areas with the longest effective verified setting. Comb between passes, use conservative cheek and neckline boundaries, compare both sides in normal light, and stop before sparse areas enter the cutter repeatedly.
This is a visual-balancing workflow, not a hair-growth method. A trimmer can change length, silhouette, contrast, and boundary placement, but it cannot add follicles or make a sparse area grow new hair. Natural density differences should remain visible after a responsible trim.
Patchy Short-Beard Decision Map
| What you observe | Conservative response | Avoid |
|---|---|---|
| Sparse area is already short | Leave it untouched and preserve surrounding coverage | Repeated passes trying to make it look denser |
| Dense zone is longer or darker | Test a longer verified setting on that zone only | Lowering the whole beard immediately |
| One side has a higher natural cheek edge | Use a balanced visual path with minimal cleanup | Dropping both lines to the lowest point |
| Jaw or chin carries more visual weight | Reduce local bulk gradually while preserving structure | Removing the chin anchor in one pass |
| Difference is density, not length | Stop cutting and assess shape, lighting, and style options | Chasing equal darkness with shorter settings |
The official Philips MG3900-series manual supports starting with longer settings, making controlled movements, keeping the guard in contact, and clearing collected hair. Braun’s beard-trimming guide separates overall length reduction from final shaping. These sources support conservative sequencing; the exact manual for your tool controls guards, direction, wet use, cleaning, charging, and safety.
Separate Density From Length
Comb clean facial hair into its normal direction and inspect the beard from the front and both profiles in even light. A darker area may contain more hairs, thicker hairs, longer hairs, a different growth direction, or simply more shadow. Those causes do not require the same trimming response.
Use fingertips or a comb held outside the moving cutter to compare the beard surface. If a dense zone projects farther from the face, local length reduction may help. If both areas have the same surface length but one shows more skin, the difference is density. Cutting the sparse area again will not correct it.
Photograph both sides from the same distance and head position before starting. Photos are not objective measurements, but matched lighting can reveal whether the main difference is silhouette, boundary height, hair direction, or color contrast.
Define a Short-Beard Target
Decide what “more even” means for this trim. A useful target might be a consistent outer silhouette, less bulk at one jaw corner, a balanced cheek-line path, or a similar transition from sideburn to chin. Do not define success as identical hair count or identical darkness on both sides.
Preserve enough length for existing hairs to overlap small gaps naturally. Very short settings can increase skin visibility and make density differences more obvious. That does not mean longer is always better; the useful length depends on the existing coverage, hair direction, style, and tool.
The beard trimmer length chart helps translate style language into millimeters. The exact model’s setting remains controlling because guard numbers and cutting results are not universal.
Map Sparse, Transitional, and Dense Zones
Divide each side into practical zones: upper cheek, sideburn, lower cheek, jaw corner, chin, under-jaw, mustache, and connectors. Mark each zone mentally as sparse, transitional, or dense based on current visible coverage and length.
Sparse zones are generally protect-first areas. Transitional zones require minimal passes and careful direction. Dense zones are the main candidates for conservative bulk reduction when they are genuinely longer or extend beyond the intended silhouette.
Do not turn the map into a medical assessment. It is only a trimming plan. If you notice sudden hair loss, a sharply new bare area, pain, scaling, redness, or another concerning change, stop the styling workflow and seek appropriate professional advice rather than attempting to trim it away.
Prepare the Beard and Inspect the Tool
Follow the exact model’s approved wet or dry method. For a typical guarded dry trim, let hair and skin dry fully, remove heavy product, and comb the beard into its natural lay. Damp hair or balm can flatten sparse zones and pack the guard, changing what you see during the trim.
Switch the tool off before attaching or changing a guard. Check blade teeth, guard teeth, locking points, adjustment wheel or lever, housing, cable, charger, and battery area. Stop if any part is bent, cracked, loose, corroded, unusually hot, or otherwise unsafe.
Confirm the setting in millimeters or the exact model manual. Start longer than the final target. The guard-size guide explains why a number printed on one system should not be copied to another.
Protect the Sparse Areas First
Begin by identifying areas that should not be cut. Comb those hairs into the direction that provides their natural coverage. If they already sit at or below the intended silhouette, leave them untouched during the first pass.
Do not press the guard repeatedly over a light-coverage area because adjacent hair looks darker. Each additional pass can remove hairs that were providing useful overlap. A pass count is not a quality target.
If one or two sparse-zone hairs extend far beyond the surface, isolate them after the main trim and use a model-approved detail method. Avoid lowering the entire zone to capture isolated ends.
Reduce Dense Zones With the Longest Effective Setting
Test the longest plausible setting on a small dense area near the jaw or lower cheek. Keep the guard stable and use light pressure in the model-approved direction. Clear loose hair, comb the zone back into place, and compare it with the protected sparse area before making another pass.
If the tested area still projects beyond the desired silhouette, reduce one documented step at a time. Keep the shorter setting inside the defined dense zone. Do not cross into the sparse area simply to make the motion continuous.
The goal is to reduce excess visual weight, not to make every hair the same measured length. Curved surfaces and changing growth direction can make a single setting feed differently around the chin, jaw, and neck.
Use Direction to Avoid Accidental Overcutting
Map the grain with a comb before each zone. Hair on the cheek may grow down, diagonally, or sideways, while hair under the jaw may reverse direction. Against-grain passes can capture more hair than with-grain passes, so do not switch direction casually.
Start with the gentler direction supported by the exact manual and your previous recorded result. If a dense zone remains long, change one variable at a time: direction, setting, or pass location. Changing all three prevents you from knowing what caused the result.
Use short strokes near a transition. Long sweeping passes can carry the cutter from a dense zone into sparse coverage before you notice. Switch off and clear the guard whenever packed hair changes contact.
Balance the Cheek Lines Without Lowering Both
Natural cheek-line height and density can differ. Preserve the highest usable coverage on each side, then remove only isolated hairs outside the chosen path. Do not automatically lower both cheeks to match the side with the least coverage.
A soft natural line often tolerates small density differences better than a very sharp, low contour. If you choose a defined line, approach from outside the beard toward the existing boundary and stop as soon as it becomes visible.
The short-beard edge cleanup guide provides a separate boundary-only sequence. Keep line cleanup distinct from density balancing so the cheek edge does not creep inward while you are judging the beard surface.
Use the Jaw and Chin as Structural Anchors
The jaw and chin often carry more natural density and length than the upper cheek. That weight can support the overall short-beard silhouette, so reduce it gradually. A dense chin does not need to match the cheek’s darkness or length exactly.
Check the transition at each jaw corner. If one corner flares outward, use the longer base setting on that small area before considering a shorter step. The jaw-corner blending guide explains how to keep a transition narrow without creating a hard length shelf.
Preserve enough chin length to maintain the selected style. Removing the chin anchor can make upper-cheek gaps more prominent and force additional corrections elsewhere.
Compare Matched Checkpoints
After each controlled change, clear loose hair and compare matched zones: both sideburn connections, upper cheeks, lower cheeks, jaw corners, chin edges, and neckline corners. Use the same head position and mirror distance.
Compare silhouette before darkness. If both sides occupy a balanced shape but one is naturally less dense, more cutting may make the difference worse. Step away from close magnification and inspect at normal conversational distance.
Use a stop rule: one tested reduction per zone, followed by a full reassessment. Do not alternate indefinitely between sides. Tiny density differences can appear larger under bright directional bathroom light than in ordinary conditions.
Style Choices That Preserve Natural Coverage
A short boxed outline, a slightly fuller chin, a soft cheek line, or a defined goatee area may work with the beard’s existing distribution. These are options, not universal face-shape rules. Choose a style that uses the strongest connected areas without pretending sparse zones have disappeared.
Do not use fibers, dyes, oils, or balms as evidence that trimming changed growth. Products can alter color, lay, shine, or texture temporarily, and ingredient or skin-comfort questions require their own evidence. This page does not recommend a growth treatment.
Common Patchy-Beard Trimming Errors
- Cutting sparse zones repeatedly because dense zones look darker.
- Starting at the shortest setting to create instant uniformity.
- Lowering both cheek lines to match one isolated gap.
- Changing guard, direction, and zone at the same time.
- Removing the fuller chin or jaw structure in one pass.
- Comparing sides before brushing away loose clipped hair.
- Treating natural density differences as a flaw that must disappear.
- Claiming that trimming, oil, or styling created new growth.
Repeatable Visual-Balance Workflow
- Comb the dry beard into its normal direction and photograph matched profiles.
- Separate sparse, transitional, and dense zones without diagnosing them.
- Define a silhouette or boundary goal rather than equal darkness.
- Verify the exact guard and begin longer than the intended result.
- Protect sparse zones during the first pass.
- Test one dense zone with the longest effective setting.
- Clear hair, recomb, and compare before shortening another step.
- Balance cheek lines, jaw corners, and neckline as separate tasks.
- Stop when the silhouette is controlled even if density remains different.
- Record the model, settings, zones, directions, and stop point.
Frequently Asked Questions
Can trimming make a patchy short beard grow more hair?
No. Trimming changes visible length and shape; it does not create follicles or fill sparse areas. This workflow aims only to balance the existing beard visually.
Should I cut the sparse side shorter to match the dense side?
Usually protect the sparse area first. Reduce only genuinely longer or heavier hair in denser zones, then reassess before changing the sparse side.
What guard should I use on a patchy short beard?
Use the exact model’s verified setting and start longer than the intended result. Test the denser zone first and avoid repeatedly passing over sparse coverage.
When is patchiness not a trimming problem?
If hair is suddenly missing, the skin is painful or inflamed, or you are concerned about a new change, stop treating it as a styling issue and seek appropriate professional advice.
Sources and Claim Boundary
Primary references reviewed in July 2026 are the Philips MG3900-series manual and Braun beard-trimming guidance linked above. This page provides a generic visual-balancing workflow. It does not diagnose hair loss, recommend a treatment, promise new growth, report hands-on testing, or guarantee equal density or appearance. The exact model manual controls guard identity, direction, pressure, wet use, cleaning, lubrication, charging, and safety.
