
Disclosure: This site may use affiliate links. Product specifications should be checked against manufacturer or retailer pages before purchase.
Direct Answer
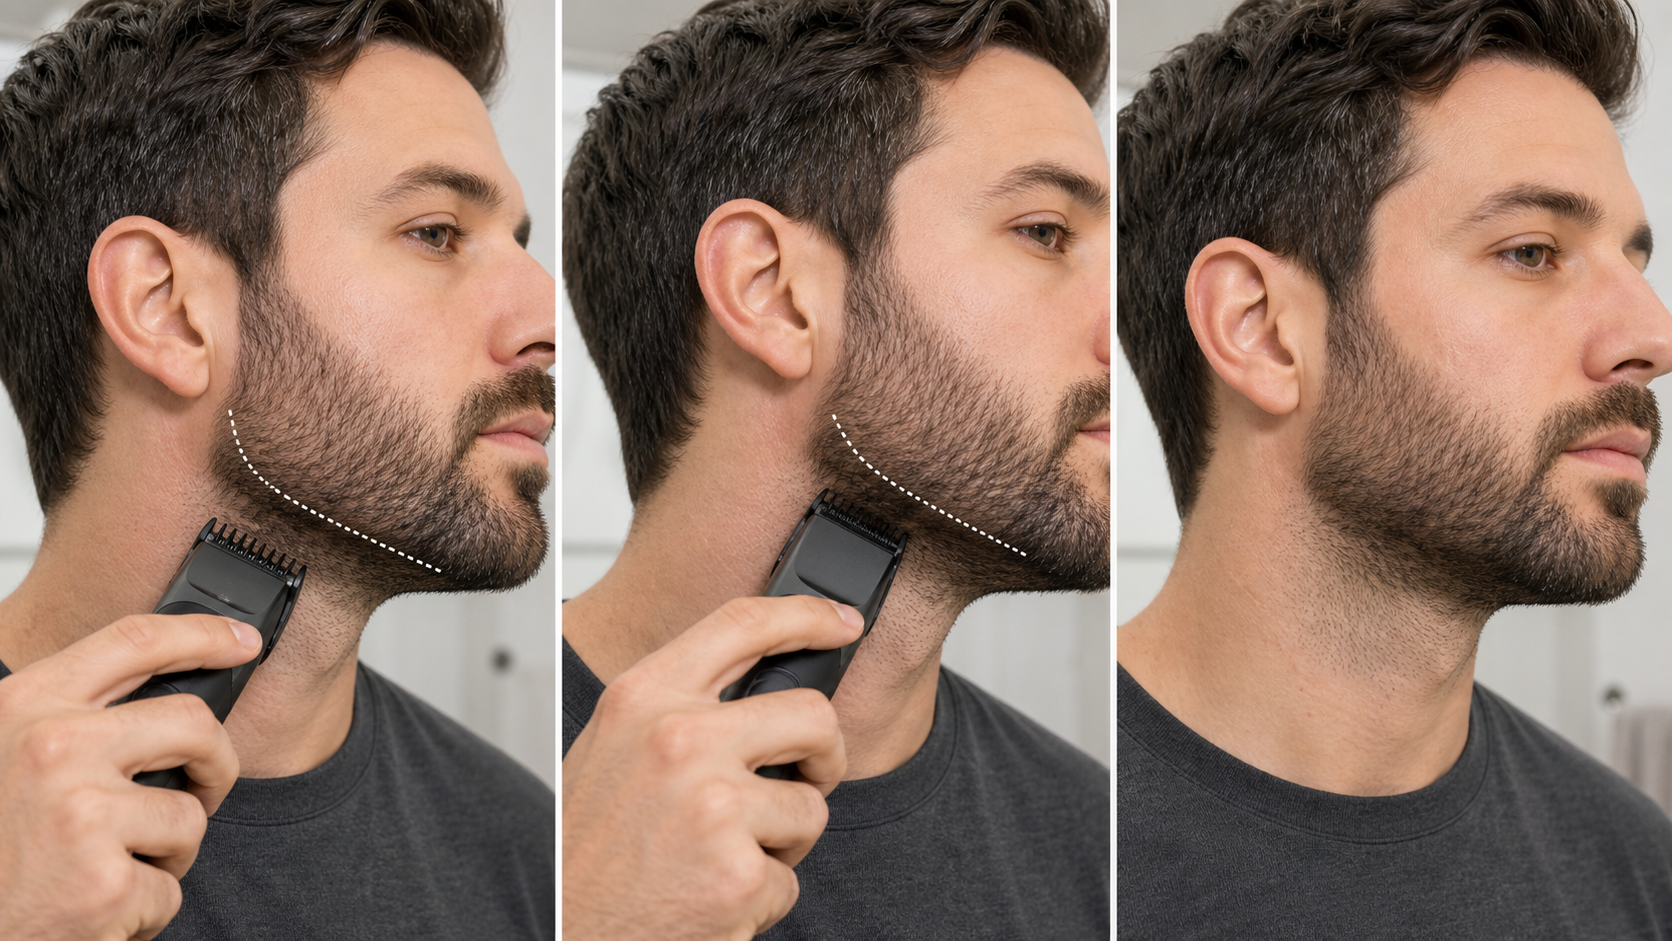
Direct answer: Blend a short beard around the jaw corners by establishing one base length first, mapping the curved transition from cheek to under-jaw, and using only one slightly shorter documented setting in a narrow band. Keep the guard flat, use short outward flicking passes, alternate sides, clear clippings, and stop before the transition becomes a visible stripe.
This is a contour-blending task, not another left-right symmetry guide. The goal is to soften an abrupt change where the beard turns around the jaw and meets the chin or neckline. It does not require making both sides anatomically identical, creating a full sideburn fade, or cutting the whole beard progressively shorter.
Jaw-Corner Blend Planning Table
| Zone | Starting approach | Main risk |
|---|---|---|
| Cheek and side beard | Keep the chosen base length | Shortening the visible body of the beard unnecessarily |
| Jaw corner | Use a narrow transition band with one controlled setting change | Creating a hard horizontal shelf |
| Front of chin | Usually preserve the base length unless the style plan says otherwise | Hollowing the chin or breaking the beard outline |
| Under-jaw | Follow the planned contour toward the neckline | Taking the neckline too high while trying to blend |
| Left-right comparison | Alternate matched zones after each small change | Different transition heights or pass counts |
The official Philips MG3900-series manual advises starting with the maximum trimming length, working on clean dry hair, using smooth gentle movements, keeping the guard surface in contact, trying directions that match local growth, and clearing accumulated hair. Braun’s official beard-fade guide establishes a base length before using shorter settings in defined transition areas. The exact instructions for your model remain controlling.
Define the Blend Before Switching On
Stand in even front and side lighting and identify three boundaries: the lower edge of the cheek beard, the point where the jaw turns toward the neck, and the front chin mass. Trace the jaw corner with a finger while the tool is off. The transition band should follow the curve rather than forming a straight stripe across the side of the face.
Decide whether the intended result is a uniform short beard with only a softened under-edge or a deliberate subtle taper. This page covers a small contour transition. A full beard fade into the sideburn or haircut uses more zones and settings and should not be improvised from this shorter sequence.
Take reference photos from the front, both profiles, and below the chin before trimming. The photos are checkpoints, not promises of perfect symmetry. Natural jaw shape, hair density, growth direction, and connection to the neck can differ from side to side.
Establish One Base Length First
Comb the beard into its normal position and make it fully dry for a documented dry-trimming workflow. Inspect the blade and guard, attach the correct model-specific comb, and begin longer than the intended finish when the tool or setting is unfamiliar. Trim the cheek, side, chin, and under-jaw to one verified base length before attempting a transition.
A complete base pass shows where the beard is genuinely longer and where density only creates a darker appearance. It also prevents blending around hair that has not yet been reduced consistently. Clear hair from the guard during the pass and brush loose clippings from the beard before evaluating.
The guard selection workflow explains why guard numbers are not universal. Use the documented remaining length in millimeters for the exact attachment or dial position, and record the setting that created the base.
Map the Jaw Corner as a Narrow Transition Zone
The jaw corner begins where the visible side beard curves beneath the lower edge of the jaw. It ends before the central chin area and before the neckline becomes the main boundary. On many faces this is a relatively small zone. Making it too tall can turn a subtle contour into a prominent fade or remove support from the chin.
Use the corner of the mouth, the lower ear area, the jaw curve, and the existing neckline only as visual references. Do not force the same geometric width on both sides when the anatomy or growth pattern differs. Match the function of the zone rather than measuring an identical stripe.
If the neckline itself is uncertain, plan that boundary separately before blending. The beard neckline guide covers placement and conservative shaping. Philips’ official neckline instructions also work from the center outward and distinguish the jawline from the lower neck boundary.
Choose One Transition Setting
Move only one documented step shorter than the base length for the first transition test. If the base is 5 mm, the next safe choice depends on the actual settings available on that model; do not assume every tool offers the same increment. A large jump removes correction room and can leave a visible shelf.
Switch the tool off before changing a guard or adjustment control unless the manual explicitly permits adjustment while running. Confirm that the comb is fully seated and level. Do not combine an unidentified attachment with a dial position to invent a length that the manufacturer does not document.
Make the first test in a small section under the least visible part of one jaw corner. Clear clippings and compare it with the untouched side before expanding the zone. If the step looks too strong, return to the longer setting and blend the boundary rather than shortening the entire beard.
Use Flat Contact and an Outward Flick
Begin below the visible boundary with the guard surface in stable contact. Move through the transition using a short controlled pass, then let the guard leave the beard gradually at the top edge. This outward flick reduces the time the shorter setting remains fully engaged near the longer base.
The flick is a small exit movement, not a fast wrist snap. Hard pressure, a tilted comb, or a long pass deep into the cheek can cut a short stripe. Use gentle movement and stop the pass before entering the main side beard. The model manual controls whether the effective direction is upward, downward, or across local growth.
Do not use the corner of a guard to dig into a dark patch. Density can make one area look longer even after the hair has reached the same setting. Brush the area, change the viewing angle, and inspect in normal room light before repeating.
Blend the Chin Without Hollowing It
The front chin often carries more visible beard mass than the jaw corner. Preserve the base setting across the front unless the style specifically calls for a shorter chin. Use the transition setting only where the under-jaw curve connects to the side, then let that zone merge into the base length before reaching the center.
Work from each jaw corner toward the chin in small sections rather than running one continuous shorter pass under the entire jaw. A continuous pass can create a uniform undercut that changes the beard shape more than intended. Keep a clear central reference area until both sides have been evaluated.
Check the beard from below as well as from the front. A transition that looks smooth in profile can contain an uneven notch underneath. Remove loose hair and let compressed hairs return to position before deciding that another pass is needed.
Alternate Sides at Matched Checkpoints
Complete one small jaw-corner section, switch off, clear the guard, and repeat the same stage on the other side. Compare transition height, width, base setting, shorter setting, and number of controlled passes. Do not fully finish one side while the other remains at the base length.
The left-right stubble guide provides a broader matched-zone comparison method. Here, use that comparison only to control the jaw-corner transition. Do not duplicate the stubble page’s whole-face symmetry workflow.
If the two sides still look different after the process is matched, density or anatomy may be responsible. Shortening the darker side repeatedly may create a real length difference without producing identical visual density.
Remove a Hard Step Conservatively
A hard step usually appears when the shorter setting travels too high or exits abruptly. Return to the longer of the two settings and make short passes across only the visible boundary. Keep most of the guard in the shorter zone and let the upper edge touch the longer zone briefly.
Clear the guard and reassess after each pass. Do not immediately add a third, much shorter setting. If the boundary remains after controlled work with the longer setting, allow the beard to settle and inspect again later rather than lowering the entire side.
If a strip has already been cut too short, stop cutting that strip. Preserve the surrounding length or soften only genuinely longer hairs with the longer safe setting. Time and regrowth may be the least damaging correction.
Keep the Bare Blade for Contours
A bare cutting element removes much more length than a guarded transition setting. Use it only for the close-trim or contour task permitted by the exact model, such as defining the lower neckline or removing isolated hair outside the planned beard shape.
Do not run a bare blade through the jaw-corner blend to erase a shadow. That changes the transition into a close-cut area and can make the next maintenance session harder to reproduce. Guarded blending and line definition are separate steps.
Hold a model-approved contour head as instructed, use gentle pressure, and maintain visibility. Stop over broken, painful, or markedly irritated skin; this page does not diagnose skin conditions.
Common Jaw-Blend Mistakes
- Skipping the base-length pass and blending into inconsistent growth.
- Making the transition band too tall or perfectly horizontal.
- Jumping several settings shorter at once.
- Tilting the guard or pressing harder at the jaw curve.
- Running the shorter setting through the central chin.
- Finishing one side before mapping the other.
- Using a bare blade to correct a guarded length boundary.
- Repeating passes before clearing clippings and checking normal lighting.
Stop Conditions and Tool Checks
Stop if the guard is cracked, loose, incorrectly identified, or unable to sit flat; if cutting teeth are bent or damaged; or if the tool pulls, rattles, stalls, smells unusual, becomes unexpectedly hot, or has a damaged cable, battery, plug, or housing. Do not hold a loose guard in place or alter it to continue.
Switch off and disconnect charging power before removing attachments or cleaning near the cutter. Follow the exact manual for brushing, rinsing, drying, lubrication, charging, and storage. A washable attachment does not establish that the powered handle may be rinsed.
Repeatable Short-Beard Blend Sequence
- Define the base length, transition zone, chin reference, and neckline separately.
- Trim clean, dry hair to one documented base setting.
- Clear clippings and photograph both profiles and the under-jaw view.
- Select only one documented step shorter for the first transition test.
- Test beneath one jaw corner with flat contact and a gentle outward exit.
- Repeat the same stage on the other side before expanding either zone.
- Preserve the central chin and main side beard at the base length.
- Use the longer setting to soften any visible boundary.
- Define contours separately with the model-approved tool and method.
- Record settings and zone width for the next maintenance trim.
Frequently Asked Questions
What is a jaw-corner transition in a short beard?
It is the small curved zone where the cheek and side beard turn under the jaw toward the neck and chin. A controlled transition prevents one abrupt length step from dominating that curve.
Should the jaw corner be shorter than the chin?
That is a style choice, not a rule. If you want a subtle taper, keep the chin at the base length and use one slightly shorter documented setting only in a narrow jaw-corner transition zone.
How do I remove a hard line between two beard lengths?
Return to the longer of the two settings, work only across the visible boundary with the guard flat, use short outward flicking passes, clear clippings, and reassess before shortening anything else.
Can I blend a short beard with a bare blade?
A bare blade is mainly for model-approved contouring and close trimming. It removes too much length for most blending work, so use documented guards or dial settings for the transition.
Sources and Claim Boundary
Primary references reviewed in July 2026 are the Philips MG3900-series manual, Braun beard-fade guide, and Philips neckline guide linked above. This is a generic jaw-corner contour workflow, not hands-on testing, and it does not promise a specific style result. The exact model manual controls guard identity, direction, contact, cleaning, wet use, charging, and operating safety.
